Rather than going into great length on known details of the construction of shields (particularly round), I will simply direct you to this fabulous site: http://members.ozemail.com.au/~chrisandpeter/shield/shield.html.
SHIELDS
4/22/07
|
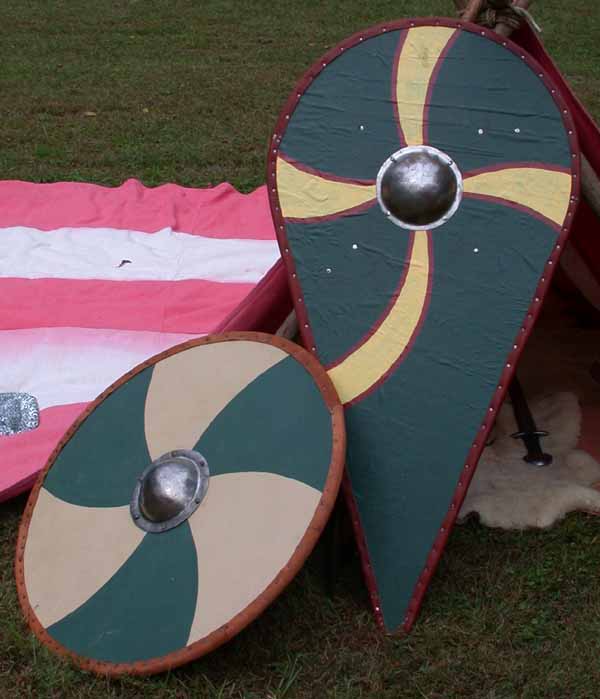
Shields are
either round or "kite" shaped. Your shield may be made of planks,
as they were in 1066 (see below), but most of us use plywood.
However,
since plywood looks very modern, it should be covered with fabric or
leather
(one or two large pieces), especially the edges. The back of your
shield should also be covered if it is not made of planks.
Padding
must be covered with fabric or leather to hide any foam, carpet,
etc.
Details like these may seem nitpicky, but the public does notice them! Rather than going into great length on known details of the construction of shields (particularly round), I will simply direct you to this fabulous site: http://members.ozemail.com.au/~chrisandpeter/shield/shield.html. |
If you are
making your first shield or replacing an old one, a kite is strongly
recommended.
It is perfectly good for Saxons as well as Normans, and does not need a
boss. It can also be easier to hold and maneuver, and you can
lean
on it during lulls in the fighting!
 |
The
kite shield, really more of a teardrop shape, is 20 to 24 inches wide
by
40 to 48 inches tall, and may be flat or curved. The top is a
semicircle
and the edges may taper straight to a point or be slightly curved.
Start with 3/8" to 3/4" plywood. Draw the shape and size you want on the wood and cut it out with a sabersaw or jigsaw. Knock off the splinters with a rasp or file. Trace the shield's shape onto a piece of canvas (linen, cotton, even denim, etc.), adding an extra inch or so all around, and trace another piece (same fabric or different) with an extra two to three inches all around. Glue the smaller piece onto the back of the wood with Elmer's Carpenter's Glue--spread the glue evenly with a paintbrush, spackling knife, even a piece of cardboard. Trim off the excess fabric. Now glue the larger piece to the front of the wood, wrap the excess over the rim, fold the edge of the fabric under neatly to make a 1/2"-wide border around the back, and tack it down with black carpet tacks. (Make sure your tacks are not so long that they poke throught the front!) Don't worry about pleats or puckers at the back. Allow the glue to dry, and give the shield a good coat (or two) of flat/matte or semi-gloss paint, front and back (NOT spraypaint!). |
|
Make a pad for your arm from a flat bag of linen or leather (c. 6"x12-18") filled with cotton batting, fabric scraps, etc. Tack it to the back of the shield where your arm will be. You may have two straps, parallel and vertical, or four in a square for a choice of gripping styles (in which case you may want to make the pad a different shape). Measure the straps to allow for your armor and glove. Make them out of good leather, six to eight-ounce, well-oiled to prevent rot. (Old belts can be dry-rotted and fragile!) Do not use webbing or other modern materials. |
 |
Attach the straps with carriage bolts and square nuts, not hex nuts (you may have to ask a couple stores). File any letters off the heads of the bolts, put them through the shield from the front, and use washers between the leather and the nuts. Double-check the fit of the straps (did you make them a little extra-long just in case?), cut off any excess bolt shaft just above the nut, and rap on the stub of the shaft with a hammer for a while ("peening"), until it is mushroomed over the nut to hold it permanently in place, like a big rivet.
Nails can be used instead of bolts, either peened over washers or simply clenched (bent over). When clenching, first bend the tip over about 90 degrees with a pair of plyers, then hammer it over where it comes through the wood/leather/metal. This will make the point drive back into the wood and keep it from poking out and being both unsightly and dangerous. Nail heads (and the shanks, if you are clenching them) can be made to look handforged rather than modern simply by heating red hot in a gas flame and hammering a little.
All
that's left is to paint a nice authentic design on the front.
Color
schemes and decoration may be copied from the Bayeaux Tapestry or other
11th century source, or play it safe and leave it a plain color.
Most shields on the Tapestry are plain. For an article on good
colors
to use, see http://www.geocities.com/baldurstrand/paint.html.
You can get nice colors from milk paint from the Old Fashioned Milk
Paint
Company, http://www.milkpaint.com/.
ROUNDSHIELDS
Roundshields are 24 to 36 inches in diameter (most often 30 to 35 inches) and must have a boss--Saxon bosses were actually a complex conical shape, but domed Viking bosses are fine. The dome is about 5" in diameter and should be 1-1/2" to 2" deep or more, and the flat flange around the edge is 1/2" to 3/4" wide. The steel should be 16 gauge or thicker, for safety's sake, and (like your helmet) it should be kept proudly bright and free of rust. The cast aluminum bosses which were being produced years ago will also be accepted.
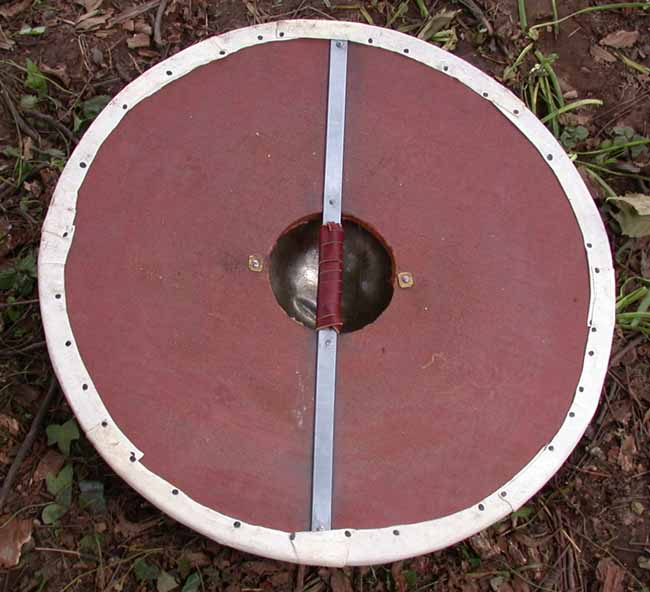 |
The boss covers a round or oval hole about 5" in diameter in the center of the board, which is where the hand holds the grip. The boss is secured either by large nails or by carriage bolts and square nuts (like the kite shield straps). In either case, sand or file off all galvanization, raise lettering, and other tell-tale signs of modern manufacture. Four to six bolts is most common. All plywood should be covered by fabric or leather, as for kite shields. |
Across the middle of the back is a strip of metal or wood which forms the handgrip. Two of the bolts holding the boss will go through the grip. If using modern lumber, take a few moments to rasp off the upper edges and perhaps taper the ends, so that it will not look so much like modern lumber. In a similar vein, the ends of a steel strip can be rounded, scalloped, forked, etc., very quickly escaping a modern appearance. Metal door handles that stand out from the back of the shield should be avoided, not only because they look like door handles, but also because the handle must be close to the back of the shield for it to balance properly and be easily controlled.
Two other wood or steel strips may be fixed to the back of the shield as reinforcements, particularly for plank shields.
OPTIONS:
--A guige or neck strap can
be added for carrying the shield, its ends secured by the top two bolts
on a kite shield, or by any of the bolts on the handle of a
roundshield.
The guige and the forearm strap can be made adjustable with a buckle.
--Instead of wrapping the fabric facing around the edge, cut it off like the back and make a rim of leather strips c. 2" wide. Cut pieces to match the curve of the top, tack them to the front, then wrap them over the edge and tack them to down at the back as for the fabric.
--Cover the entire face of the shield with leather instead of fabric. Use a single large piece (not too thick) if possible, but if not, use two or three pieces and make them join neatly. A roundshield can be covered in four quarters and the seams disguised with a cross or two-color scheme.
--Curved shield: Start with
two rectangles of 1/4" plywood, each 2'x4'. Lay one flat with 4"
to 6" high blocks under each long edge, coat with glue, lay the second
sheet on, and weight HEAVILY down the middle. Pipe clamps, strap
clamps, or tying the wood around a barrel or tree may also work.
Let dry overnight (or a couple days), then cut to shape with a saber
saw.
In Saxon England, the law required the covering of a shield to be ox hide, though it is very possible that some shield makers cheated with thinner leather such as goat or calf. The back may certainly be left uncovered, though it can still be painted. (Do not use stain, though--that is only used to make cheap wooden furniture look more expensive!)
The handle(s) and reinforcing bars, as appropriate, can be done as described above.
Naturally you will want to do some research before embarking on a project of this sort, to learn about features such as the form of the handle, etc. A hand-forged boss and other similar details will greatly enhance the finished product.
--Of the 22 shield remains found in an Anglo-Saxon cemetary at Empingham, 19 showed some trace of leather under the boss, and one had cloth. These are from the pre-Christian period, however, several centuries before Hastings.
--Sixty-four shields were found hung along the railing of the Gokstad Viking ship. They are generally thought to have been specially made for the burial and not functional battle shields, partly because they are slightly above average in size (c. 37" diameter), and also because they have no coverings on the wood. The wood itself is painted, half of the shields being black and the others yellow.