The
shield is what made a Greek warrior a hoplite, because
he could not stand in the phalanx without it. "Aspis"
is the proper name for the shield, "hoplon" being an
incorrect modern word taken from the Greek "hopla"
meaning equipment in general (as in "panoply", for
instance). It was a deeply dished wooden shield
with a flat or angled rim, a band for the arm (porpax)
at center, and a handgrip (antilabe) near the
edge. The best shields had a full facing of thin
bronze sheet, and some had only a bronze-covered rim,
but coverings of linen and thin leather are known from
archeology and are the rule for reconstructions.
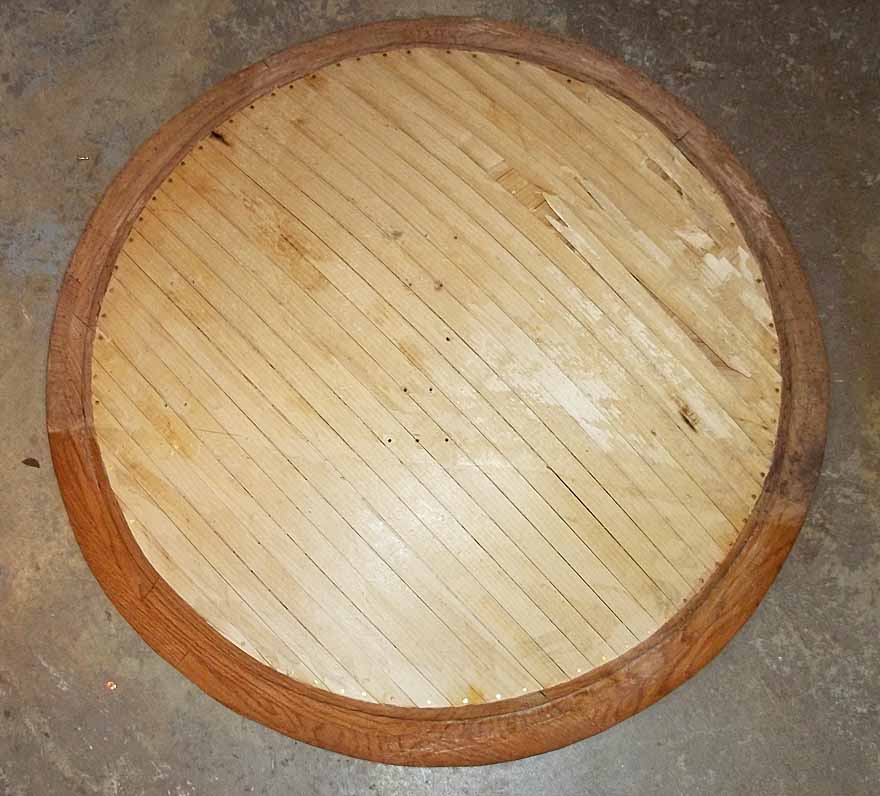
The wooden remains
of several shields have been found, the best-known of
which is that in the Vatican Museum. The bowl was
about 10-11mm (c.3/8") thick at the center, thinning
slightly to about 7-9mm where the face "turns" downward,
and thickening to 14-18mm (c.3/4") at the angle of the
rim. Obviously this is only one example, and
rivets or nails from other shield fittings may indicate
thicker wood. What is clear is that the aspis was
NOT as horribly heavy and cumbersome as often
described. A total weight of 12 to 15 pounds seems
likely.
Lightweight woods
like poplar and willow were used, either as solid slabs
glued together and turned like a large bowl, steamed and
bent to shape, or even built of 2 or more layers of thin
strips. Plywood is commonly used today and is
acceptable, but again, birch or other lightweight
plywood is preferable. Obviously any modern
plywood or ring construction MUST be completely covered
by leather or fabric. Oak is too heavy!
Modern materials such as plastic, fiberglass, and
aluminum are of course forbidden. Skip the saucer
sleds!
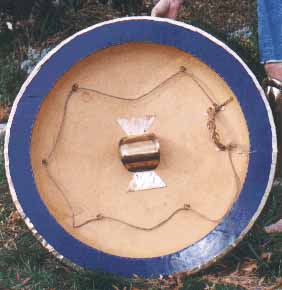
The
distinctive interior of the aspis, showing the central
armband or porpax, the handgrip or antilabe near the
rim, and the carrying cord. The shield at left is
lined with deerskin, that at right with wool felt.
In the newer
Osprey Warrior Series volume #27, Greek Hoplite
480-323 BC, Nick Sekunda shows the wood core
being composed of several wide slabs laid edge to
edge and then hollowed and shaped by turning on a
lathe, like a large bowl. Peter Raftos of
The
Phalanx explains that the Greek word for "shield
maker", torneutoluraspidopêgos, roughly translates as
"one who puts together lyres and shields by
turning". Thin laths are then laid cross-grain
around the rim. The back is covered by leather,
fittings attached, then the bronze facing is stuck to
the front with pitch and the edge neatly worked around
the rim so that there are no pleats or puckers.
Luckily, they "cheated" on this last part at least
some of the time: on a shield facing in Piraeus the
edge has been clipped into "tabs" about 2" wide, as I
did on mine, so that they fold around the back much
more easily. Then a flat ring of bronze was laid
over the back of the rim to hide the tabs.
A word of caution:
John Warry's Warfare in the Classical World
shows a drawing of the inside of a aspis on page
35. At its left edge is a strange detail which I
believe is an attempt to show the layers of leather
peeled back to reveal the wood underneath. It's
not some sort of fixture!
Various sources indicate
that the diameter of the shield ranged from 32" to c. 40", with
a maximum depth of c. 5". Some vase paintings show the rim
as very thin and flat, on others it is thicker and sloped, with
various depths and curvatures for the body. The Chigi Vase
shows the backs of several shields, seemingly divided into
rectangular and wedge-shaped segments, each of which is
cross-hatched in a different direction. This may be
showing layers of wood strips, similar to Roman scutum
construction.
There are several excellent
discussions on the Roman
Army
Talk board, but of course they have CHANGED SERVERS AGAIN
and I'll have to fix all my now-dead links... Do a search on
RAT or browse back through old threads in the Greek sections to
find them.
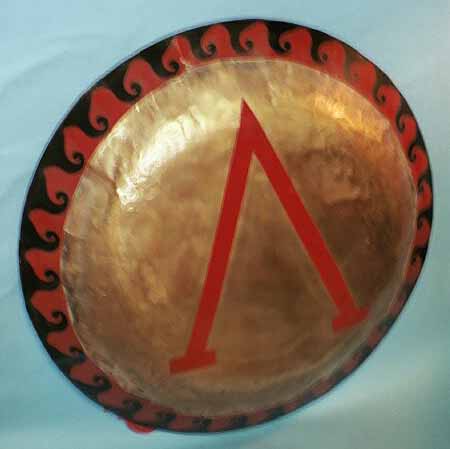
Front and back
views of Jon Martin's aspis. He dished the facing
from a single sheet of copper (being unable to get bronze)
and pieced the rim. The Greek letter lambda on the
face was used by Spartans (Lakedaimonians) during the
Peloponnesian War era, but not as early as the Persian
Wars.
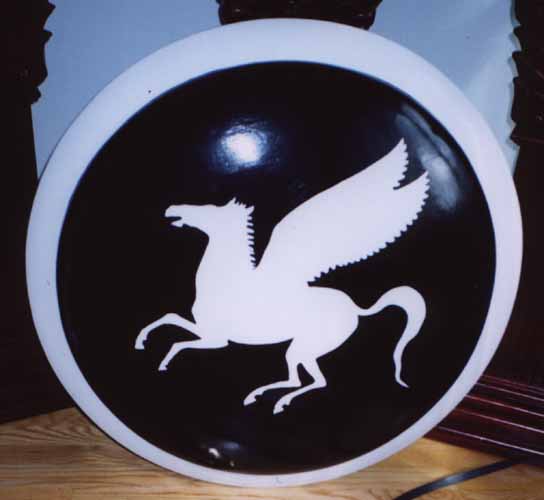
This is
one of George Marcinek's shields, by Manning Imperial.
The face is simply painted wood, without a leather or metal
facing, but what a lovely paint job!
The only commercially made aspis known to be reasonably accurate
(though too heavy) is made by Daniyal Steelcrafts in
India. It is available through Kult of Athena and other
vendors, either unpainted or with a variety of painted emblems.
A much nicer one is from Manning Imperial
in Australia. He offers wooden cores correctly turned on a
lathe from parallel slabs glued side-by-side, with your choice of
fittings and coverings, including complete brass facings! I
don't know about thicknesses or weights. Not cheap, and
remember the shipping...
There are two sources that I heard about some years ago, and I
don't know if they are still in business: Michael
Broyles, mjbroyles AT yahoo DOT com, wooden blank c. $450
plus shipping. Any covering or fittings would be
extra. Also Wulf in the UK, wulf.lighting AT
virgin DOT net, or sabre.wulf AT virgin DOT net, though I don't
know what sort of finishing he does nor what the cost might
be. He made most of the shields shown on the Hoplite Association
site.
The old Deepeeka #AH3721 "Greek shield" is utter garbage, too
small with ugly bolts around the rim, crappy fittings, and a great
big Viking boss in the middle! Their catalog shows
something that looks a little closer and has a Spartan lambda, but
don't trust it. They are *supposed* to be working on a
much-improved version, so stay tuned.
The construction method
described here uses rings or donuts of wood stacked and glued
together, and was told to me by Toe Johnson in Australia.
Plywood is often used, but for my second shield I used poplar 1x8
plank (3/4" thick). This is NOT a historical method, but is
a *little* easier to accomplish in the average modern
basement. You will need four hand-held electric power
tools: jigsaw, planer, belt sander, and angle grinder (with
flap sander). Oh, and a drill. Yes, this can be done
without power tools, but don't say I didn't warn you...
My first shield was made
from miscellaneous plywood and oak, and covered with 5-ounce
leather, and it weighed 18 pounds. Yuck. An
attempt to reduce the weight resulted in a lot of mess, a worse
appearance on the back, and the loss of only one pound
overall. So for my second shield, my main goal was
lightness! I suspect that poplar or birch plank would weigh
less than even pine plywood, but in any case do NOT use oak or
other dense woods.
Start by drawing a full-size, half-width
cross-section of the aspis, or print the one below and blow it up
to full size. Remember that with your arm through the
central arm band, the edge of the body should curve neatly over
your shoulder. Draw it as if it is lying flat, face
up. Draw a series of parallel horizontal lines through
it, the intervals between them corresponding to the thickness of
your wood. For any particular layer, the point where the
upper line crosses the inside of the cross-section determines the
inner radius of that ring, and the point where the lower line
touches the outside of the cross-section gives you the outer
radius. Now you know exactly how big to make each layer!
I used
the template from my first shield to trace the outline of my
second, but made the cross-section thinner, the bowl a
little shallower on the inside, and went with a flat rim
instead of sloped. This worked out to six layers, each
3/4" thick, plus a 1/4"-thick rim.
However, the cross-section at
left and the chart of dimensions at right have been modified
to better reflect the thicknesses of the Vatican shield,
with a sloped rim, and the total diameter of 36
inches. (Remember that the ancient Greeks were
generally shorter than us moderns on average, so a shield of
3 feet or a tad more makes for better proportions!)
The grid on the cross-section is 1 inch, and the red
outlines correspond to wood 3/4" thick. (American
standard planks such as "one-by-six" or "one-by-eight" are
actually 3/4" thick.)
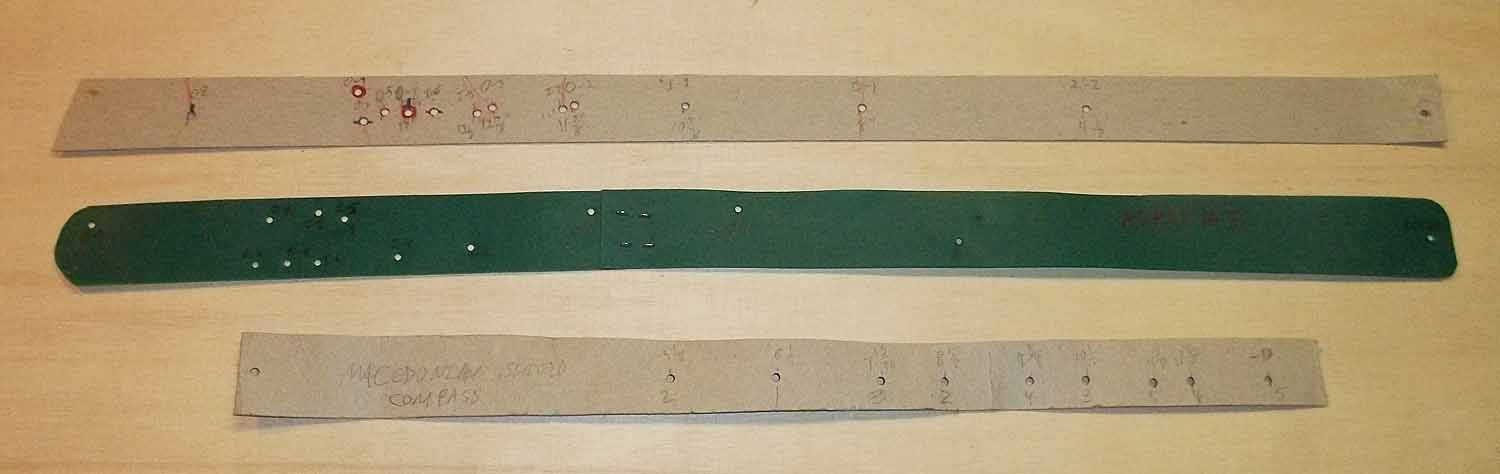
MAKE A COMPASS.
Punch a small hole near the end of a c. 20" strip of
cardboard as the center point, for sticking a tack or
pushpin through. Then measure out from that center
point and mark each inner and outer radius, punching another
hole at each. Mark the holes with their layer number
and whether they are inner or outer, e.g. I-2, O-4.
Note that with the dimensions at right, O-3 and I-5 will use
the same hole. (Slight adjustments in the dimensions
may cause more of them to correspond.) If you can't
drive a tack into your floor, just lay down a layer or two
of corrugated cardboard. A really big sheet that is
over 3 feet square is handy, but not necessary as long as
nothing shifts while you are tracing your arcs.
LAYER
INNER RADIUS
OUTER RADIUS
1
solid
9-1/2"
2
6-9/16"
13"
3
11-7/16"
14-5/8"
4
13-15/16"
15-5/16"
5
14-5/8"
15-5/8"
6
14-15/16"
15-3/4"
RIM
15"
18"
At left,
3 strip compasses. The green plastic one at center
goes with the cross-section and dimensions above. That
and the top one have their "center" holes at the right end,
because that's just how I was measuring from that
cross-section! The bottom one is the other way around,
for some reason, and is for my smaller Macedonian
shield.
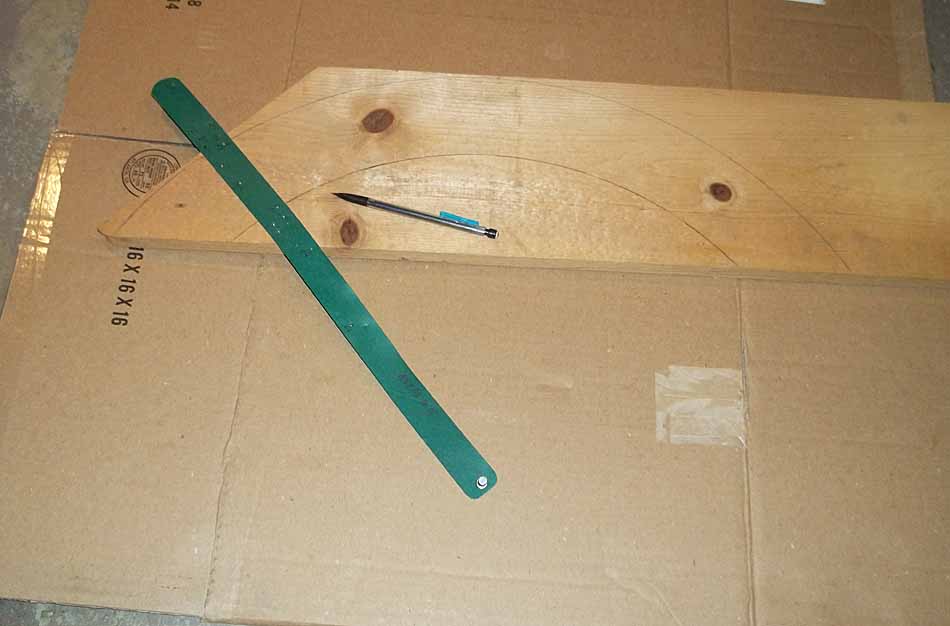
At right, the compass
in action. Just shift the plank around until you get
the largest possible arc on it efficiently, and draw.
You can also draw a series of circles on the cardboard to
help align the segments of each layer after cutting, to help
with marking and trimming their ends to fit together.
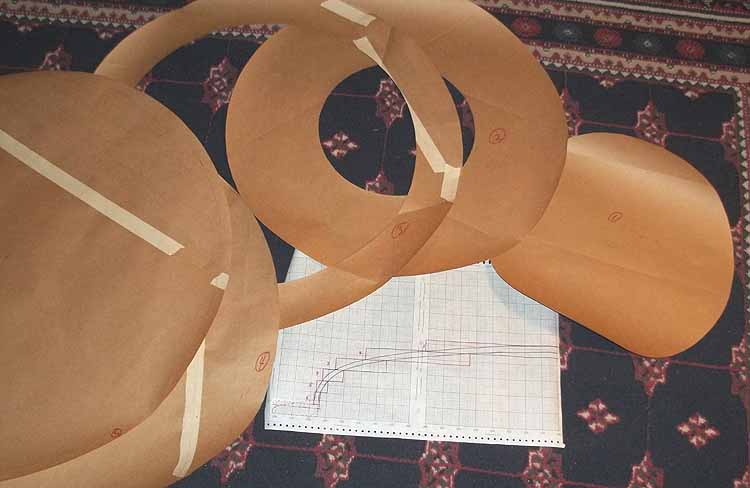
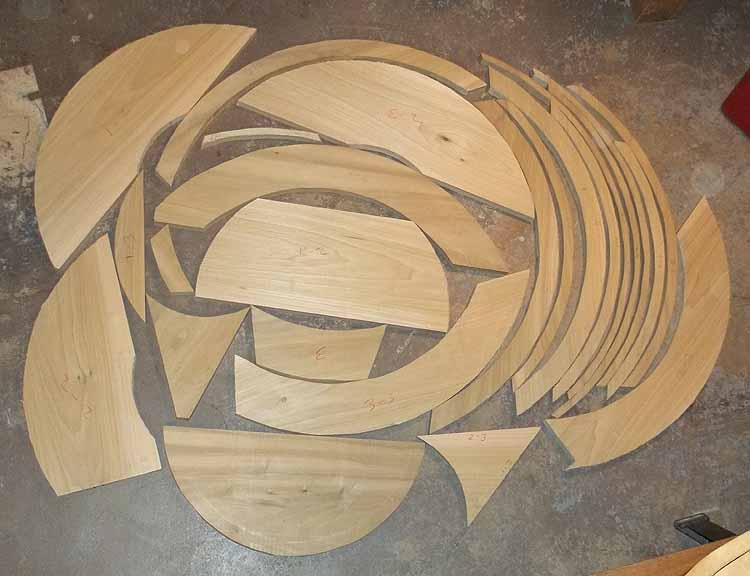
For this shield, I traced out each layer on
brown paper and cut them out. Layer 3 was so squirrely to
work with that I decided not to cut out the insides of the
remaining layers. It was easier to trace the outer
line with a full sheet, then just use a normal mechanical
compass to draw the inner line (I set the compass to the
width of the layer, and followed the outer line with the
point while drawing with the pencil).
Note that on a subsequent shield, I simply used my cardboard
strip compass to draw the circles (each one in several
segments) directly onto the wood (as shown above), without
using a paper pattern. Saved all kinds of time!
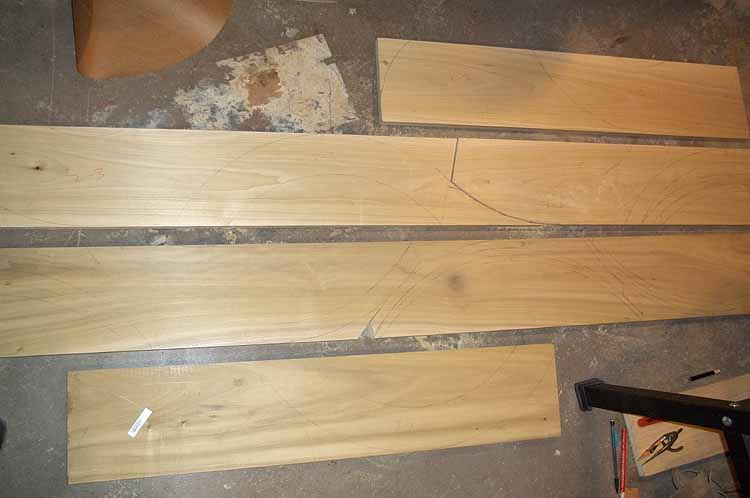
The wood is 1x8 poplar planks, so 3/4"
thick. I bought 2 eight-foot planks, and 2 pieces 3 or
4 feet long. It turned out that a foot or two less
would have been enough, not a big deal. I traced each
pattern onto the wood in several segments, with each one
marking the pattern where it left the wood in order to know
where to start the next segment. Many segments can be
nested inside others. Each segment, and its
corresponding pattern section, are marked with the number of
the layer and the number of the segment, e.g. 2-3, 5-2.
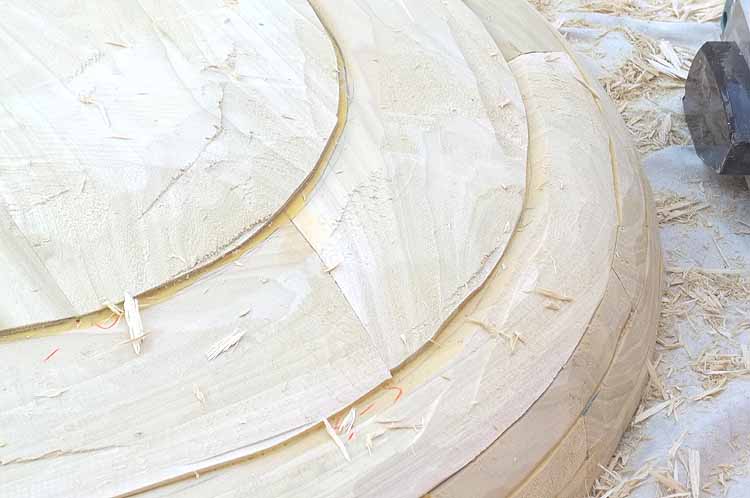
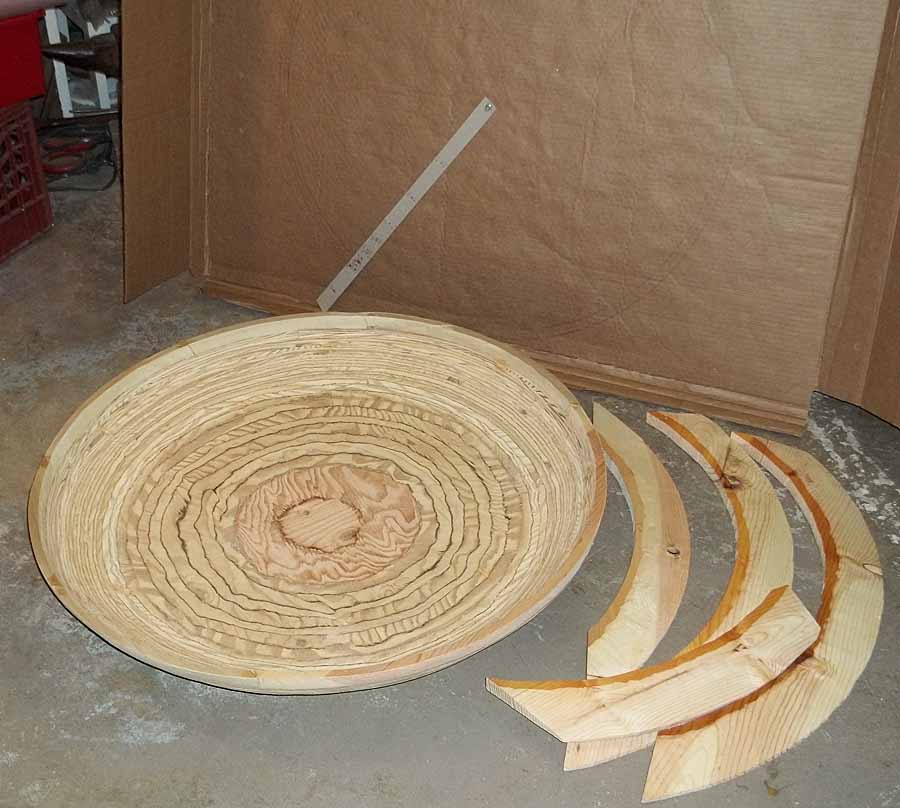
All the wood for the bowl cut out, using a
hand-held electric jigsaw. Made a lot of dust!
The total weight of the wood at this stage was 15 pounds.
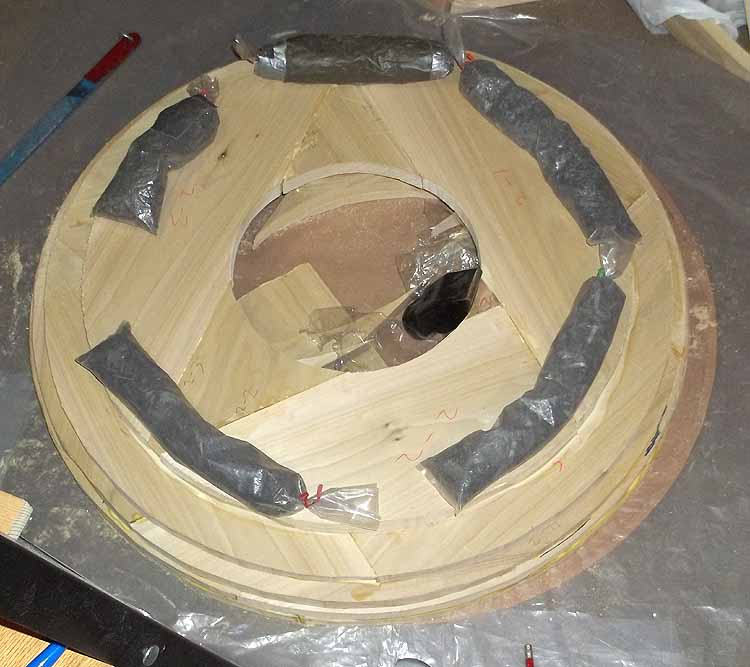
Gluing starts with layer before the rim, 6 in
this case. I laid the segments out on the paper
pattern (with a layer of plastic to avoid gluing paper to
wood!), to be sure they were in a circle. You can see
that I have drawn the circumference of layer 2 on layer 3,
to make certain it is properly centered. Shims or
props are needed inside to support parts of the ring.
Dry-fit all the parts first, and then use plenty of glue to
avoid any gaps. I used regular Elmer's wood glue.
Layer 2 glued in place, with weights (plastic
bags with lead printer's type, very handy!). I allowed
a good half hour for the glue to set in each layer before
starting the next, and let the whole thing dry overnight
before even attempting to move it.
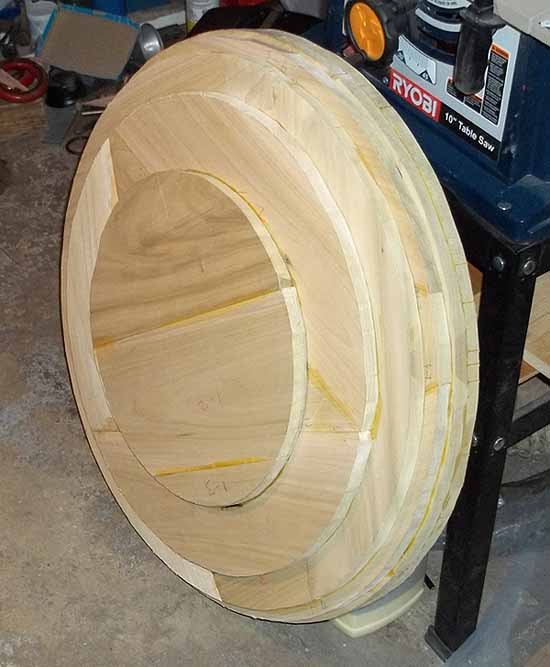
Outside of the bowl so far. I forced
glue into as many cracks and gaps as I could. Feel
free to drill and add pegs to reinforce the seams at this
point--I've never bothered, relying on the glue and the
coverings for strength. I *do* add nails or pegs when
installing the rim!
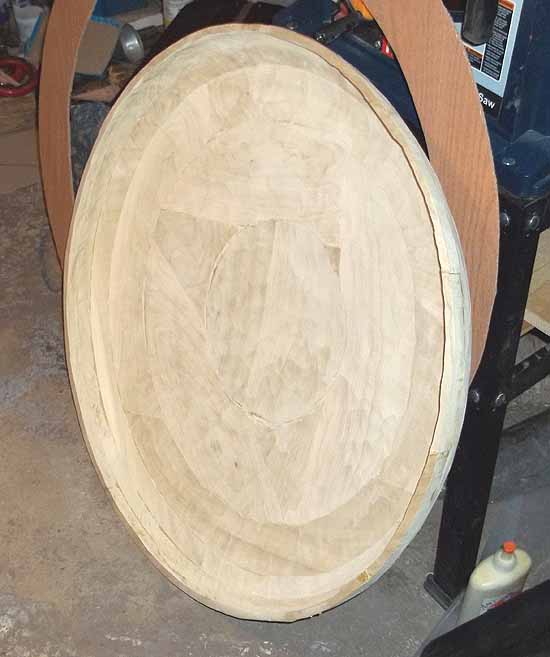
Inside of the bowl.
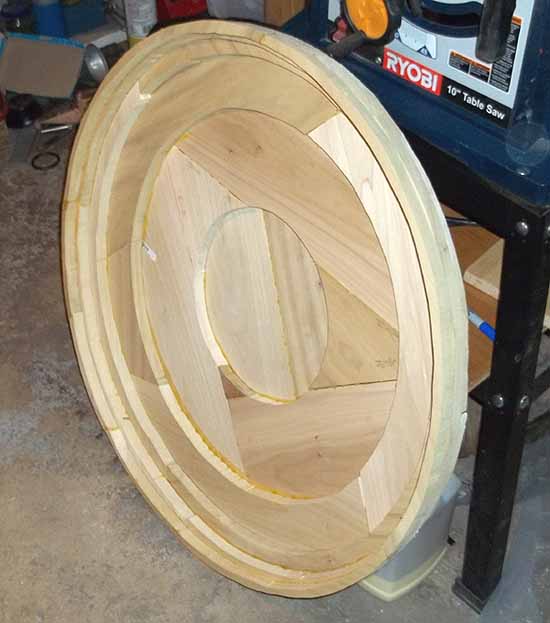
Thirty minutes with the electric
hand-held planer, and most of the wood removal is done on
the outside of the bowl. This took literally weeks
with a rasp, on my first shield! You can see the kind
of mess this makes, hence a big tarp spread out on the
deck. Be a little careful, since the planer will gouge
too deep if given a chance. But this is THE essential
tool to have before even considering a project like this,
trust me!
The goal is to eliminate the little steps
between layers, to make the entire surface smooth and
unbroken. So the planer is followed by the belt sander
with a couple of fresh coarse belts (80 or 60 grit).
The first step proved a bit tenacious to eliminate, since
that entails removing wood over the widest area.
Closer to the rim, things went much more quickly. Try
to avoid going *too* deep--those steps are your depth
markers, as it were, so just barely smooth them away.
For the inside, I tried the planer but could
only reach a little of the innermost step, as I suspected.
It just doesn't fit inside curves like that. So I spent a
half-hour or so with hammer and chisel, quickly and roughly
chopping out whatever wood could be removed easily, mostly
from the second step. Then another 30 or 40 minutes
with the angle grinder, and the inside is nearly done!
Makes incredible dust. I had to go over it with the
belt sander, because the angle grinder doesn't make an even
surface. This is the time to fit the rim to the bowl,
though I did not attach it yet. Make some pencil marks
so that you can get it lined up when the time comes.
The finished weight for the wooden bowl was 6-1/4 pounds,
and one pound for the rim.
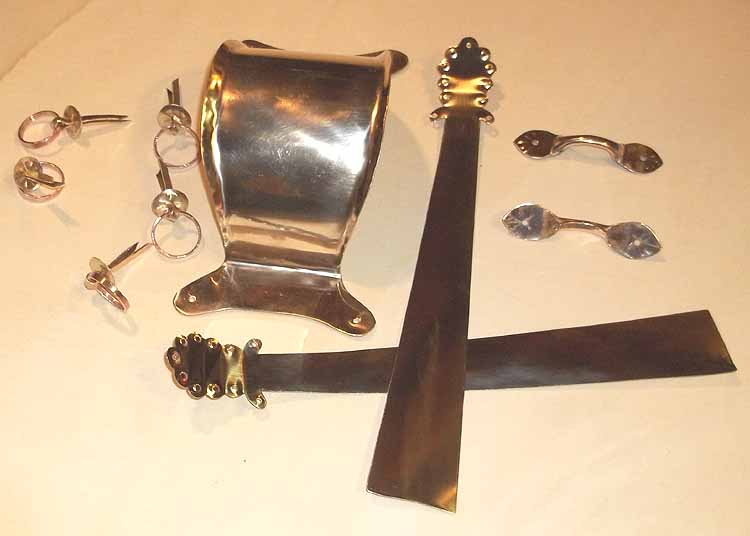
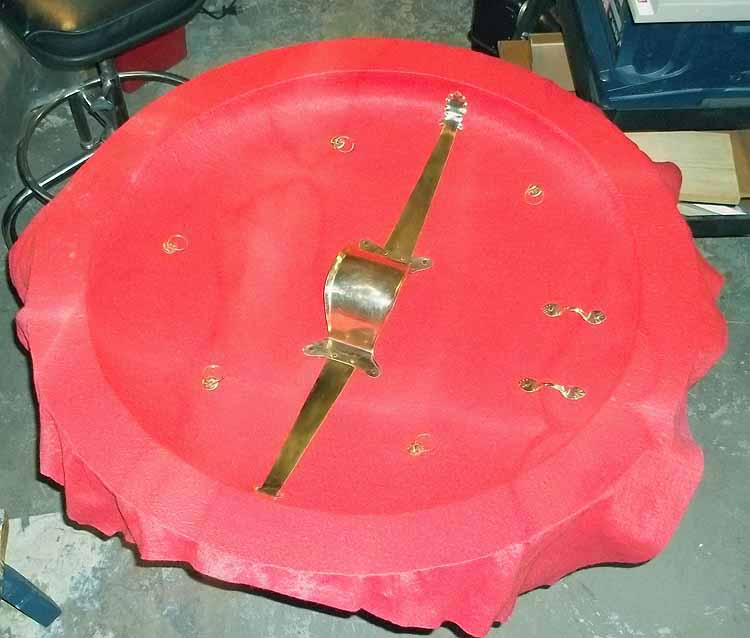
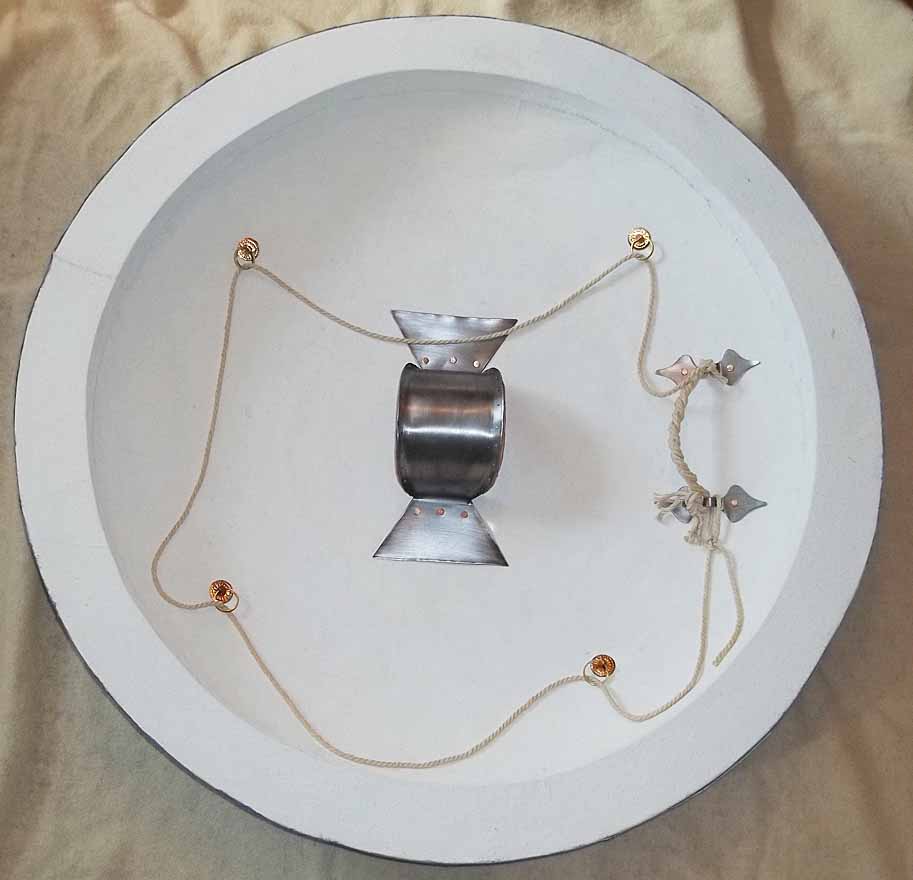
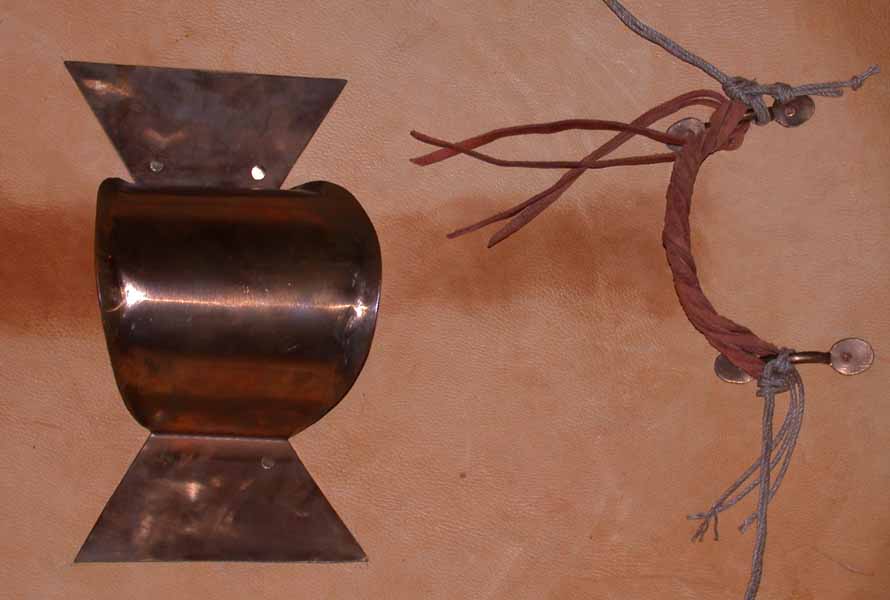
The fittings are based on those shown in vase
paintings. The porpax and antilabe loops are 18 gauge
bronze, while the porpax extensions and discs for the
carry-rope rings are 24-ga. The rings are cut from
heavy copper pipe, each one on a split pin or "cotter pin"
made from a strip of bronze sheet. The split pin
passes through a decorative disc, in this case with a simple
radial motif done with a chisel. Many originals are
startlingly similar to the bosses applied to Roman armor and
helmets, though the Greek ones tend to be a little larger,
1-1/4" to 1-1/2" in diameter. Some porpax extensions
are plain strips, but many are decorated--I decided that the
individual fronds of an acanthus leaf motif were a bit
beyond my skills and patience, and went with a simpler sort
of leafy look.
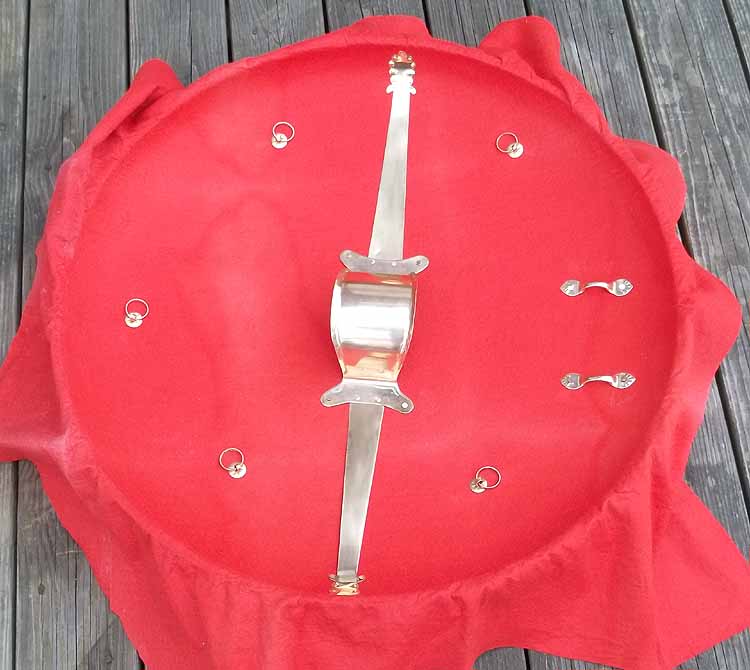
My lovely wife donated some old red wool felt
for the inside lining. I glued it in from the center
outwards, and it is stretchy enough that I had no
puckers. The excess felt is for covering the back of
the rim. Then I nailed the fittings in place,
pre-drilling all the holes. On the outside, I cut
grooves in the wood to clench the nails and "cotter pins"
(for the rings) into, so that nothing would stick up above
the surface. The tips of the nails and pins are bent
90 degrees before clenching, so that they stick back down
into the wood. Measure and mark carefully to get
everything in place and straight! I held the head of
sledgehammer against the inside of the bowl while hammering
the nails and pins flat on the front, to make a more solid
surface and avoid cracking anything.
After clenching all the nails and pins, I
covered everything generously with Plastic Wood, also
filling in any likely gaps, steps, or other
irregularities. After allowing that to dry thoroughly
(outside, phew!), I sanded again with the belt sander.
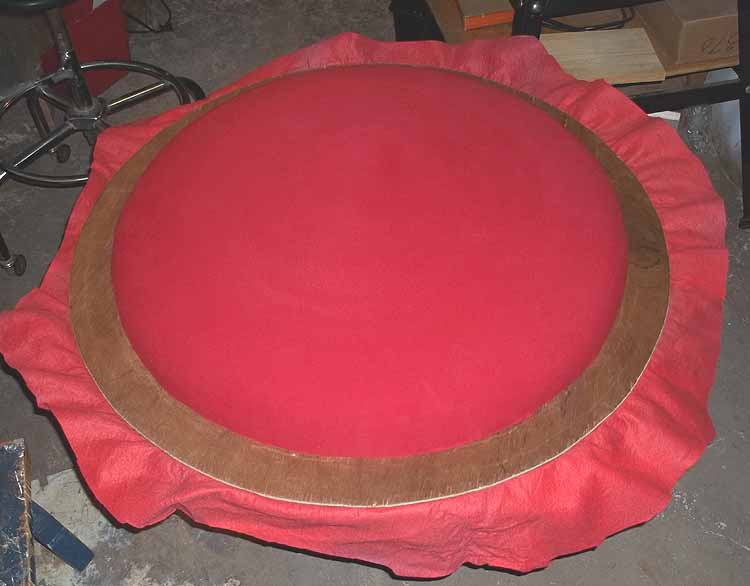
The front I covered with red denim (*before*
attaching the rim!). Thin leather is preferable, but
beyond my budget for this project, unfortunately.
You'd need a c. 36" diameter circle of c. 2-ounce leather,
not an easy thing to find. In any case, the denim went
on better than I expected, just stretchy enough to be free
of major puckers. After the glue dried I trimmed off
the excess fabric and glued the rim in place, reinforcing it
with small nails every few inches. Be careful not to
get glue all over the lining, or to let nails poke out
through the surface of the bowl!
Then I glued the felt lining down over the
back of the rim, and was again able to do it without
puckers. Yea! The color isn't actually quite as
garish as it looks in these photos, but there is some
mottling due to old water damage.
Having cleverly remembered to trace the rim
out on heavy cardboard before attaching it to the bowl, I
then had a pattern for cutting thin leather to cover the
front of it. I left a little extra width so that it
could be folded around the edge and glued down at the
back.
One of the pieces of leather was soft enough
to simply glue in place, with a couple clamps. For the
rest, I wet the edge using a syringe, folded it around the
edge of the wood, and clamped it in place using wood and
cardboard shims to prevent any clamp marks in the
leather. After letting it dry overnight, I glued the
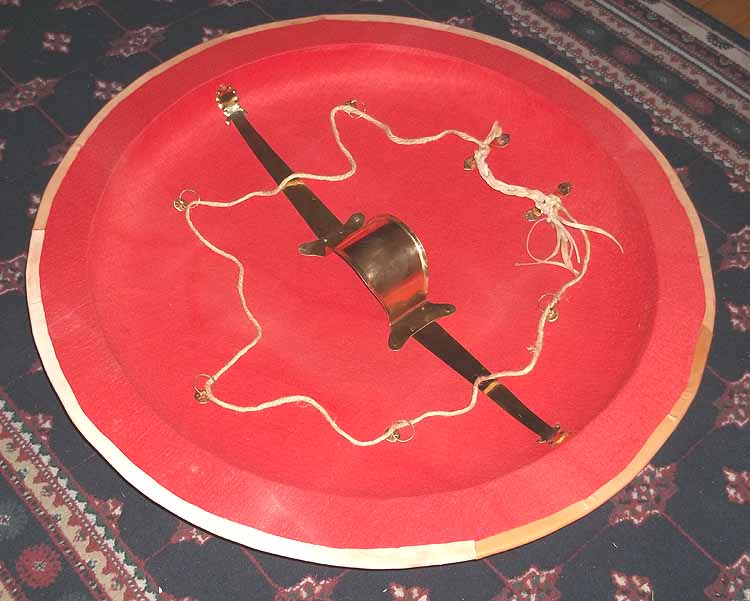
leather into place. The antilabe is 3 leather thongs,
doubled through the upper loop, braided together, and tied
off below the lower loop. The carrying cord is jute or
hemp--with the cord passing across the front of your
shoulders, the porpax rests neatly in the small of the back
and is very comfortable. White or brown 1/4" hemp cord
is available in 6-foot lengths at craft stores, or you can
get longer lengths in various colors online as (no kidding)
bondage cord. (Regular hemp rope is coarse, stiff, and
stinky!)
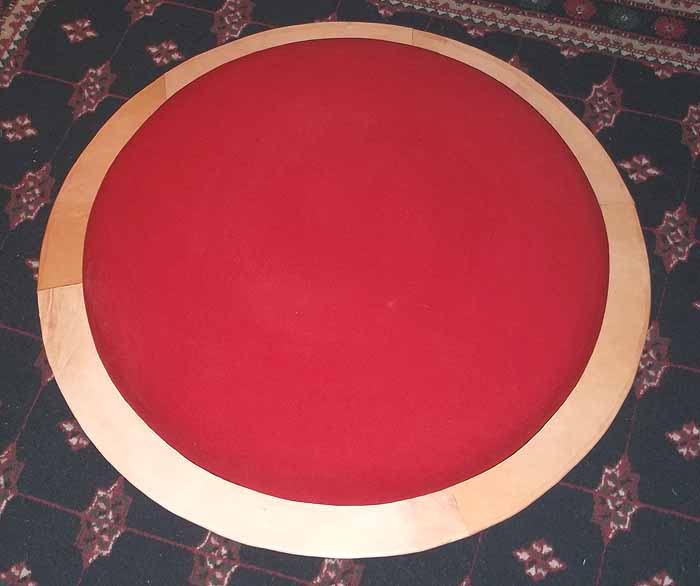
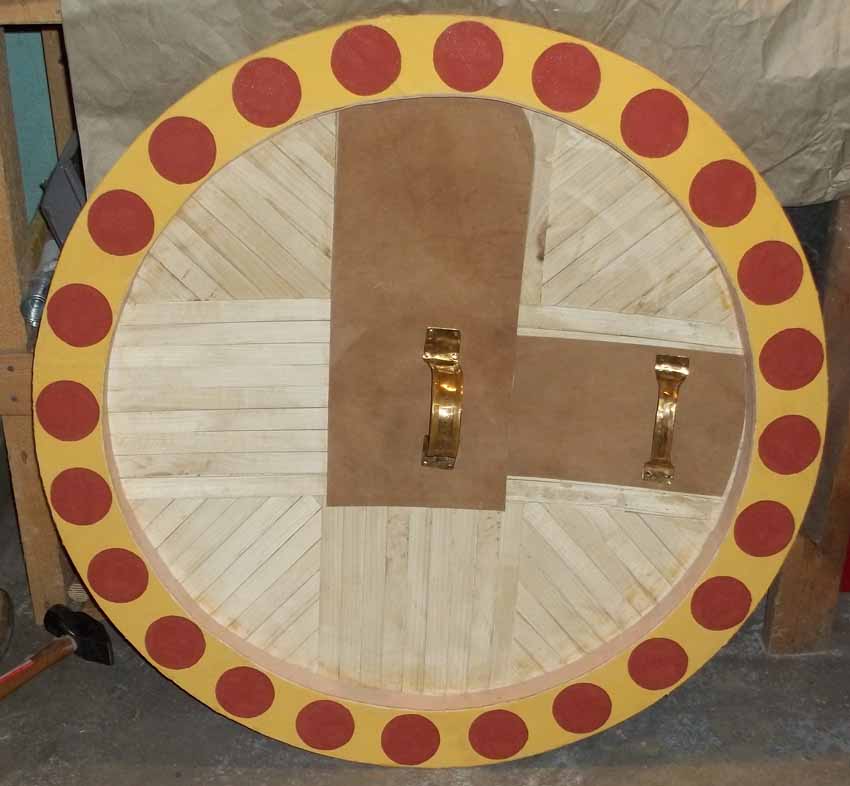
The leather rim is painted with casein/milk
paint. I decided not to paint the bowl, which in
retrospect was a bad idea. If it were painted, any
mistakes in painting on the emblem could be painted over--as
I found out the hard way. Plus, shields were most
likely painted in ancient times! Go with what they
did, eh?
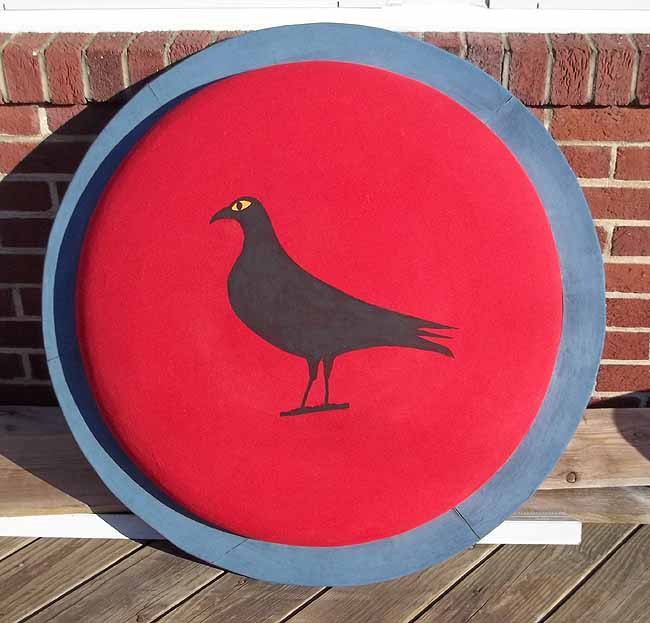
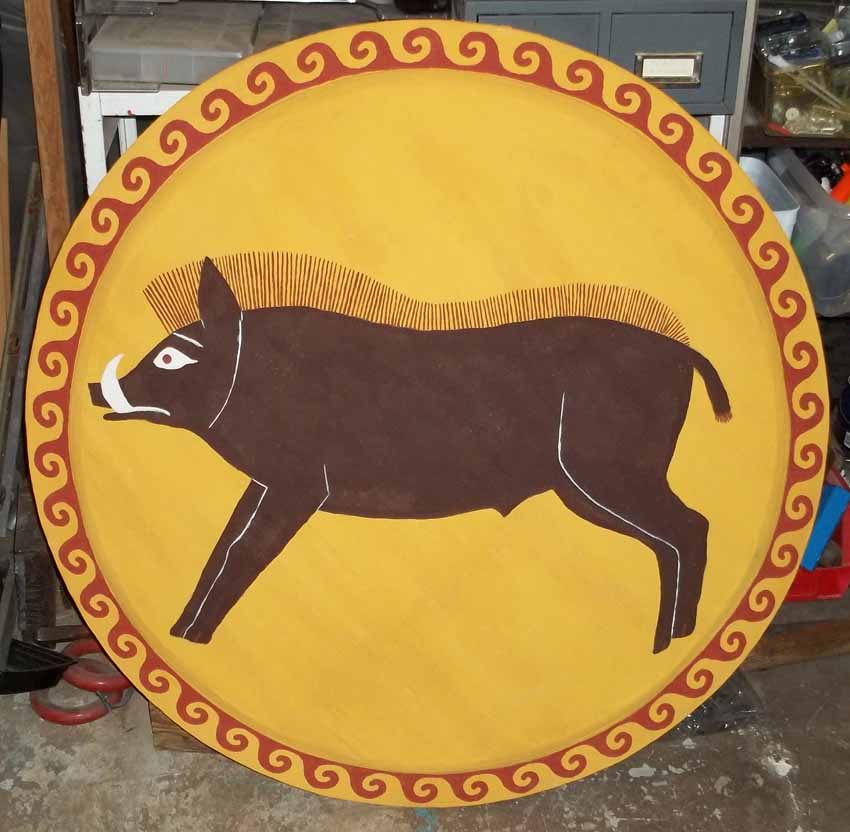
Yea, it's a shield! The bird is taken
from a couple vase paintings. While working through
several iterations on paper, I was trying to make it more
realistically crow-like, then realized how far I was
straying from the evidence and went back to the vase
painting! This is also casein paint, so I will let it
cure for a few weeks before giving the entire surface a coat
of wax. The final weight is 9-1/2 pounds.
Aspis in
progress, using plywood and pine scraps. At left the
bowl is complete and smoothed, and the rim pieces cut and
planed to a slope but not attached. Behind is the
large sheet of cardboard I used when tracing and fitting the
pieces, with the strip compass in place. You can see
several circles traced for different layers, so that I could
lay the cut pieces out properly aligned and trim their ends
to match up. (Obviously this would lie flat on the
floor while in use!)
I did not try to be as
precise with drawing and cutting on this shield, and it does
not seem to have made any difference! Small gaps can
be filled with wood putty (as they always are!), and any
measurement off by a few millimeters just wasn't
detectable.
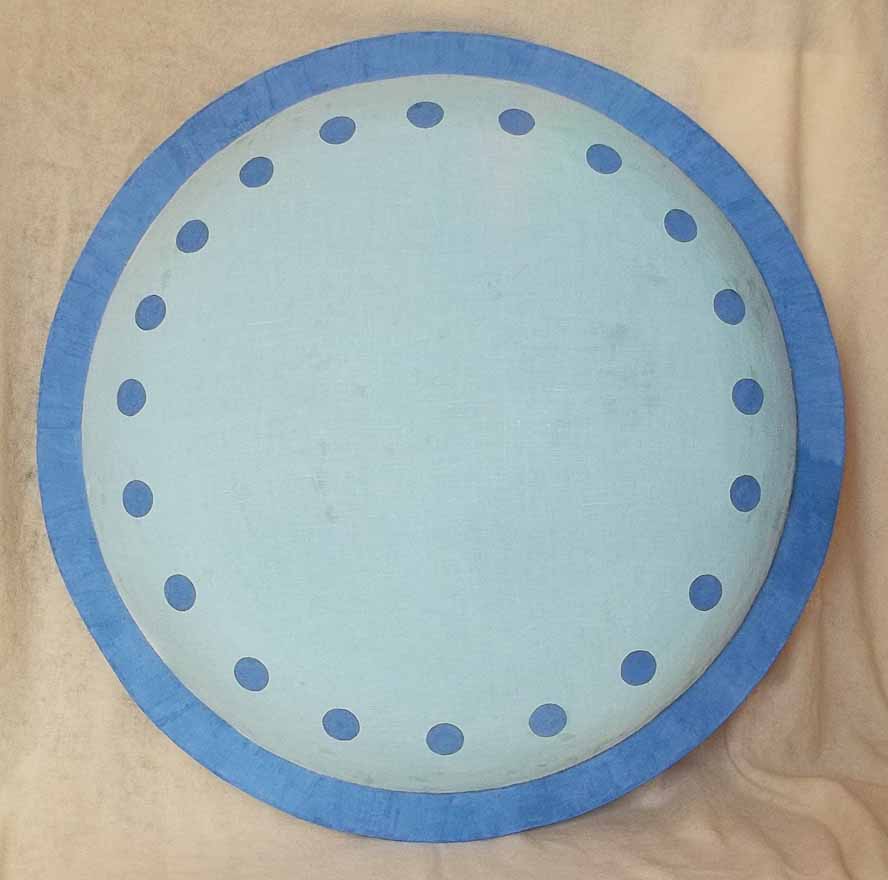
And here
it is finished. The facing is pale blue linen, with
canvas painted white inside. Iron fittings are rare
and probably all or mostly from Macedonia, but I thought I'd
try them for variation. The porpax is lined with heavy
leather. This will probably be the last metal-based
porpax that I do, since it is looking like the metal ones we
find are actually thin *sheathings* for a *wooden*
porpax.
This shield was bought
by one of my Romans, as my nefarious plot to turn the legion
into a phalanx proceeds.
Christian Cameron (Taxis Plataion) designed the bowl of this
shield based on the Chigi Vase. Thin strips of ash are
mounted in a notch in the oak rim to make a shallow
dome. The crossing inner layers create exactly the
pattern of wedges seen on the Vase, and their springiness
makes for surprisingly good resistance to weapons. A
brilliant reconstruction concept! I undid some
finishing work which had been done to the shield, then
covered the face with two layers of linen and painted it to
match the Vase.
I also replaced part of
the rim, partly because I feel that oak is unnecessarily
heavy. But Christian's design also bevels the inside
of the rim to remove the inner ridge or step (the part that
rests on the shoulder), which for some reason he believed
did not exist. (I hope I am not misstating
anything!) It might be possible that *some* shields
lacked that step, but it is obviously present on any
sculpture or relief, as well as on the Vatican shield
remains, so I added it. I don't know if Christian is
offering these for sale, just be aware of the controversy.
If you want leather for the
facing or lining, use nothing heavier than 2-ounce. (I used
5-oz leather and it only added unnecessary weight!) It is
easiest to fit the leather to the front of the bowl before the rim
is applied--wet the leather completely, stretch it over the body,
and staple it in place. (Put the staples on the edge of the
body that will be glued to the rim!) When the leather is
COMPLETELY DRY, pull out the staples and trim the excess
leather. The remove the leather from the wood and set it
aside.
Before gluing the
leather to the face, almost everything else has to be done!
First, glue and peg or nail the rim to the body. Then line
the inside of the body with leather--deerhide works well.
Glue the middle first, then work around section by section, gluing
and using a sandbag for weight, to keep the leather smooth.
Then cover the back of the rim with leather, too, with several
pieces if necessary. Where the rim and body lining meet at
the inside angle of the rim, the Vatican shield shows a line of
running stitches, to keep the leather from peeling up. The
lining can be painted or dyed--I painted the rim lining dark blue
but left the body lining its natural golden color.
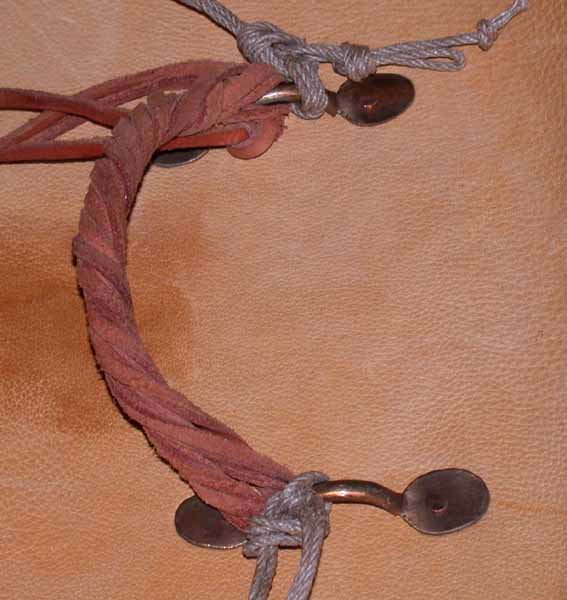
Close-up
shots of the porpax and antilabe of my first aspis. I
decided to keep the porpax very plain, but the edges are
flanged outwards for comfort. With a little better
planning, the tassle on the antilabe would have been at the
*bottom*, not the top...
RIM--For a bronze/brass rim,
you need to calculate the proper radius very carefully, remembering
that since the rim is sloped you will essentially be making a slice
of a very shallow cone. For my first shield I tried to cut my
rim from just 2 pieces, but made it an inch too large, so I had to
cut it into pieces and trim the inner edges to fit. My
finished rim is 5 pieces, overlapped and nailed. Moral:
MEASURE, MEASURE, MEASURE!! And then MAKE PATTERNS!!
Don't be afraid to spend several evenings just sitting a staring at
pictures, parts, patterns, and measurements, it will save you much
wailing and gnashing of teeth. I used .020" brass, which
worked quite well. Anneal the part that will be folded over
the edge, and add any etched or embossed decoration that you want (I
went with etched triangles, effective and as complicated as I wanted
to get.) Knowing that I would not be able to avoid puckers in
the brass at the back, I preferred to cut slits about an inch and a
quarter apart to create overlapping tabs. This is actually how
at least one surviving original was done, with a flat ring of bronze
added to cover the tabs. I added a strip of deerhide to cover
my tabs when I found that they constantly snagged on everything!
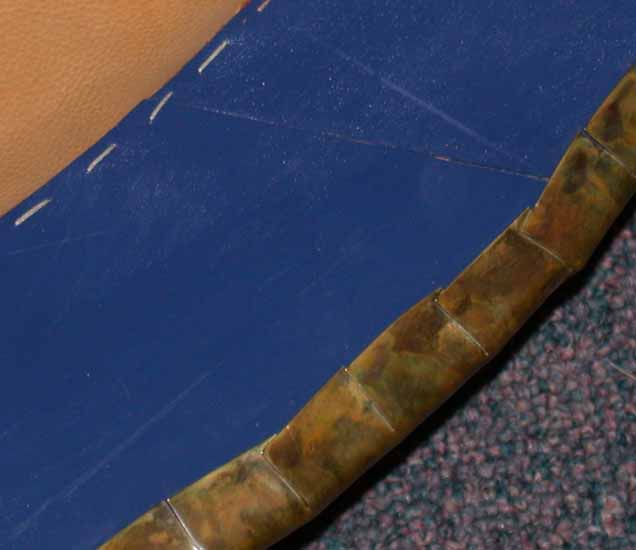
Front
and back of the rim of my shield. Each seam on the
front is secured by 2 small brass nails, and you can also
see the (rather faint) zigzag line that I scribed into the
brass. On the back, you can see the overlapping tabs,
a seam in the leather backing, and the stitching that
secures the blue rim backing to the gold deerhide inside the
bowl.
A
more accurate alternative to the plywood donut method would be to
glue poplar or birch 4x4s and 4x6s together face-to-face to
make a bloody great slab of wood, and work it into shape. With
clever planning the pieces could be cut to rough shape beforehand,
similarly to the donut method. If you happen to have access to
(or can build) a wood lathe that will take a piece 3 feet in
diameter, use it to turn the turn the wood like a big shallow
bowl. This is apparently how the ancients did it! (You
could just do the dome that way, then add the rim.) It's
possible the lathe was more like a potter's wheel, with the shield
blank lying flat, which would be much easier to build. If you
do the outside first, you might be able to shape your bronze facing
over it, even spinning or lathing it to shape using the wood blank
as the form. Then hollow out the inside.