 |
RECONSTRUCTING THE WARRIORS OF THE BRONZE
AGE
ARMOR
and SHIELDS
5/24/17 |
 |
You will read in many books about how all the bronze armor and shields have been found are "ceremonial" and are so thin as to be "useless in battle". Some will go so far as to mention thicknesses of a millimeter or so. Well, THAT'S REAL ARMOR! That's how thick armor is, and it works just fine. The books may cite an old article by JM Coles back in the 1960s, in which he cut up some very thin copper shields, and apparently came to the conclusion that bronze would be no better. It's hogwash, and deserves to be put to rest. (The rest of Coles' article has a LOT of good information, by the way!) For a much better test, go here:
http://forums.swordforum.com/showthread.php?s=04c55514d876fd1fa48bf3341af54c39&threadid=21752 or
http://forums.swordforum.com/showthread.php?s=&threadid=21752&highlight=shield
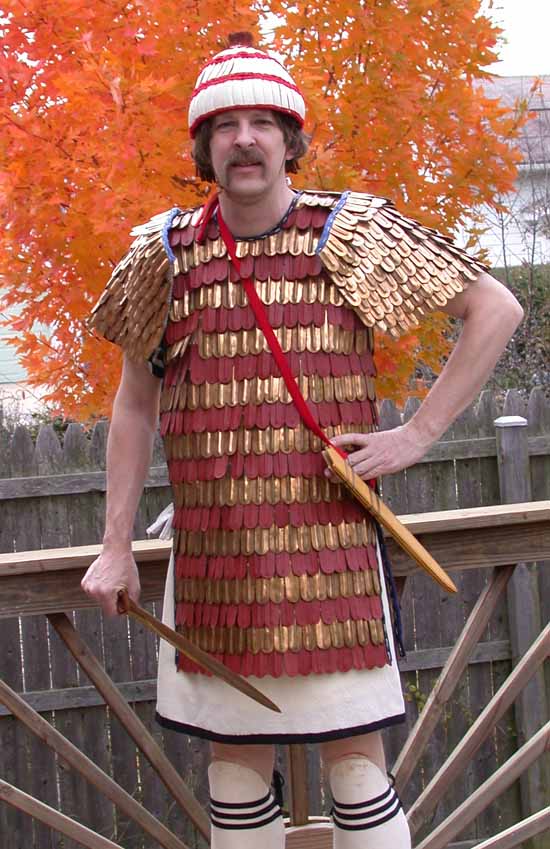
You will also read about how bronze armor is so terribly heavy that it must have exhausted the wearers, or perhaps it was only ceremonial! Don't you believe it. In the photo above, my cuirass weighs less than ten pounds, my helmet only two pounds, and the shield less than eight. With a little adrenaline, that's very light indeed!
Bottom line, warfare did indeed involve a lot of ceremony, and looking good was very important to the warriors. But their armor and weapons were highly effective and made for serious combat.
* Helmets
* Body Armor
* Greaves
* Shields
 |
THE BOAR'S TUSK HELMET PROJECT! Left, experimenting with 3 tusks graciously donated by John Ebel. They are hollow, and triangular in section. Each will be sawn each into 3 slabs, though the face from the inside of the curve might not be very usable. You're going to be jealous! |
 |
Woo hoo! Got 20 terrific
tusks from Boone Trading Company! Shown here
next to one of the first ones (above) cut into pieces,
you can see how much bigger they are. (These are
the 6" size.) Because of the curvature, I'll
probably cut them into pieces about 2" tall and use
three rows. This will make it easier to fit them
together than using longer pieces. |
 |
Cutting the tusks. I did go over them beforehand with a dental pick and fine sandpaper to remove the worst discoloration, but I decided not to try completely smoothing and polishing the outsides. Top left are tusks with pencil cutting lines. The concave inner face (with hatch-marks) is pretty much waste. Bottom left, each tusk cut into 2 usable sections. At right, slabs from about 8 tusks, rough-cut by bandsaw. They need to be trimmed and drilled, then sorted. Stinky work! And tricky, but vastly faster than cutting by hand. |
 |
The
pieces of 20 tusks all cut, trimmed, and
drilled. Each tusk yields 4 usable pieces,
and there are right and left tusks. Most are
about 2-1/4" tall, some are a little shorter. At
top left are the pieces of the first three smaller
tusks, not yet trimmed or drilled, since I'm not sure
where I'll need them. Right and left won't
matter, but they'll have to be fit together by size
and curvature when stitched in place. And I'll
need a few more tusks. |
 |
The start of the leather thong base, about 25" long by 12" tall plus a 3" to 4" extension which will form the neckguard. All is sliced into c. 1/4"-wide thongs, except for the 1"-wide rim band. Just didn't feel like messing with a hundred individual thongs! This will keep them more organized. It is vegetable-tanned top-grain leather, about 5-ounce in thickness. Homer also mentions a felt lining. |
 |
The thongs gathered at the top and lashed together. I tried wetting them before gathering, but that didn't work since the leather was too floppy. After drying flat overnight they were still damp but stiff again, and that worked fine. I also had two complete layers of thongs at first, but that made WAY too big of a bundle at the top. So to this will be added a second layer of shorter neckguard strips, and the top of the bundle will be cut off. (What, don't YOU have a spare head??) |
 |
Here the top has been trimmed and tied with rawhide, and the second neckguard layer added. I also added a strip a little over an inch wide, just forward of the neckguard, to lengthen the circumference. It fit neatly on my head as it was, but stitching on all the tusks will have a "gathering" effect on the whole thing so I had to allow for some shrinkage. The whole cap has been waxed with SnoSeal to protect against sweat and moisture, except for the neckguard which I coated with neatsfoot oil for more suppleness. |
 |
A 3-inch-wide band of red wool stitched in place. I'll lay the first row of tusk pieces on it, fold the edges of the wool over the ends of the tusks, and stitch through. You can see that the wool overhangs the leather brim, so that when it is folded up the tusks will be at the edge. This first wool band is a straight strip, but the others will have to be cut in a curve to match the slope of the helmet. |
 |
The first row about
3/4 done. My regular awl doesn't fit through the
holes in the tusks, but this old stitching awl
does. The foam head makes a great backing while
punching the holes. Hold the tusk piece in
place, punch its holes, then remove the head and
stitch the piece in place, remembering to include the
folded-over wool. I try to punch through the
thongs rather than just stitch between them, for extra
security. |
 |
First row finished. The tusks were secured first with a regular running stitch, then I sewed another lap around to make it a continuous line of stitching. Only two tusk slices of this size were left over! That's a glimpse of my Mycenaean tunic, too. |
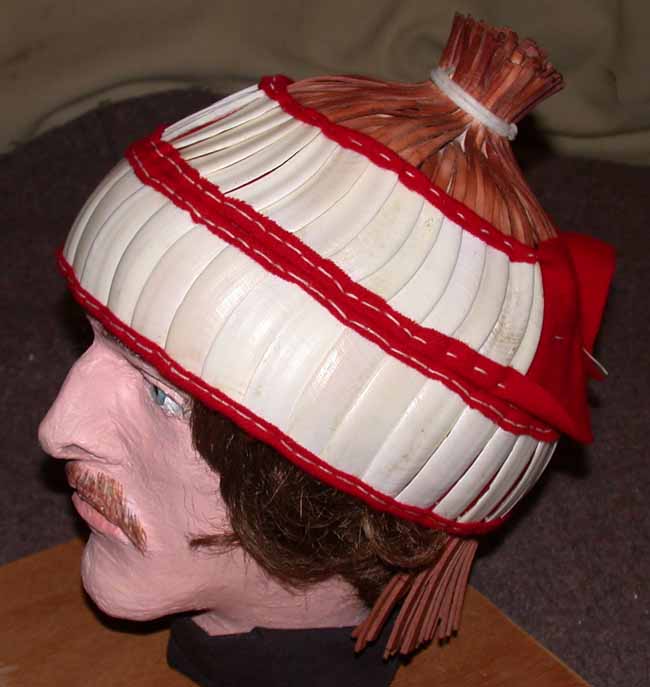 |
Second row three-quarters finished, and I'm out of tusks. There is also a top view. In this row the pieces have to overlap more at the top than at the bottom. I clipped off the top corner of each one so that it would not interfere with the hole of the next piece. In some cases, I actually overlapped the holes of two pieces. The third row will take some clever planning. |
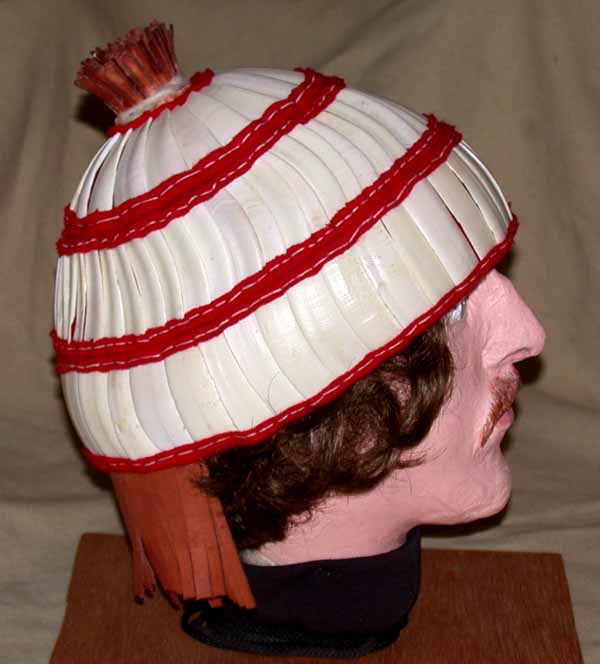 |
Complete! As of November 3, 2004. Also a view from the rear. Bought 14 more tusks and have 5 left over uncut, plus some unused pieces, so about 26 tusks were used. Finished weight is only 1 pound 11 ounces. Actually I still have to sew in a better wool lining. I could also cut up the remaining tusks for cheekpieces--maybe eventually. |
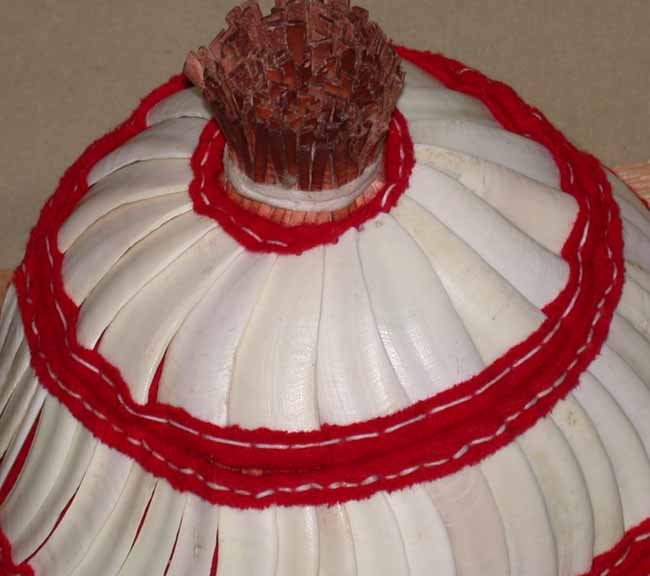 |
Detail
of the top. These pieces are tapered, and I had
to overlap them in the opposite direction from what
I'd wanted or they would not lie flat. Stitching
the top was a little dicey--you can see that the wool
kind of pulls back and rolls up at that one
point. One of the pieces shows an extra hole,
unused. (If you don't build in a flaw, the gods
will zap you for hubris!) |
 |
Interior
view without the lining. The way Homer
emphasizes the crossing leather thongs, a more
accurate design should probably have another layer of
leather, even if only the outer one is gathered in the
topknot. But that might still make the whole
helmet a little bulky. |
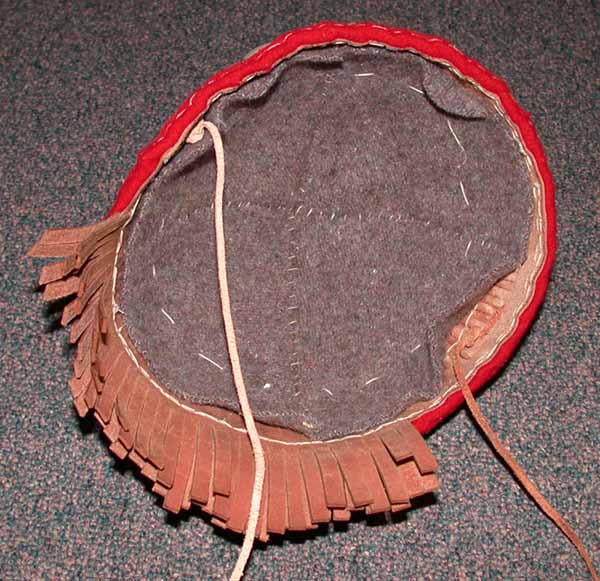 |
Lining finished, a simple cap made from blanket wool in four segments. The long stitches that hold it in simply dive under the thongs. Also threaded under the thongs are the chinstrap laces. A very comfortable helmet. |
Yes, you're jealous, aren't you?
From Ron Glass, on working boar tusks: "I found that there is a fracture point at the apex of each corner of the tusk. After cutting the tusk to length, if you tap it verrrrrry gently with a sharp chisel (a small wood working one is great) and hammer it'll split along that point near perfectly. Much easier than trying to saw it. I feel confident that's how it was done in the past. It would be too time-consuming to saw it with a bronze-age blade." Thank you, Ron, brilliant idea!
 |
When starting my boar tusk helmet, I made two of the fringe bases, thinking I'd use both layers. But that turned out too bulky, so I sold the extra one off to Gregory Liebau. He made a nice Phillistine/Sea People "feather" helmet with it, and then gave it back to me! He made the "feathers" about three-quarters of an inch wide, but I decided on a finer look so I slit them each into thirds. At right, I have painted the band, and waxed the leather. Neat hat! | 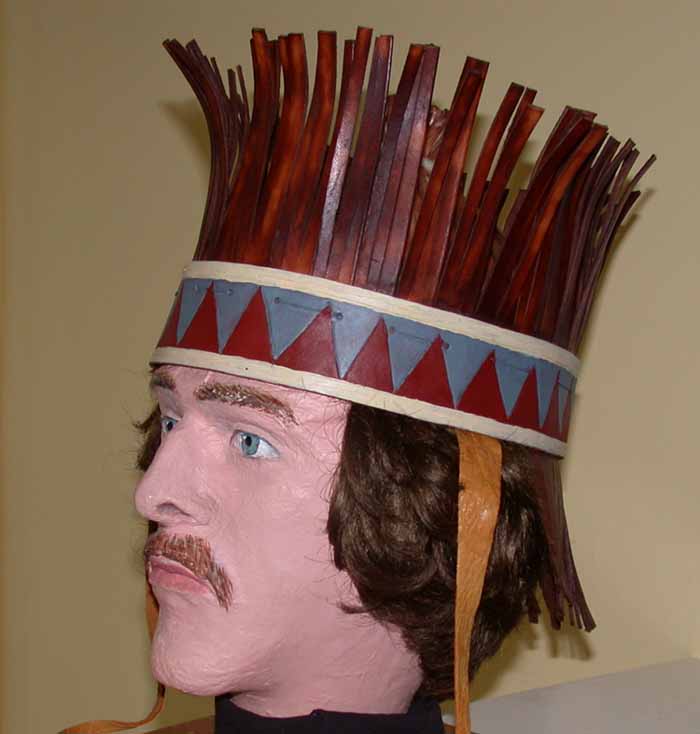 |
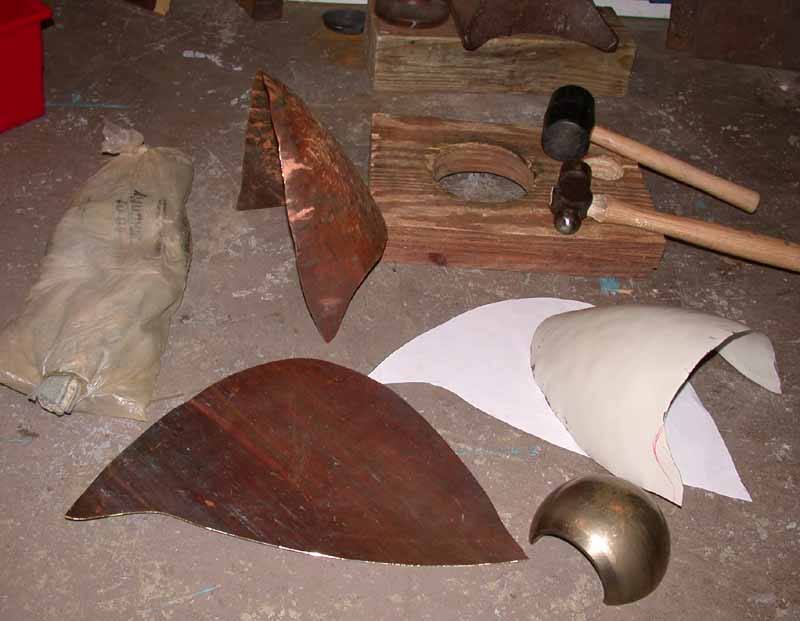 |
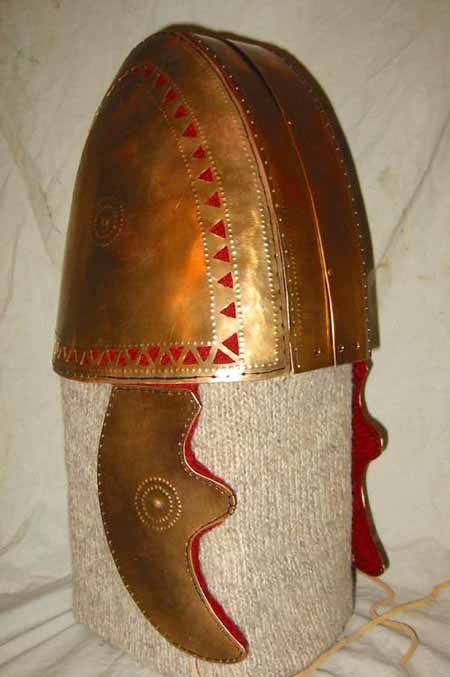
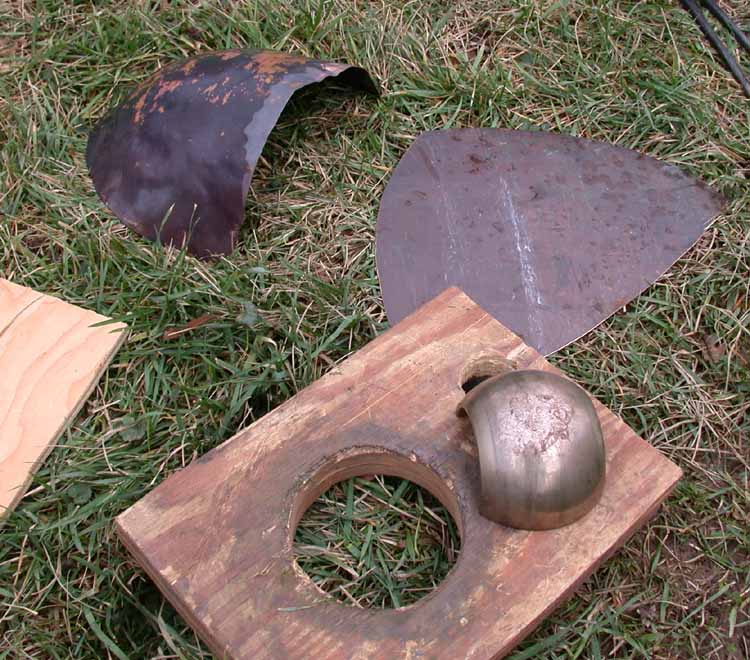
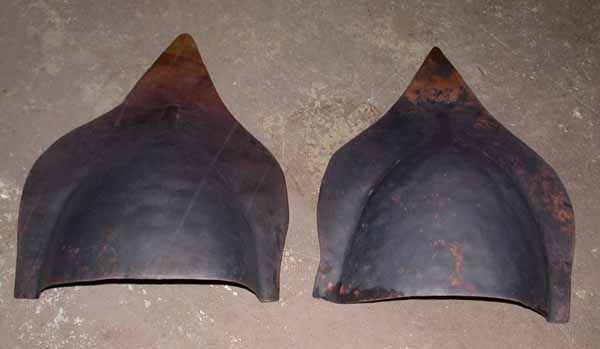
10/9/05--Finally started my bronze horned helmet,
based on the Warrior
Vase, the Medinet Habu reliefs, and the
"Ingot God" from Enkomi, Cyprus. The white paper
pattern and a white thin steel test piece are at
right. Bottom left is the right half of the
helmet as cut out, above it is the left half,
partially dished. It is starting to take shape,
but probably a couple more tough sessions of pounding
are needed. The bronze hemispherical bearing
seems to work best for dishing, with sandbag and
plywood dishing swage. |
 |
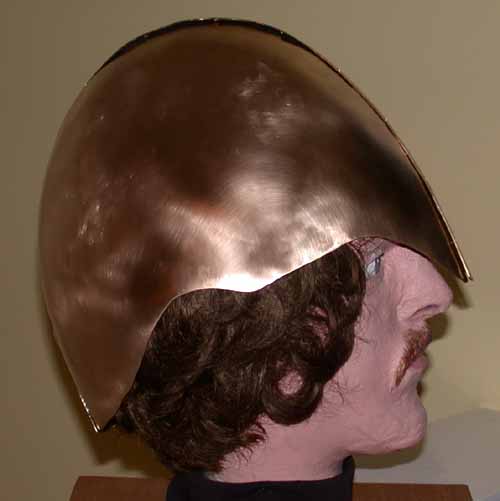
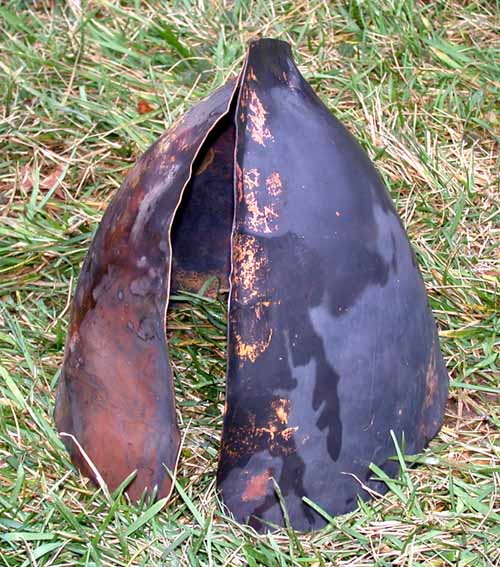
Next day, after about 2 hours of heating and dishing. I annealed both pieces several times in my forge, burning wood scraps, between bouts of hammering, and it made a HUGE difference in how the metal works! |
 |
Wow, this might actually work! Another hour and a half or so of adjusting, trimming, fitting, and fiddling, and the two halves more or less fit together (temporarily taped!). I wasn't sure I could really make a helmet like this! |
 |
10/12/05--Plannishing complete, and the surface has been sanded smooth. The bottom edge has been trimmed to shape, pretty much, and I punched some of the rivet holes along the seam. Still working on the pattern for the crest, but if it keeps looking a little odd I'll just leave it off and use only the horns. |
 |
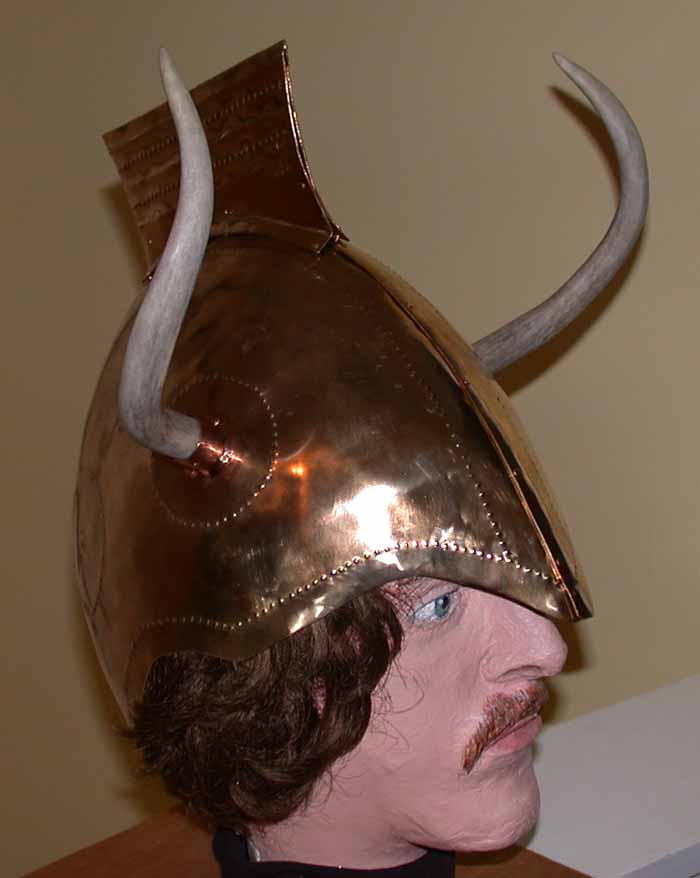
10/18/05--One shot of all the parts
at left, embossed and ready to assemble, and then IT'S
DONE! Oops, still have to add some
horsehair. Plus a lining and chinstrap.
But those don't count. Look on my work, ye
mighty, and despair! There was some very finicky
riveting. |
 |
 |
Side and front views. It sits tilted back a
little more on my spare head than on my real
one. There is also a rear
view, and detail shots of the left horn mounting and the crest. I'll drill a
row of small holes along the top edge of the crest,
and use them to secure the horsehair. Special
thanks to my co-worker Linda for the antlers! |
 |
I wouldn't turn my nose up at a copy of the Knossos, Tiryns, or Pass Lueg helmet, of course. At the moment I'm leaning towards Pass Lueg, since I think that would go well with my armor, but some other crested helmet style is an option.
 |
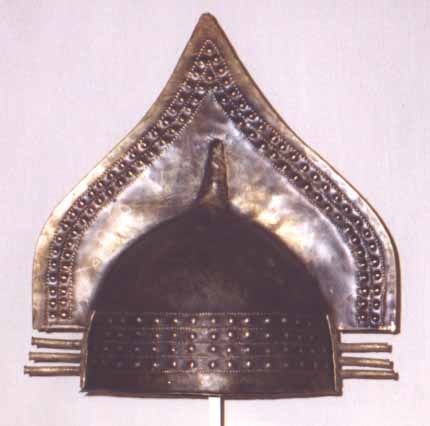
Speaking
of the Tiryns helmet, I've started making one for Dan
Z. The halves are dished out and mostly shaped,
and need a fit check. There will be a strip of
heavy leather between the halves, with a horsehair
crest such as those seen on the back of the Warrior
Vase. A colored lining will show through the
openwork. 7/27/06 |
 |
Thanks to our friend Andrea Salimbeti at the Bronze Age Center, we now know that more of the original helmet survived than we thought! There is indeed a central bronze strip, apparently made from 2 parallel pieces, so that is what I have approximated here. If this fits, we'll start making dots and holes. 9/1/06 |
 |
And here it is with dots and holes, c. 9/15/06. Each hole will be filed into a triangular shape. The parts will be held together by the lining, essentially. |
 |
Dan spent many hours filing the holes! He did the lining with red wool, and stitched all the parts together. Excellent job! Interestingly, this helmet looks VERY tall when worn, though it doesn't look that way when it's sitting on a table. We seem to have gotten the proportions pretty accurate, so it must be about right. Looks good, anyway! |
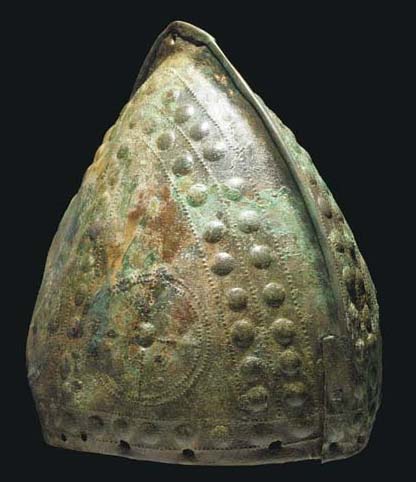
My next helmet is a crested type from the Axel Guttman collection, which I thought would be good practice for the more complicated Pass Lueg (which is still on my list!). This type is basically Late Bronze Age, from central Europe, and is presumably an ancestor of the Villanovan type shown below.
 |
The
first half is shown after one annealing and dishing
pass, and my plywood dishing swage and the bronze
bearing I use as a hammer are in the foreground.
1/14/07 |
 |
Two
annealings and dishings for the first half (left) and
three for the second, plus a final annealing for
both. Total work time about 90
minutes. The rest of the shaping and
embossing should be possible without further
annealing, so I can do it in my basement
workshop. The "crest" in this case is less than
an inch high. |
 |
Then it sits on the workbench for two weeks, and then an hour's work of shaping, trimming, and fiddling brings us to this point. I cut one inch off the bottom edge, and half an inch off the edges at front and back. The ridge stops a couple inches short of the rim to become an overlap which will be riveted. |
 |
About 3 hours of sanding to remove all the scratches, and another hour and a half of plannishing and shaping. You can see how the ridge of the left half is taller, to be folded over the right half to hold the pieces together (along with the rivets). |
 |
All of the decoration, including laying out the pattern and embossing the dots, takes about 6 hours. Then 40 minutes to make it fit back together again, just over an hour to assemble the two halves, final buffing and polishing 1-3/4 hours. Total construction time c. 16-1/2 hours, plus another 2 hours or so for the lining and chinstrap. 2/4/07 |
A bit more complicated
is the classic crested Villanovan helmet, as seen on the
main page in the "Romulus" photo.
Full progress report on
the Bronze Age Center, http://z8.invisionfree.com/Bronze_Age_Center/index.php?showtopic=1176
Here
are the photos of its birth, though:
 |
 |
 |
 |
 |
Also see my page on Romulus. The Villanovan culture was a Late Bronze Age and Early Iron Age culture in central Italy from which rose the founders of Rome in the 8th century BC.
 |
This Villanovan helmet is by Chris Levatino. A number of these have been found, with variations in decoration, crest size, etc. The Pass Lueg helmet from Austria is very similar, lacking the three pegs at front and back, and having a more rounded crest. |
 |
Here's
a different Villanovan I copied from a helmet in the
Axel Guttman Collection, using a spun brass
dome. The crest is horsehair mounted in a
wooden block. This detail
shows the tab that secures the crest at the front,
and here is a photo of the
original. The shield is shown below. |
* Main Bronze Age Page * Armor * Weapons * Chronology * ROMULUS *
A Dendra-style cuirass would be REALLY cool, but since my focus is definitely on a slightly later period I'm going for a less-involved cuirass with some embossed lines and dots. Evidence includes the cuirasses from France and Switzerland, the greaves and cuirass fragments from Kallithea and Enkomi, the Tiryns and Pass Lueg helmets, depictions such as the Medinet Habu relief and Warrior Vase, etc. The end result will admittedly be a pastiche, with evidence from various sources used to approximate a possible Mycenaean cuirass from the Trojan War era.
As
with any project like this, I started with a cardboard
pattern, and spent several evenings just taping it on and
checking the fit, adjusting here and there, comparing to
pictures of originals, etc. This is a slightly
daunting project!
 |
Here
are my back and breast plates as first cut out,
November 22, 2004. They are 18-gauge bronze, the
last big piece that I have. If it
goes well and I have enough metal, I might add
shoulder guards. |
 |
Plates are shaped, and the neck opening and bottom edges are roughly flaired. Before shaping I went over the metal with a scouring pad on my drill's sanding disc. 11/28/04 |
 |
Getting there! Shaping and trimming are done, edges are flaired or rolled, and the fastenings are complete. The hinge wires on the left side are temporary. The metal is covered with fingerprints now! I will give it another going-over with the Scotch-brite pads and fine sandpaper in a few spots before starting the embossing. There is also a detail shot of the shoulder, showing the fastening loop and slot (and the neatly rolled edges!). This is copied from the Dendra cuirass. 12/4/04 |
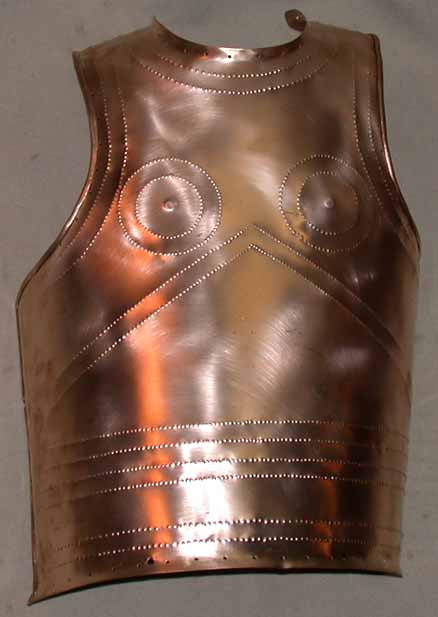 |
Embossing under way. Still have a couple rows to do on the backplate, and then need to do larger dots between the rows of small ones. All done with a pointed steel punch, backed with a lead block. The straight lines I marked with tape, and the curved ones by scribing with a knifepoint, to keep the rows from wandering too much. 12/12/04 |
 |
Finished! Embossing the large dots only took a couple hours on New Year's Eve day. For a punch I used a cheap little hammer-screwdriver combination tool that had a nice ball peen, backed with a lead block. It took a few more evenings for final reshaping, buffing and polishing, and the lining. |
 |
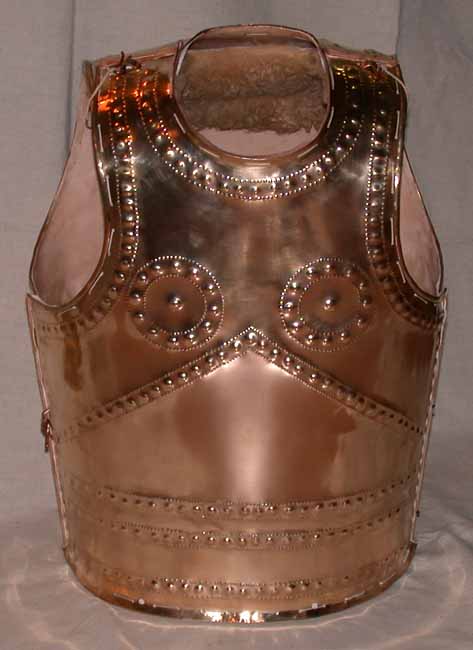
Detail
of the right shoulder. The closures are secured
with copper "omega" rings, tied to their loops to keep
from getting lost. You can see the flaired neck
opening and the rolled edges, and one of the wire
"hinges" inside at the left joint. The leather
lining is stitched in and lightly waxed, and folds
around the sides and the ends of the shoulders.
I stitched some pieces of sheepskin inside the
shoulders for padding. |
 |
And the back. I left the decoration on the back pretty minimal compared to the French and Swiss cuirasses. And the shaping at the top isn't quite right--looks a little "hunchbacked" rather than fitting nicely to my shoulders. But not bad for a first try, and I deliberately did no dishing, just bending, to avoid the danger of lots of visible irregularities in the finish. The three wire hinges are visible, and one of the lock pins hanging from its "leash". |
Åstrom's report on the Dendra finds says the metal of the
cuirass was about 1 millimeter (about 18-gauge), the same
thickness mentioned by Osgood, Monks, and Toms for other
Bronze Age armor; but the greave and armguard were "about as
thin as a piece of paper" (it does not say if this might be
due to corrosion). Scale armor was also popular,
especially in Egypt and the Middle East.
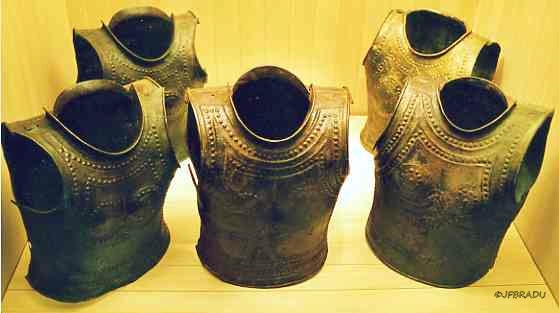
The
Marmesse cuirasses from France has been very influential on
my own armor. It was several months after finishing
my armor that I found out that there were apparently NINE
cuirasses found at Marmesse! Five are shown
here:
http://jfbradu.free.fr/celtes/les-celtes/cuirasses-marmesse2.jpg
Other Marmesse photos and
information,
http://www.musee-antiquitesnationales.fr/pages/page_id18024_u1l2.htm
http://www.musee-antiquitesnationales.fr/homes/home_id20392_u1l2.htm
--------------------------
Having
decided that I need more armor, but not having enough large
pieces of bronze for a solid cuirass, I have turned to scale
armor. The goal is a thigh-length shirt covered with
alternating rows of bronze and painted rawhide scales, and
the scales themselves are based on one from Troy, as shown
in Connolly. It is 3 inches tall by 1 inch wide, with
4 holes across the top and a midrib. More commentary
on the Bronze Age Center, http://z8.invisionfree.com/Bronze_Age_Center/index.php?showtopic=818.
Todd
Feinman's Egyptian scale armor has been very
inspirational: http://z8.invisionfree.com/Bronze_Age_Center/index.php?showtopic=8
 |
The
first samples done, 7/18/07. I can make 6 scales
from start to finish in less than an hour. The
one at top right has a lumpy rib because I was
experimenting with using a small cross-peen hammer to
emboss it. But a modified wide cold chisel works
much better. The scale at center top is also one
of the first ones, and I forgot to check the picture
before punching its holes in the wrong place! |
 |
First
the bronze must be sanded clean (my usual old brown
18-gauge scrap!), then the scales are traced and cut out with snips.
The edges are filed, and the midrib embossed--I ground
the edge of a 3" cold chisel to the shape I needed,
and a lead slab forms the "negative". The
notched piece of wood is used to flatten the scale
without touching the midrib. After stamping, the
front is buffed and the holes punched with a "Whitney"
hand punch. |
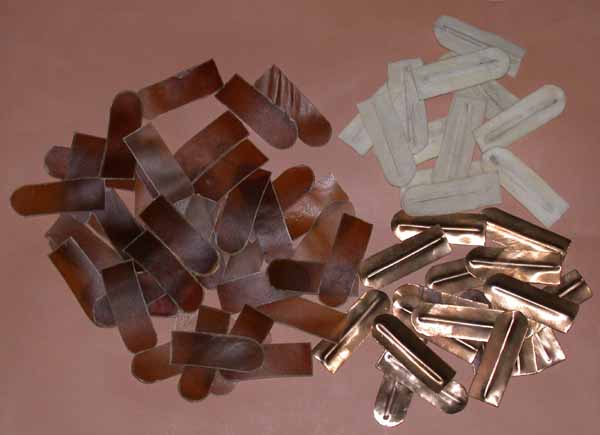
 |
The
white rawhide is from dog chews, which I had ended up
not using on a previous project. It is not as
hard and strong as the good brown stuff, and does not
take the embossing as readily. I trace out the
scales while the rawhide is dry, and cut them with
snips and scissors. Then soak them and emboss
the rib into one of the slots in the plywood. I
made the wood block with the wire set into the bottom
as an embossing tool, but the chisel generally works
better. |
 |
To
keep the scales from curling up while drying, they are
pressed under wood blocks and weights. The
midribs either lie upwards and rest between the
rounded edges of the blocks, or face-downwards between
two strips. |
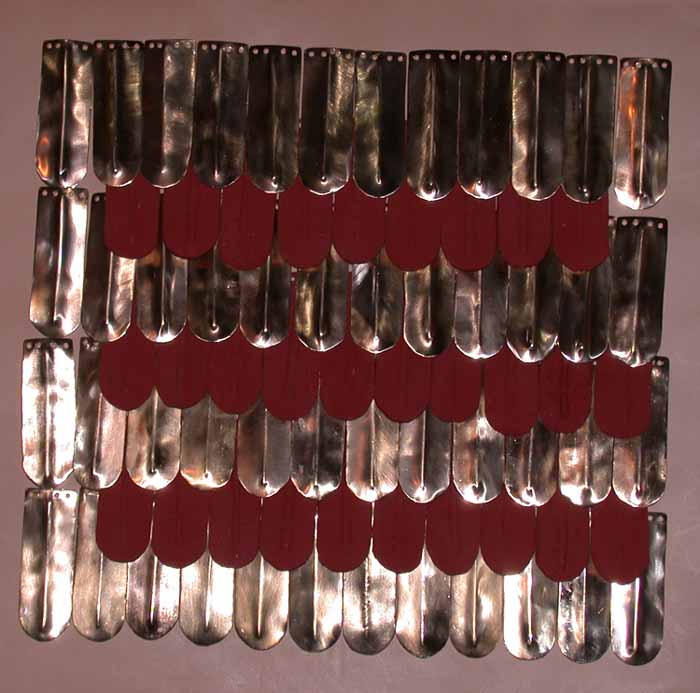 |
A
square foot of scales done, 7/24/07! Plus a pile of unfinished
scales. Once dry (and sometimes bent back
into shape), the rawhide scales are painted with red
casein paint. I will test safflower oil to waterproof the rawhide and keep the bronze
from tarnishing. |
| 8/10/07. 170 bronze scales done, and 18 more cut out. 192 rawhide scales done, 32 needing to be painted, and 29 more have been stamped and are drying. All the finished scales have been oiled with safflower oil. | |
| All of the scales (for the body!) were finished on Sept. 3. Here is the leather backing, lined with 2 layers of linen--yellow and green for the front, yellow and purple in back (only the yellow will be visible when it's done). The shoulders a slightly angled and the sides trimmed back at the arm openings. In this detail shot you can better see the pencil lines for the rows of scales. |
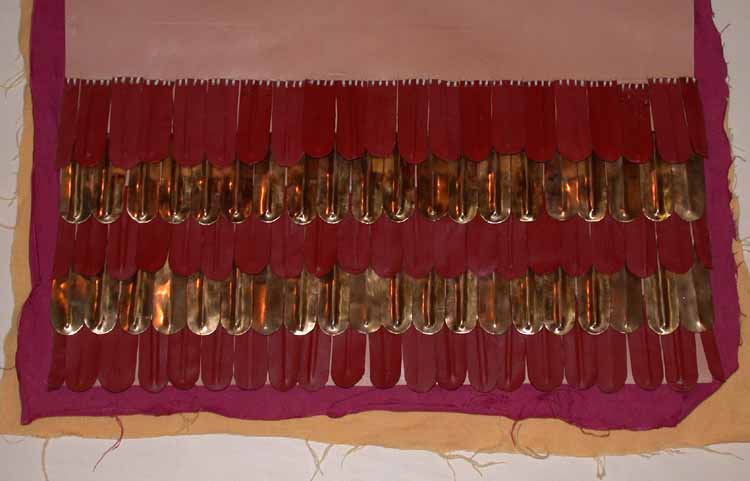 |
The
first 100 scales stitched in place, 9/14/07.
Each rawhide row ends with a half-width scale whenever
that row ends at an edge. |
| The back is done! Well, at least all the scales are on the back, 9/26/07. Still have to trim the linen and add the edging, and of course sew up the side seam--but that all has to wait for the *front* to get done.... At the moment the weight is 12 pounds. And it sounds REALLY NEAT! | |
 |
And now the front is done, too, 10/6/07. Actually, I need to add a few half-length bronze scales at the base of the neck hole, mostly to avoid a visual gap. Then comes punching and drilling a few hundred holes to sew the edging on! |
 |
Detail of the shoulder. I curved the upper 2 rows, front and back, with a few blows with a rubber mallet on the horn of my anvil. Otherwise they stuck out! The horizontal scales covering the seam at the top need a couple more stitches to keep them in place better. |
 |
The
scales for the shoulder guards are all bronze, 2" by
about 7/8", after the example from Mycenae. Here
about 120 are oiled and ready for their holes, and
another 200 need to be buffed. One of the larger
scales from the body is at bottom left for
comparison. 10/25/07 |
 |
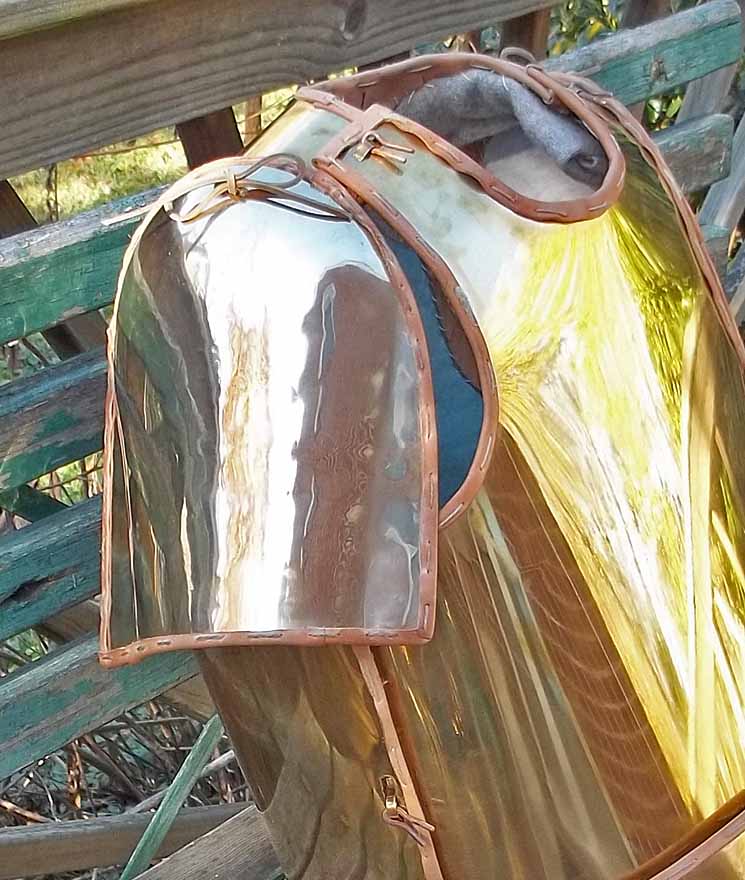
Shoulder
guards done! 11/13/07 There is a lining of
blue linen, folded over the top edge. The sides
are left unedged to permit more flexibility. The
bottom 4 rows are straight, the upper 5 successively
curved. The scales are all *supposed* to be
vertical... Each shoulder guard weighs about
3-1/2 pounds. |
 |
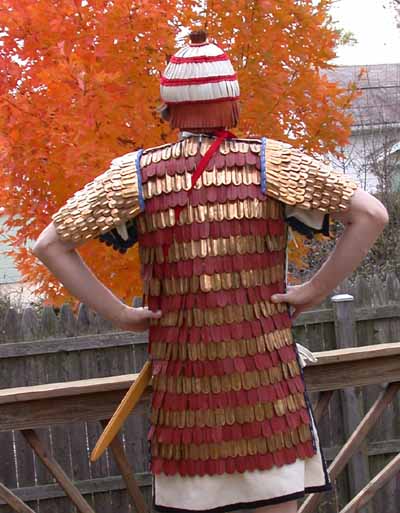
All
done at last! On Nov. 15th I got the shoulder
guards attached, stitched with heavy linen cord.
Here is a shot of the back.
The side opening gaps a little, so I have to add
another pair of ties and maybe fiddle with their
placement, or add a leather flap or something.
But it works! |
|
This
is a Villanovan "poncho cuirass" from Narce, Italy, in
the museum at the Univ. of Pennsylvania,
Philadelphia. It dates to the era of the
founding of Rome, mid-8th century BC. Only the
breastplate survives, though I believe it had a
backplate since the shoulders are made the same way as
a full cuirass. |
|
|
Front
view, needing only a final repolishing (easier to
photograph this way!). The plates are joined at
the shoulders by loops and slots, secured with split
rings, identical to my Marmesse cuirass above.
There are rings at the side for a lace. The full
story, http://z8.invisionfree.com/Bronze_Age_Center/index.php?showtopic=1167
|
|
|
The
form and decoration of the backplate is speculative,
of course. I dished out the shoulder blade
areas, and used the decorative motifs from the front
(a little more spaced out). Total weight about 6
pounds. I will line it with linen, glued in, to
prevent any green sweat stains on my nice tunic.
2/22/09 |
 |
Probably the last full bronze
cuirass I will make! This is the cuirass and
accessories found in the armory at Thebes. The
cuirass is severely plain, without decoration or even
rolled edges. It is riveted on the left side and
has closure loops at the right side and
shoulders. As usual, there is a linen lining
sewn to the leather edging, with some folded wool
padding at the shoulders. The total weight is 14
pounds. 11/12/16 |
 |
 |
And to round out my collection, I spent a few weeks
stitching 15 layers of miscellaneous linen to make
this quilted armor jerkin tunic thingy. It's
based on the fresco at right, and Connolly shows at
least two others that have vertical rows of
quilting. It weighs about eleven pounds and is
quite comfortable, and warm! Watched a lot of
"Stargate SG-1" as I stitched, and went through three
or four rolls of dark red waxed linen thread.
January 2017. |
 |
* Main Bronze Age Page * Armor * Weapons * Chronology *
 |
My linen greaves were an experiment from a few years back. They are four layers of cotton canvas with an outer layer of linen, all glued together. The black linen bands at top and bottom tie behind the leg. They can be worn with or without the bronze greaves, copied from the Kalithea greaves. (See the Linothorax page for more information on linen armor.) | 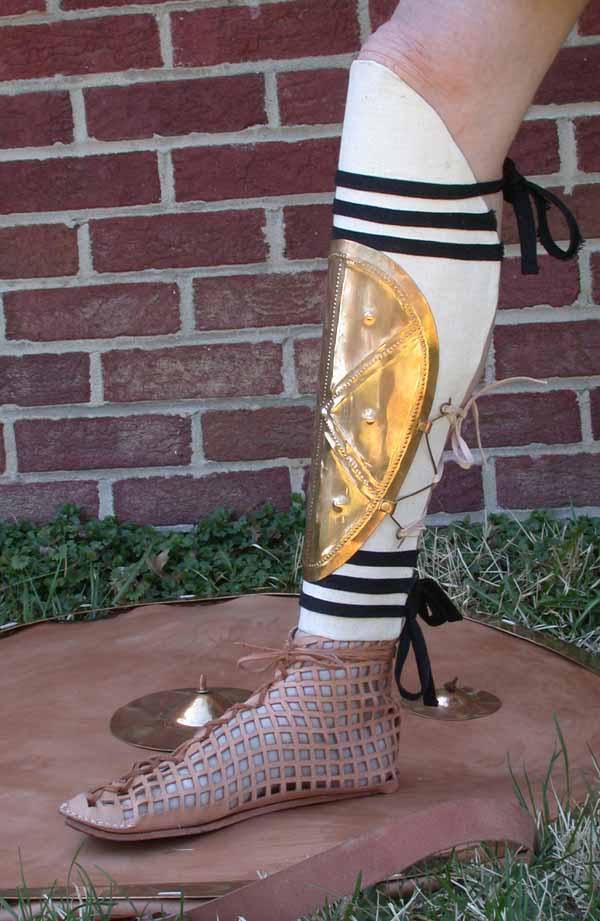 |
SHIELDS
Shields came in a variety
of shapes and sizes. The best-known types from the
Aegean area are the figure-8 and the "tower" styles, both
essentially covering the whole body from chin to
ankles. But these are out of style by the Trojan War
period, apparently replaced by smaller round shields and the
crescent-shaped pelta seen on the Warrior Vase. There
was also the Dipylon type, which is often said to be a
descendant of the figure-8 but is more likely derived from
Hittite shields, being essentially circular with a large
semi-circular cutout on either side. A decent page on shield styles is
here: http://home.att.net/~a.a.major/wrapup.htm.
A
model of a figure-8 shield has also been found, http://home.att.net/%7Ea.a.major/votshield.jpg.
 |
My
first round shield started as a round wicker base
about 2 years ago, c. 32" in diameter and made of
woven strips of ash. This will be very similar to
those being used by the "Sea People" and Sherdana
warriors in Egyptian reliefs. The strips forming the
handle were soaked and bent under weights, the grip
thickened by a wood block and wrapped with
leather. The leather thongs securing the handle
were later replaced by rawhide. There is
actually very little good evidence for the use of a
wicker base! |
 |
Homer
mentions hide or leather for shields. The
facing is 8-ounce leather, spot-glued to the
wicker. I will soak the edge of the leather and
fold the little tabs back around the edge of the
wicker, then stitch through. A flat bronze rim
will cover the stitching on the front.
Probably the leather will just be coated with wax. |
 |
The edge, folded and
stitched. Wetting and weighting the leather to
fold it back worked quite well. The tabs all
stay put very nicely, and it was easy to drill through
for stitching. However, there is some lumpiness
where the bronze rim will have to go, so we'll see
about that. So I'm not a champion basket-weaver! |
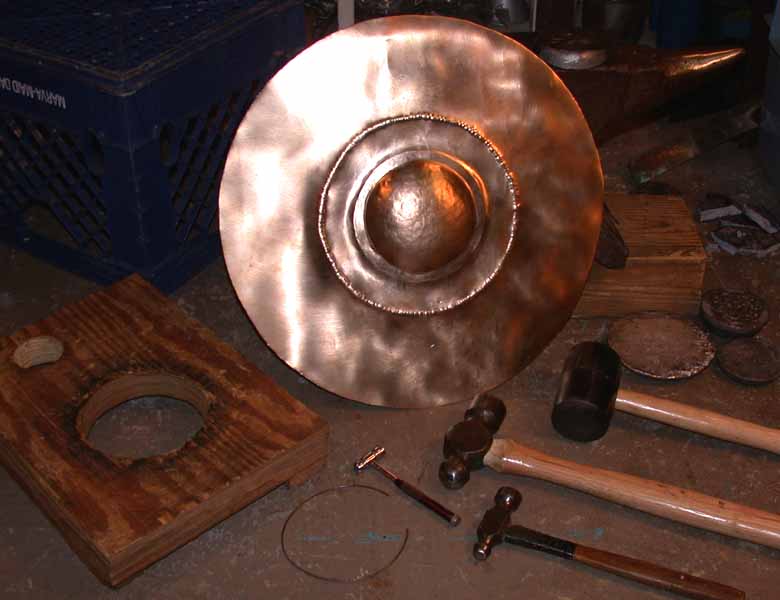
| The bosses are dished out of 18-gauge bronze. They are the same size as the Kaloriziki bosses, but not being able to reproduce the tall conical shape of the large one I settled on a somewhat conical dome, topped by a bronze disc and a short copper spike. | |
 |
The completed shield. Weight is 7 pounds, 12 ounces. The rim actually disguises a little of the rippling or wavy edge, but the leather sticks out beyond the bronze in a couple places. The small bosses have only a single hole in the center, so I put a thong through with a knot to hold it. On the large boss, the inner end of the spike is pierced, and a copper wire goes through that and is secured inside the shield. |
 |
And a detail of the
back. The top of the shield is to the
right. The neckstrap (not oiled yet) is looped
under the wood strips at each end and simply laced to
itself. Near each end of the neckstrap can be
seen the thongs holding the small bosses, similarly
just tied around the wood strips. The large boss
is secured by a copper wire, visible just this side of
the handle. A couple spots of hide glue are also
visible. |
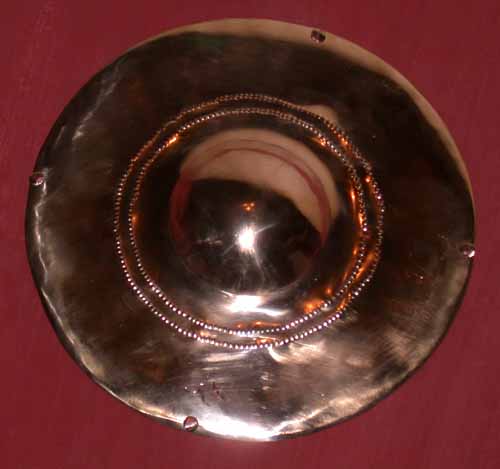
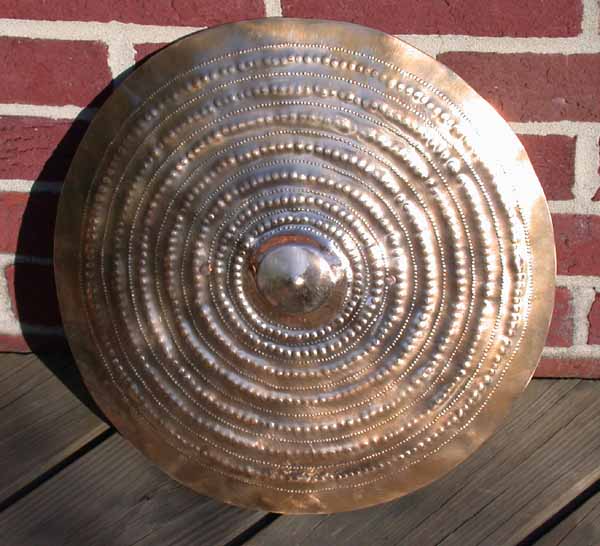
Next is a western European style of shield known as the Nipperweise class. Made of bronze, they are not very large, and have two raised concentric rings on the face. This example is based on one found at Long Wittenham, England (to go with my Ewart Park sword!).
 |
In progress, after
about 3 hours of work. The boss is fairly
shallow. The first ridge has had just one pass
with hammer and "punch" so far, and will be taller and
of course smoother when done. The metal is
currently about 16" in diameter, it will be about
15-1/2" after the edge is folded. The large ball
peen hammer is used for dishing the boss, and for
striking the smallest one which serves as my
punch. Also visible is my plywood swage or
dishing block, rubber mallet for general shaping, and
some lead blocks for embossing. |
 |
Close-up of the boss
and inner ridge. I used wire and lead block to score a circle on the front
to define the boss before dishing. Then I
embossed one from the back for the "step" around the
boss, and did some hammering to bring up the step. |
 |
Second ridge dished out, and a LOT of warping evened out (mostly by rubber mallet). It turns out that my boss is actually deeper than it needs to be, and not quite the right shape, so I embossed a line around the circumference near the base and will dress it up a little more while plannishing. |
 |
Whew! Well, THAT took some doing. Plannishing those lumpy ridges was terrible! I did not get anything as crisp and smooth as I'd like, but at this point I have to say "Enough." Rolling the edge went well, though, and the finished diameter is within a couple millimeters of the original. Now it needs a handle! (Has to be specially cast...) |
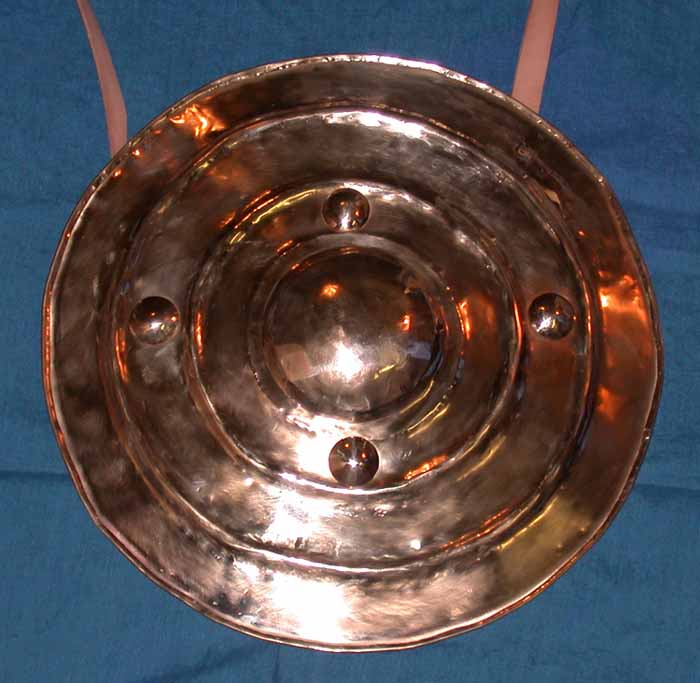 |
6/18/06--Impatience wins: I cut the handle and tabs out of heavy brass sheet. If I can ever get them properly cast, I'll replace the brass! Here's the front, all polished. Here's the back. The handle is wrapped in deerhide, with the loose end fringed. The strap ends are narrowed and tied through the tabs, which can swivel. Large copper rivets are soldered inside the little domes. |
As tempting as a Mycenaean figure-8 shield is, I just don't have the know-how to attempt one yet! The "tower" style is an option, but will take a lot of hide. So the next one is a pelta-shape style like those on the Warrior Vase.
 |
A
shield based on the Warrior Vase starts with poplar
planks glued edge to edge. I have started to
bevel the edge, and once that is done I will cover the
face with rawhide. When the rawhide is dried to
shape, I'll hollow out the inside of the wood.
(I want to leave the wood as thick and heavy as
possible to resist any damage if the rawhide
shrinks!) 7/27/06 |
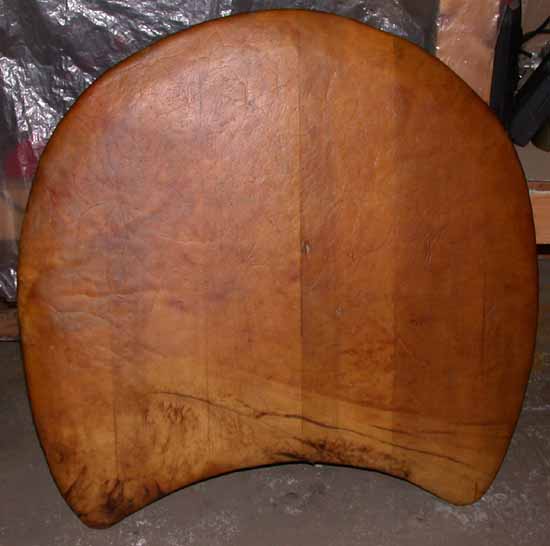 |
The rawhide worked! It's neat since it's translucent--you can see the planks through it! Here's a detail of the back. I left the tabs long and just stapled them down. Next I'll pull the staples, remove the hide, and chisel out the back to make the whole thing thinner. Then trim the tabs to half-circles and nail them down. Still have to decide about bosses, paint, etc. |
 |
Several hours of work chiseling out the back. The low spots are almost half an inch deep. I'm leaving the edges of the planks full thickness until the rest is done, for maximum strength during the stress of working. 9/26/06 |
 |
11/6/06. Finished chiseling the back a couple weeks ago, and smoothed it out with a rasp-disc thingy on my drill. Put the rawhide back on, and it did manage to bend the wood slightly concave as it dried. So I re-wet part of the face by soaking overnight with rags, then keep it under weights for several days to dry. Seems to work! |
 |
Okay,
it didn't work. It must not have been completely
dry, because it turned concave. I decided to
live with it, and painted the face, then decided I
couldn't live with it. Another day of soaking in
wet towels, and now it's back under BIGGER weights for
a week. At least. Got the handle nailed on
the back, and made a spiffy boss. Stay
tuned. 11/10/06 |
 |
Nope, no luck, it's a potato chip. It's concave to a depth of 2 inches in the wrong direction... Oh, well, at least it didn't self-destruct completely. Finished it up as is, 12/9/06. 30-1/2 inches wide and high, 9 pounds 4 ounces. |
 |
Finished front. The boss is based on the largest one found in the grave at Liatovouni, though it's only 8-1/2" in diameter instead of nearly 10". Here's a close-up of the boss. Had to guess at how to attach the boss, since no holes are visible in photos of the originals. (They are also interpreted as pectoral plates, but were found at the warrior's feet!) |
 |
Back view. The handle is oak, secured at each end by two bronze nails. It turned out that the top and bottom nails securing the boss also went through the ends of the handle. The strap is riveted on by two copper nails, with bronze washers. |
 |
Well, I got annoyed with the potato chip.
Stripped off the boss, handle, and rawhide, planed the
edges, and cleaned up the wood a little. Then I
flipped it around, covered the old back as the new
front with some hair-on cowhide, remounted everything,
and gave the new back a coat of paint. Yay,
shield that curves the right way! 5/5/16 |
 |
 |
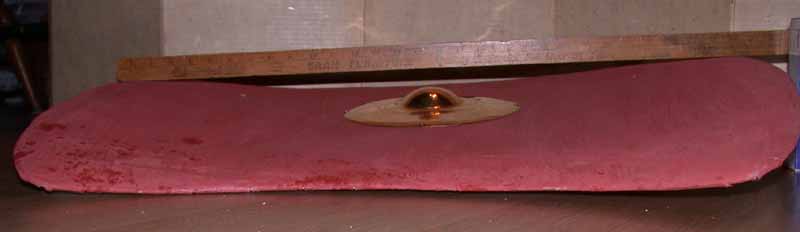
Then I used the rawhide from the potato chip as a
layer in a new shield based on Homer's
descriptions. It is four layers of rawhide
stitched together, two of which are the full diameter
while the other two are progressively smaller.
This makes the rim thinner than the center, as Homer
says. The multiple bosses are based on grave
finds and images such as Medinet Habu. The rim
is the same "dark leather" that Homer mentions.
I have also added a carrying strap since the photos
were taken. It's a little warped! Rawhide just does NOT want to behave and dry flat. And I used a drill for all the stitching holes, no way I could have done it with an awl. VERY tough shield! July 2016. |
 |
At least two shields have been found in Ireland which are carved from a single slab of wood, including the boss and the handle. Both are "U-notch" types, with raised ribs on the front that dip towards the boss at one point.
 |
Thanks
to Dan Z. and one of his helpful co-workers, I now
have a large slab of wood from which to attempt a
one-piece shield modeled on the one from Cloonlara,
Ireland. It measures about 20-1/2" by 21" by 5"
thick, and weighs about 82 pounds. In other
words, the goal is to remove at least 90 percent of
the wood! The original shield was alder wood,
while this appears to be poplar (or ash?). |
 |
And now it's round! Took an hour or less with Dad's old chainsaw--poor thing isn't very powerful. The block is roughly 20 inches in diameter and weighs 67 pounds. 8/6/06 |
 |
After a trip to the shop for the chainsaw, it roars into action again, 9/29/06. Naturally I made my first cut across the face too deep on one side, but it should all work out anyway. The weight is down to about 33 pounds, and it begins to look, well, maybe not a lot more like a shield, but you can see the potential! |
 |
A good session of chiseling takes off another 3 pounds, and removes most of the chainsaw cut marks. While the foreground edge is about down to the right thickness, that on the right is still over 3 inches, so after this photo I sawed a slab off the back to thin that area, and trimmed the front some, too. Current weight 21 pounds. |
 |
The last chainsaw session left both the front and the back nice and level. With that and the start of rounding the boss (with saber saw and chisel), the weight is under 15 pounds. The thickness at the edge is now 1-1/8", more or less. 11/8/06 |
 |
11/12/06--With
the boss shaped and the hollowing of it started, the
total weight is down to about 13 pounds. You can
see the flaws that runs through the wood--hopefully
they won't be fatal! The 3/4" spade bit and the
"saw bit", along with the faithful chisel, have worked
for hollowing the boss so far. |
 |
 |
Cutting
the grooves and ridges, 12/13/06. Again, the
chisel was the best tool for this, followed by some
clean-up with a knife. I traced the ridges out
on paper, then transfered the lines to the wood using
carbon paper. Then it was basically a matter of
cutting V-shaped grooves between the lines. The
edge has also been roughly trimmed to its final size
and shape. Current weight is 10 pounds 14
ounces. |
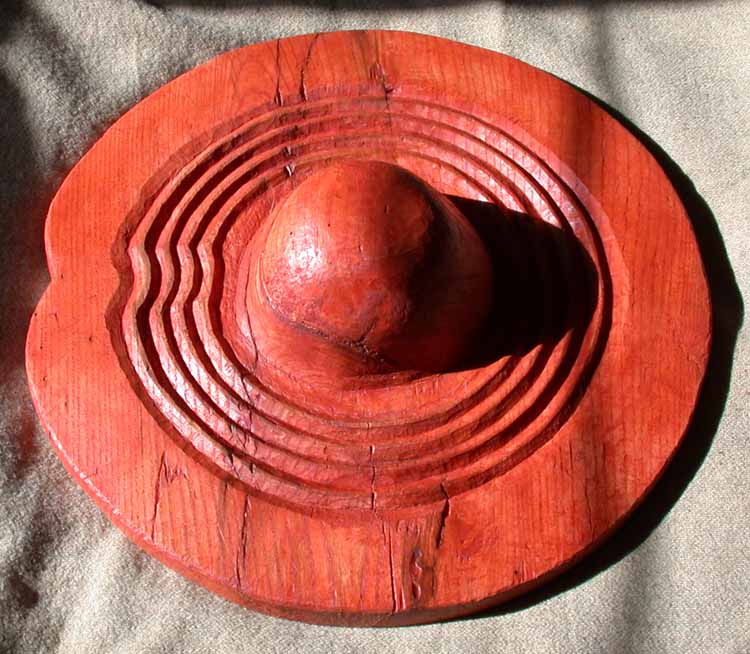 |
3/7/07--The woodwork was actually done a couple months ago, scraping everything smooth with chisels and knives. Toolmarks are realistically visible! The big split in the boss I filled by gluing in wood shims. Finally I got around to staining it with red ochre and coating it with wax. The back is left plain, however. Since the weight is still a good 10 pounds, my feeling is that this shield was made from the start as a votive offering. |
 |
This
is a drawing of a Sardinian shield based on the
numerous bronze figurines found on that island.
The boss is conical, and the face has a number of
raised round panels, plus a wide lined band extending
to the left edge. On this particular shield the
boss is actually off-center, though others are
symmetrical. More info: http://z8.invisionfree.com/Bronze_Age_Center/index.php?showtopic=941
|
 |
The
base is planks, pine and poplar, planed down to about
a quarter-inch thick at the edge. (Early January
2008) The Roman historian Strabo mentions
Sardinian shields, and while his description has been
translated as "small leather shields", the actual word
is "pelta"--which tells us nothing about the
construction! |
 |
Being
out of bronze sheet, I decided on a leather
boss. The darker inner layer is a very tough
waxed leather about a quarter-inch thick. The
outer layer is 8-oz tooling leather, which I may
harden with hot water. The wood base will be
covered with a layer of thin goat leather, and the
raised panels made of heavier leather, glued on. |
 |
6/9/08--After a long hiatus, here are all the major parts. I hardened the outer layer of the boss by pouring about a quart of boiling water over it. Seems to work! The horizontal band has just been tooled, so it's still wet and dark. The wood base has its goat leather cover glued on, but the other pieces are just set in place. |
 |
"Exploded view". The under-layer of panels don't have to be full circles, of course. I skived the edges of the leather on them so that the topmost layer would lie flat without showing the edges underneath so much. Each panel will be glued in place and then painted. |
 |
Done!
6/19/08. Diameter is 23 inches, weight just
under 6 pounds. Painted with casein paint and
coated with linseed oil. The six studs are 1"
discs of bronze, slightly domed, soldered to bronze
nails. I couldn't see any indication of how a
strap might be attached, so I'll just run a cord or
strap through the handle when needed. |
 |
A
Villanovan shield copied from an example in the Axel
Guttmann collection. It is 13-3/4" in diameter,
so more of a buckler. Doesn't weigh much!
Also see my Romulus
Page. |
 |