
----------
*Home*Handbook Intro*Tunic*Caligae*Cloak*Belt*Helmets*Segmentata*Hamata*Squamata*Subarmalis*Scutum*Gladius*
*Pilum*Pugio*Packs*Mess
Gear*Tools*Crests*Drill*Leatherworking*Armoring*
----------
BALTEUS--MILITARY BELT
3/25/10
----------
*Home*Handbook Intro*Tunic*Caligae*Cloak*Belt*Helmets*Segmentata*Hamata*Squamata*Subarmalis*Scutum*Gladius*
*Pilum*Pugio*Packs*Mess
Gear*Tools*Crests*Drill*Leatherworking*Armoring*
----------
The plate-covered belt popularly called a cingulum was actually known as a balteus. In the mid-first century AD a single belt to support the dagger was most common, but the two crossed belts worn in Augustan times still appeared. It is clear that the balteus was a valuable personal posession. Although made in army workshops and probably a required item of equipment, it was perhaps not issued at random but more carefully chosen by the soldier according to his own tastes, and budget.
Beltplates are generally described as either narrow or wide. The narrow plates are the older style, the narrow belts often being worn in pairs. These plates are either cast brass or cut from sheet, and frequently tinned or silvered, and inlaid with niello (a black silver sulfide compound). They range in width from 1" to 1-1/2", and in length from 2" to 2-1/2". Closer examination of many so-called "cast" plates seems to show that they are actually sheet brass (16- to 18-gauge) with the design punched into the face with small punch tools. This would be much quicker than casting the plates individually. (Thanks to Dan Peterson for the information!) Many narrow plates are plain, though they are still often tinned. Some have pegs on the back to serve as rivets (rivets can be soldered on instead), or are just riveted normally with domed or flat-headed copper rivets. On many cast plates the rivet heads are "countersunk" and filed flush to be nearly invisible. Some are tinned but with an untinned brass border. Another example has a punch-work design of a vine with leaves, very simple to do with a hammer and nail.
Wide plates, measuring 1-1/2"
to
2" wide by 1-3/4" to 2-1/2" long, are generally stamped from thin brass
sheet (.010"), and are also often tinned or silvered. Frequently
the ends are rolled, sometimes with ball-headed pins inserted in the
resulting
tubes. Belt plates often had just concentric rings. You can
use socket wrench heads of varying diameters to stamp the rings,
working
first from the back and then from the front. Some original plates
from Germany are tinned and have concentric rings scribed on so that
the
brass shows through--cut out a little steel rectangle just under an
inch
wide with a serrated bottom edge: one longer spike at the end which
goes
thru a hole in the center of the plate (like a compass, see below) and
one tooth for each ring you want (4 or 6, in pairs, for example).
The trick is getting all the teeth the same length. Then stick
the
spike through the hole in the plate and start scratching around.
This works on untinned plates, too.
If the ends of the belt
plates are rolled, cut notches in one plate end with a file to mate
with
the buckle, and likewise for the frogs.
 |
Click on the image at
left for
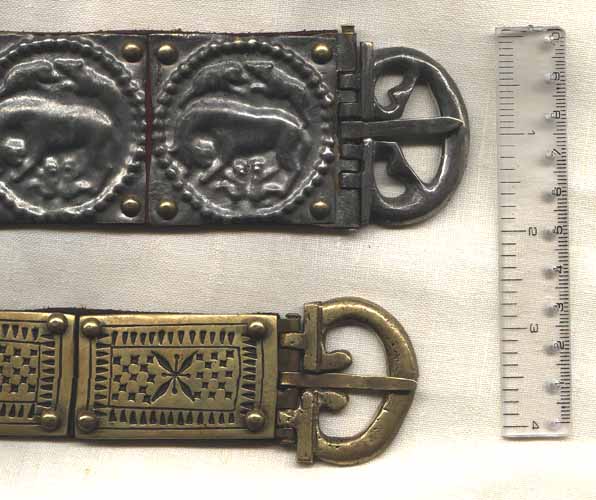
a larger version. Above: Cast plates copied from Hod Hill
finds, 2-1/4" by 1-1/8". Below: Stamped plates of tinned brass
with
Wolf-and-Twins motif, copied from Oberstimm find, by Matthew Amt.
2" square. Both buckles are joined to the belt by a separate
hinge
plate made of folded brass sheet which is riveted between the first
plate
and the leather (see frog drawing below).
Dies for stamping plates
begin
with a mockup sculpted from modeling clay or wax, simply a flat block
about
a half-inch thick with the design raised on one face. This mockup
is then used to cast the "positive" half of the die in brass or
bronze.
The "negative" half of the die is made by floating the positive half
face-down
in molten lead, which is allowed to cool so that it retains the
impression
of the positive die. (Small holes can be drilled through the
edges
of the positive die at the corners for wires to suspend it at the right
depth in the lead.) |
 |
Left: Rheingonheim belt
plates
made by Matthew Amt using punches on 18-gauge sheet bronze, 2-1/4" by
1-3/8".
A littled sloppy, but I've only done three. Each one took
half
an hour, much longer than a stamped plate, but with practice it would
go much more quickly.
I made my punches in just a few minutes from masonry nails
(particularly
the squarish "cut" type), by grinding and filing their points or heads
into the desired shapes. It might be a clever idea to make full-size photocopies of the plate style you want, as many as the number of plates you'll need, and tape each to a brass blank (or tape them all to a single large piece of brass), then just follow the pattern with your punches and chisels. At right, a poor sample of a scribed plate and the scribe I used to make it. The teeth need to be sharper, probably. |
 |
 |
The buckle and dagger
frogs (or
"suspension discs") are usually cast brass, with hinge tubes or
lugs.
Frogs can be cut from sheet, from about 20-gauge up to 1/8" thick or
more,
with snips and nibblers, or with a jeweler's saw. Buckles can be
made the same way if you have no source for cast ones.
Matching hinge tubes are
either
cast directly with the appropriate belt plate, cut into a rolled plate
end (with a file), or made seperately (folded sheet or cast) and
riveted
behind a plate, as shown below (with a frog cut from sheet). |
| The apron commonly hangs over the top of the belt, being riveted or sewn to the back as shown at right, but can hang down from the bottom edge, especially on narrow belts. In such a case the top of each strip may have a small plate like a miniature belt plate. Some aprons that hang below the belt are shown with a rectangular plate between belt and apron, often plain-looking with just a border, but none have been found. |  |
 |
Each apron strip ends in
a dangling
terminal, usually teardrop-shaped (see below) or a larger crescent
shape.
The terminal was apparently never attached directly to the leather, but
always to a metal strap end of some sort. A simple strip of .015"
brass about 4 inches long can be folded double (around the end of the
leather)
and a slot made near the folded bottom end for the tongue on the
terminal.
Two rivets secure this strap end, and it can be decorated, especially
at
its ends, with incised lines, ridges, or filed notches at the
edges.
The terminals are either cast or simply cut from sheet brass, and can
be
decorated with punch-work. Bone, ivory, or silver could be used
for
terminals, but brass was by far the most common material. The
little
rectangular inlaid plates seen in Bishop and Coulston are generally
used
at the top of the strips on narrow belts, but they could be the strap
endplates
below which the terminal is hung.
At left is shown the front and back of tinned brass apron strap end and crescent-shaped terminal, based on originals from Tekije and Herculaneum, by Matthew Amt. The studs are cast brass, also tinned. The ends of the little tabs by which the terminal hangs from the strap end may be riveted through the terminal (brass escutcheon pins are a good size) for extra security. All apron fittings may be tinned or silvered to match the belt. The leather may be dyed like the belt. There may be a reinforcing stitching of linen thread down each side of a strip, or a decorative tooled line. |
 Cast copy of belt plate from Hod Hill and buckle from Velsen. |
Click for a larger image of a |
 Sheet brass apron strap end and simple terminal. |
When worn, the buckle is usually on the right side so that the belt tongue points back past your right hip. The apron can be right next to the narrow end, and if it hangs over the belt you can hide your worst plates under it! Then will come 2 or 3 more plates followed by the gap between the pugio frogs. Lay all the pieces out on a table, and once you are satisfied with the arrangement, number all the plates and mark their holes on the leather. If you make the belt's tongue extra long, you can loan it to larger friends when necessary. There is at least one relief showing a long tongue hanging down next to the apron (with the buckle at the left end).
 |
 |
| Reproduction of the buckle from Herculaneum, with a hinge plate made from a scrap of sheet brass folded around a rod and notched to mate with the buckle's hinge lugs. A belt plate will be riveted over this plate so that only the hinge tubes show. | Reproduction by Matthew Amt of a bone buckle found at Colchester. (Are you jealous?) Just under 2" tall by 1-5/8" from tips of knobs to back of hinge lugs. |
 |
Buckle, frog, and plates by Jeff Crean--click on the image to see it a little larger than full size. The buckle and frog are cut from brass "hinge stock" plate, which has a raised lip along one edge, which he used for the hinge lugs. The grooves on the disc were cut on a lathe; the plates are stamped with a simple ring motif and are actually about 2 inches wide top to bottom. VERY nice work! According to Dan Peterson, ring motif plates became more common in the second half of the first century AD, and were almost universal in the Flavian period. |
Below are some original belt parts in the British Museum, photographed by Richard Campbell. Click on the little pictures to see them full size.
| Belt buckle and 3 tinned and stamped plates from various
sites.
The buckle has a hinge plate which is overlying the plate but would
originally
be placed under it. At top are 2 lacing loops from a lorica
segmentata.
This photo is a little larger than life size. |
|
| Belt parts from Hod Hill and possibly other sites: inlaid
buckle and
frog, and cast plates. Just about life size. These and
other pieces can be seen here: http://www.romancoins.info/MilitaryEquipment-cingulum.html. |
Tinning can be done with instant
solder
paste, a gray goo of powdered tin and flux in a tube. (Oatey
brand
seems to work better than Kester.) Spread it on, heat carefully
from
below, and when it melts give a quick wipe with a slightly damp smooth
rag. The excess solder will be wiped off and splatter,
beware!
Be sure to tin the plates before you stamp them, it's much easier and
the
tin won't fill in the details. Stamping or punching will cover
some
of the irregularities in the tinning. You might also try melting
a coil of lead-free solder (95 percent tin, close enough) in a pot or
can,
fluxing the plate, and dipping it in the tin for a few seconds. I
got mixed results with this, but apparently the secret is to leave the
item in the tin long enough to reach the same temperature.
Albion Swords has put the rest of
their belt parts in their "Moat Sale", great products for great
prices.
Raymond's
Quiet Press has excellent belt parts as well, including buckles and
frogs (RB-22, -26, -27, and -29) at very good prices. Len Morgan
in the UK has made good belts (http://www.romanarmy.net/
and click on Fabrica).
Mark Berry of Clang Armory has
a wide variety of apron studs, and other great parts, http://clang.adkinssoftware.com/roman%20pics/apron%20stud%2001.html
Geoffrey Withcliff, geoffreywi
AT comcast DOT net , offers stamped ring motif
beltplates (works with Dean Cunningham)
Matt Lukes in Canada
(panzerknacker AT shawDOT ca) does excellent custom work including
sword
scabbards, belts, etc.
David Hare in the UK (pompeiiswords AT btinternet DOT com) also offers belts, and does great work.
Deepeeka offers several
belts, but ONLY TWO are acceptable as is: AH6760 "Roman Belt"
and AH6725 "Roman disc legionnary belt, 1cent AD".
(AH6760 has neither apron nor pugio frogs but is perfectly acceptable
as is.)
Their items AH3868,
AH3868N, AH3868NR, and AH3869 are all total losses and
unusable.
Their AH6701 "RGZM" has the radial dome motif of the cast plates
improperly
repeated on all the studs, frogs, and terminals, and it weighs a
ton. (Sliding the apron straps off the belt and discarding them
will make the belt acceptable and much lighter!) Their
AH3847
Centurion belt has hypothetical plates and the buckle is WAY too
large! La Wren's Nest
and other dealers also sell loose Deepeeka belt parts: smaller buckle
is great, good pugio
frog (remember to get 2!), and decent terminals.
The
"RGZM" plates are not necessarily bad, but cast and heavy, and the
other
parts are better avoided. See the Suppliers
page for
a couple Deepeeka vendors.
For all your belt part needs, it's hard to beat Holger Ratsdorf of HReplicate in Germany, http://www.hr-replikate.de. Pretty much anything he makes is fabulous, and the prices are surprisingly reasonable. One thing I wouldn't recommend is any plate that he casts if the original was stamped, though they are very lovely plates! He can assemble a belt for you or just send parts. His site takes a little digging to get through, but click "English" first, then head for the Katalog, go for Roman, then click "Military" (rather than "Belts"). He may not be shipping merchandise to the US any more...
The Museum Replicas/Windlass belt is completely unacceptable--none of the parts are at all accurate, and even the leather is bad. See the Page of Things to Avoid.
----------
*Home*Handbook Intro*Tunic*Caligae*Cloak*Belt*Helmets*Segmentata*Hamata*Squamata*Subarmalis*Scutum*Gladius*
*Pilum*Pugio*Packs*Mess
Gear*Tools*Crests*Drill*Leatherworking*Armoring*
----------
*Home*Schedule*Handbook
*Auxiliaries *Civilian
Clothing *Cold-Weather Clothing *Signum*LINKS*SUPPLIERS*Bibliography
*
*ADLOCVTIO*Tent
and Camp *Roman Days*History*Names
*Advice
on Starting a Group *PHOTOGRAPHS*Bylaws
*Membership*