LEGIO XX ONLINE HANDBOOK
GLADIUS
4/30/09
----------
*Home*Handbook Intro*Tunic*Caligae*Cloak*Belt*Helmets*Segmentata*Hamata*Squamata*Subarmalis*Scutum*Gladius*
*Pilum*Pugio*Packs*Mess
Gear*Tools*Crests*Drill*Leatherworking*Armoring*
----------
 |
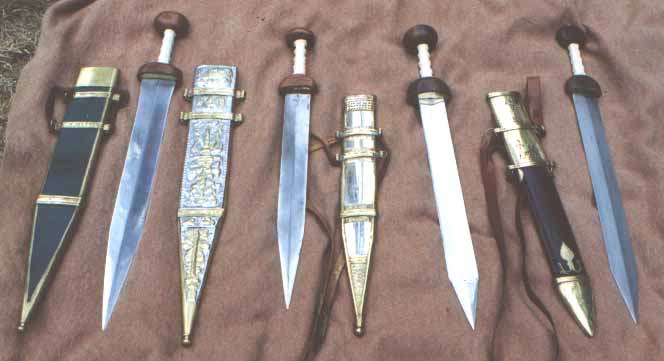
There were several types of
infantry
sword in use in the mid-first century AD. The older "Mainz"
pattern
(far left with plain and fancy scabbards) had a blade 20" to 22" long
by
about 2-1/2" to 3" wide. It was slightly wasp-waisted, with a
long
point. A variation called the Fulham pattern (second from left)
also
had a long point, but was only 2" wide with straight edges that flaired
slightly at the hilt. The newer "Pompeii" type (right and second
from right) had parallel edges and a short point, and was c. 2" wide by
18" to 22" long. Click here for a drawing
of
blade shapes.
Blades were double-edged with a flat
diamond or lens cross-section, without grooves or fullers. Some
had
low-carbon steel cores with high-carbon edges, some had high-carbon
exteriors
with lower carbon interiors, and some were low-carbon throughout.
The tang is an extension of the
blade which projects though the hilt. The tip is peened flat over
a washer or small stud.
Click
here for more Gladius Hints |
Click on the image above for a larger version.
Left, Mainz blade by Jeff Hedgecock, hilt by Mike Cope, scabbards by
Tom Kolb with embossed plates by Joe Piela.
Second from left, Fulham gladius made from quama blade and
scratch-built
scabbard by Greg Fabic.
Third from left, Museum Replicas Pompeii gladius with replacement hilt
and scabbard decoration by Mike Cope.
Right, Del Tin Pompeii gladius with bone grip and minor hilt
modifications
by Matthew Amt.
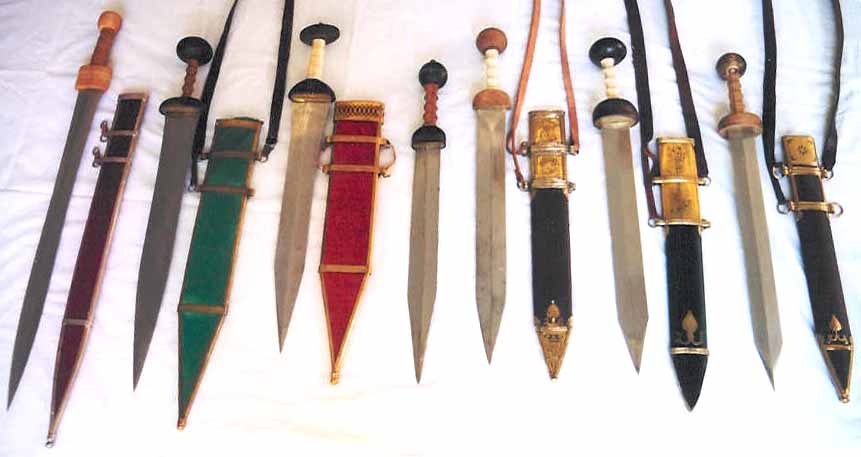
| Click on the image at right for more Legio XX gladii.
From
the left, gladius hispaniensis, c. 170 BC, blade by Mark Morrow, hilt
and
scabbard by Matthew Amt. Mainz blade by Dave Stone, hilt and
scabbard
by Matthew Amt. Deepeeka Mainz gladius with scabbard (much too
wide!)
by Matthew Amt. Fulham gladius from quama by Vince Thomas.
Museum Replicas Pompeii gladius with hilt modifications by Sean Kuhl,
scabbard
by Allan Head of Legio X Gemina,
Holland.
Museum Replicas Pompeii gladius with replacement hilt and scabbard
decoration
by Mike Cope (Oh, yeah, same as above!). Pompeii gladius with
Valkenberg
scabbard by Godfrey Knight, UK. |
 |

|

|

|
Two
excellent Pompeii gladii by David Hare in the UK (see below).
Blades are about 1-3/4"
wide, and the brasswork is tinned. While it is common for
reproduction gladii to be larger than most originals, these are much
more typical in size.
|

|

|

|
 |
Del Tin Pompeii gladius
modified
by Matthew Amt, with a close-up of the scabbard throat at right.
The pommel and guard were sanded and oiled, and a brass plate set into
the bottom of the guard. The grip was replaced with bone, and the
scabbard leather with calfskin dyed blue. The blade still has a
slight
triangular "ricasso" at the top which is not correct. The
decorated
tinned brass plate is copied from an example found at Mainz. I
enlarged
a photocopy of the drawing to the appropriate size, and traced through
it with a knife. The open parts were done with punch, drill,
jeweler's
saw, and small files. The etching was then traced through the
paper
and enhanced with various pointed steel tools. The terminal on
the
chape is a brass knob from an old porch lamp! Note that the
baldric
ends are not stitched, but simply laced with a short thong. |
 |
For some photos of original
gladius and scabbard parts, see the Legio VI Victrix page on "Real
Gear", http://www.legionsix.org/Real%20Gear.htm,
and the Roman Numismatics site, http://www.romancoins.info/MilitaryEquipment-Attack.html.
| The gladius hilt was made of wood,
bone, or
ivory, and a thin brass plate was usually set into the bottom of the
guard
(though it could simply be set flat against the guard, or be lacking
altogether).
Pommels were generally spherical, a flattened "spheroid" shape, or even
egg-shaped, though some were flat discs (standing on edge). The
guards
were similarly round or oval in plan (seen from the bottom). The
pommel and guard on some Pompeii style swords were very small.
Maple
was definitely used for a couple hilt parts (Bishop and Coulston), but
otherwise the types of wood used are not mentioned. Walnut
is popular for its attractive contrast with the bone grip, and is
certainly
permitted, but lighter woods should NOT be stained. The wood
parts
should be oiled with boiled linseed oil (can be mixed 50/50 with
turpentine).
The grooved bone grip was usually hexagonal or octagonal in
section.
(Click here for more info on making hilts and
grips.) |
 |
It has long been believed that
the Mainz pattern sword was what the Romans called "gladius
Hispaniensis",
since it was supposedly copied from a Spanish sword in the Punic War
era.
Recent studies have shown, however, that the Mainz type was not in use
that early, and apparently has no direct connection to the Spanish
weapon
(and fewer similarities than it may seem at first glance).
Instead,
a growing number of excavated blades shows that the gladius
Hispaniensis
was about 24" to almost 27" long (not including tang), and 1-3/4" to
2-1/4"
wide. Some blades are very subtly waisted, others have parallel
edges.
The points vary from about 4 to 10 inches, and the shoulders of the
blade
are rounded or sloped. Unfortunately no hilts have survived,
which
at least indicates that they were probably wood. Volume 8 of the
Journal
of Roman Military Equipment Studies has the fullest information on
the subject (see the Bibliography).
 |
Click on the image at left for a larger view of this
reproduction of
a gladius hispaniensis by Mark Morrow. It is copied from one of
the
blades from Smihel, Slovenia, dating to c. 175 BC. The blade is
26"
long and 2" wide, and weighs about 1 pound 10 ounces. See a
close-up
of the hilt and scabbard here. |
Scabbards were made of
wood
covered with thin leather. Those for Mainz and Fulham pattern
blades
were either enclosed in a frame of brass or iron "gutters", with
decorated
plates on the front, or were completely sheathed in metal.
Pompeii
type scabbards had chapes and throats of similar construction, but the
edge gutters generally did not extend top to bottom. The
decoration
could be embossed, stamped, punched, or pierced, and frequently the
brass
parts were tinned or silvered.
| Start with two 4"x24"
pieces of
wood (basswood from a hobby shop is fine) 1/4" thick. Cut it with
straight parallel edges only a little wider than the blade is at its
widest
above the point--at the hilt the blade may be as wide as the
wood.
Make the wood 3/4" to 1" longer than the blade. Now trace the
shape
of the blade on both pieces (centered), and rout out the cavity.
A drill with a rotary rasp is perfect for this, and it does not have to
be a neat job. As both hollows progress, clamp the halves
together
and see if the blade fits. It should move in and out freely but
not
rattle too much. Glue the halves together, then rasp and sand the
faces to taper the edges as shown. All the wood will be covered
with
leather and/or metal, so a couple thin spots or holes will not matter. |
 |
The leather should be top
grain,
no thicker than 3 ounce (click here for Leather
Tips). A single piece can be wrapped around and a neat joint
made up the center of the back--assuming the leather is glued to the
wood,
the seam does not have to be stitched. On a Mainz type scabbard,
there can be a seam along one or both edges, covered by the side
gutters.
Any necessary horizontal seams can be covered by the crossbands.
The leather can simply be oiled to make it brown, or dyed red or any
other
reasonable color. There does not have to be leather underneath a
plain or embossed brass plate, but of course you'll want something
underneath
an openwork design since it will show through.
The bands comprising the frame
were often ribbed, though not always. The crossbands that form
loops
to hold the suspension rings can end just inside the edge at the back,
or go completely across the back; some were ribbed at the front and
flat
at the back. Many had a different ribbing pattern for the parts
that
were bent to form the loops than for the front.
The sides of the frame are made of .015"
brass strip about 3/4" wide. Work it into a gutter shape by
bending
it over a rod or the edge of a piece of wood c. 3/8" thick. If
the
brass is long enough, the entire side guttering for a Mainz scabbard
can
be made in one piece, with the sides of the gutter clipped where it
needs
to bend. Otherwise several pieces can be used, with overlapped
joints
covered by the crossbands. The side pieces of a Pompeii type
frame
can project beyond the crossbands and be trimmed into "palmette"
shapes.
Gladius Hispaniensis scabbards originally had only two crossbands over
the wood and leather, then they developed a very simple iron frame with
little or no decoration.
The crossbands are about 1/2" wide,
and those that hold the suspension rings are best made from .032"
brass,
for strength. The band at the very top can be wider than the
others,
or the same width. One example from Hod Hill is stamped with a
row
of ovals as simple decoration. A flat plate may be soldered to
the
top band, and a slot cut through it for the blade. Occasionally
this
plate was wider than the rest of the frame, forming a sort of overhang,
but you will probably not want it to be wider than your sword
guard.
Soldered to the tip of the scabbard is a small brass finial, such as
the
decorative knobs used on some large brass door hinge pins, or possibly
a short lamp finial (most cabinet knobs or drawer pulls are too
large).
Some are very simple, like a small ribbed strip of brass wrapped around
the tip of the frame.
Place a metal ring (1/2" to 1"
in diameter) through each suspension loop, soldering them shut for
extra
strength. Many original scabbard rings are flat in section as if
made from brass strip or cut from a tube; in the latter case they would
be very strong.
Frame parts can be soldered, riveted,
or nailed together (don't forget to put the rings in place
first!).
For a Mainz type scabbard the frame can be built entirely
self-supporting
and the leather-covered wood simply slid into it. The frame parts
of a Pompeii scabbard, however, must be secured to the wood with small
nails (brass escutcheon pins) placed near the edge of the wood so that
they do not interfere with the blade. The nails can go
completely
through from front to back and be peened flat like a rivet, or they can
be driven from the back into the wood and not project through the
fronts
of the bands.
As always, it is best to copy
an
original motif when decorating your scabbard. Pompeii scabbards
tended
to have etched and openwork depictions of gods or geometric designs,
while
Mainz scabbards had either geometric openwork panels or
stamped/embossed
scenes. Remember, a plain scabbard can look perfectly attractive,
and (depending on how it is put together) more decoration can be added
in the future as your skills or resources improve.
Making a Gladius Scabbard:
Christian Fletcher Photo Show, http://www.christianfletcher.com/Site/Gladius%20Scabbard%20Construction.html
Click
here
for metalworking hints
 |
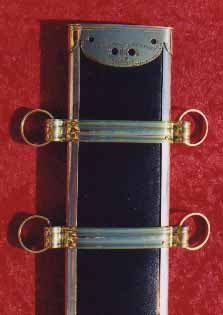
The sword hangs high on
the right
side on a leather baldric 1/2" to 1" wide. The "baldric clasps"
shown in some modern reconstructions are horse harness fittings, and
should NOT be used.
The scabbard has 4 suspension rings: at the back the baldric
forks
and is stitched to both rings (left), but at the front only the top
ring is used, the baldric being either sewn to it or fixed with a small
buckle. The baldric may be dyed. An older method of wearing
the sword, perhaps more common with Mainz types, is to hang it from the
belt,
though exactly how this was done is not certain. It must have
involved
short leather straps or thongs attached to the rings, perhaps simply
forming
"belt loops" or an X pattern (right). |
 |
If two belts
are worn, one is always for the sword and the other for the dagger--the
baldric is only seen with a single belt. However, a single belt
may
hold both dagger and sword with no baldric.
The gladius Hispaniensis
at first had only 2 rings, both at the rear edge of the scabbard, so
that
it hung at an angle. Some have been found with a pair of small
small
buckles, suggesting that short straps were attached to the belt which
buckled
to the scabbard, or vice versa (as in this photo).
The use of four rings probably came into use by the late first century
BC.
 |
Modified Del Tin Pompeii gladius by Tom Kolb. The steel
guard plate has been removed, and the grip replaced with bone.
Decorated
brass plates have been added to the scabbard. |
 |
Deepeeka Pompeii gladius with pommel and guard replaced by
Gregg Van
Vranken. The pommel may look small, but the pommels and guards
of most modern reconstructions are actually too large. Gregg says
this is his first attempt at woodworking! |
 |
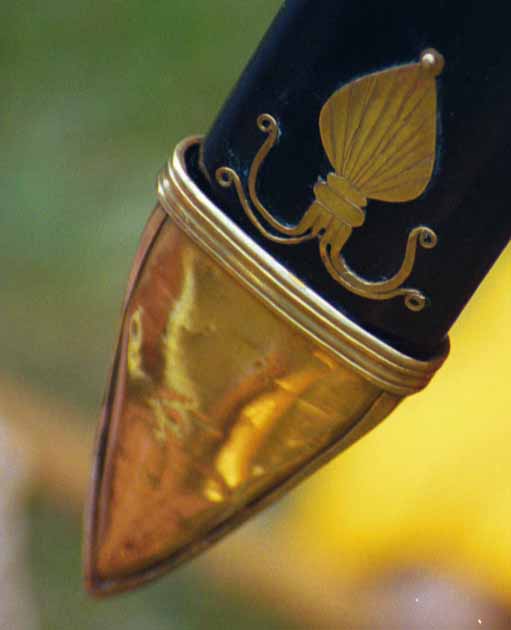
The "palmette" decoration above a plain chape plate.
The
palmette was cut from .032" brass. The tendrils were a straight
tab
which was cut into 4 narrow strips, bent and curled into shape.
The
grooves on the leaf were done with a chisel. |
 |
Hilt of a gorgeous copy of the Hod Hill sword made by Manning
Imperial for Nate Bell. This ornate hilt is of native British
style, though it may show Roman influence as well and was found in a
Roman
fort. It is a good illustration that soldiers were still
supplying
their own gear in the first century AD. The original blade is
broken
off near the point but seems too long for a gladius, so it has been
reconstructed
here as a cavalry spatha. |
 |
Greg Fabic's scabbard, stamped and openwork brass strips over
silver plates. He used leather stamping tools with a vine motif
for
the embossed bands. |

|
Detail of three pommels showing washers or nuts. At
left, a brass cap nut filed to remove the hex portion. (This is
probably not entirely correct, since the tang should project all the
way through the finial to be peened.) At center, a regular steel
hex nut has been ground into a round shape. At right, a square
nut is used, with any galvanization sanded off and (in this case) a
heat-blackened finish, over a brass washer.
|
 |
At left is the the
remains of
the scabbard and blade of the Fulham Sword in the British Museum.
Note the Wolf-and-Twins motif stamped into the brass plate. The
pommel,
guard, and grip are NOT from this sword but were found elsewhere.
The pommel has a flattened cross-section, and the bone grip appears to
be round. Photo by Orton Begner.
At right is Jeff Crean's
simple
but beautiful scabbard. He started with a Museum Replicas
scabbard,
keeping the wood, leather, and cross bands, then added side gutters and
a throat band copied from one found at Hod Hill.
For a photo of a
reconstruction
of the so-called Sword of Tiberius, see the Armamentarium
website.
Roman sword blades were
made of
steel, but their carbon content and construction methods varied.
Many were a homogenous low-carbon steel, sometimes hardened on the
outside.
Better-made ones had a low-carbon steel core with higher-quality
cutting
edges. The quality of the average blade was not necessarily very
high (besides questionable metal content, edges are often slightly
asymmetrical),
but was presumably quite adequate to the task. It is also clear
that
the fit and finish of the hilt pieces was often less than
perfect.
As with other items of Roman equipment, modern reproduction gladii are
generally made of better steel than their ancient counterparts, and
finished
to a much more exacting degree.
|
 |
Photos of original gladius and
scabbard parts are at the Online Collection of Roman Artifacts, http://www.roman-artifacts.com/
Mark
Morrow does the best hand-forged blades we've seen, and may be able
to do hilts as well. His prices and delivery times are also quite
reasonable.
David Hare in the UK
(pompeiiswords AT btinternet DOT com) makes Pompeii gladii with several
varieties of scabbards, £250-£300. Some of the best
work available. Unfortunately, he is not currently able to ship
to the US, due to Customs restrictions.
Matt Lukes in Canada
(panzerknacker AT shaw DOT ca) does excellent custom work including
sword
scabbards, belts, etc.
Albion Swords is now producing
their "Next
Generation" swords, which are excellent though not cheap.
Christian
Fletcher does excellent scabbards for Albion's gladii, and he also
sells the swords. He may do scabbards for swords by other
manufacturers
as well.
The Mainz and Pompeii swords by
Deepeeka in India (#4209 and #4211) are the most common inexpensive
"off the shelf"
gladii that are acceptable. The blades are correctly shaped
though
they may not be strong enough for actual use. The hilts are good,
though they are secured with sunken hex nuts which should be
replaced.
The scabbards are also decent, though they can be improved. That
for the Mainz gladius has decorated brass plates taken from Fulham
scabbard
(see above), but the embossing is rather cheap and cheesy--the motifs
are
thin and vague, with too much empty space in and around them. On
the Pompeii scabbard, the etched design on the plate is very good in
shape,
but lacks the cut-out parts of original. The palmette at the
bottom
and the curly decoration inside chape are both cut from thick brass
stock,
and need to be replaced or simply removed. You may also need to
secure
the cross-bands with small brass nails to keep the frame parts from
slipping. The sides of the chape are curved instead of straight,
and the finial is too small.
NOTE: Deepeeka is modifying
their gladii, and the much-improved versions should be available
shortly.

|
Another
even cheaper Pompeii gladius, also Indian-made, is available from Find-It Armory,
#SDK1171. (Other vendors also carry it, just be sure to check the
catalog number.) The blade is rather heavy, but properly
shaped.
Decent wood pommel and guard, though the bone grip needs a little
filing to deepen the finger grooves. The brass cap nut securing
the
hilt is easily replaced or modified. The scabbard is better than
Deepeeka's, with simple but well-done brasswork and reddish-brown
leather. It comes with a baldric which is rather thin and smelly,
and
with a buckle from a large wristwatch band! It is also mounted
backwards, to be worn on the left side, and may be a little short
overall. Overall a very acceptable sword. Hilt detail photo, & Chape detail. (SDK1172 is NOT
acceptable!)
|
Deepeeka's #3311 "Roman Sword II"
or "Early gladius" is not acceptable. It is very difficult even
to
modify into anything useful. The swords by Museum
Replicas/Windlass
Steelcrafts should also be avoided, as should all their various
spin-offs.
See the page of Things to Avoid.
Click here for more gladius hints
Click here for Armoring Hints
Click here for a drawing of blade shapes
----------
*Home*Handbook Intro*Tunic*Caligae*Cloak*Belt*Helmets*Segmentata*Hamata*Squamata*Subarmalis*Scutum*Gladius*
*Pilum*Pugio*Packs*Mess
Gear*Tools*Crests*Drill*Leatherworking*Armoring*
----------
*Home*Schedule*Handbook
*Auxiliaries *Civilian
Clothing *Cold-Weather Clothing *Signum*LINKS*SUPPLIERS*Bibliography
*
*ADLOCVTIO*Tent
and Camp *Roman Days*History*Names
*Advice
on Starting a Group *PHOTOGRAPHS*Bylaws
*Membership*


