LEGIO XX ONLINE HANDBOOK
SCUTUM
2/28/09
----------
*Home*Handbook Intro*Tunic*Caligae*Cloak*Belt*Helmets*Segmentata*Hamata*Squamata*Subarmalis*Scutum*Gladius*
*Pilum*Pugio*Packs*Mess
Gear*Tools*Crests*Drill*Leatherworking*Armoring*
----------
 |
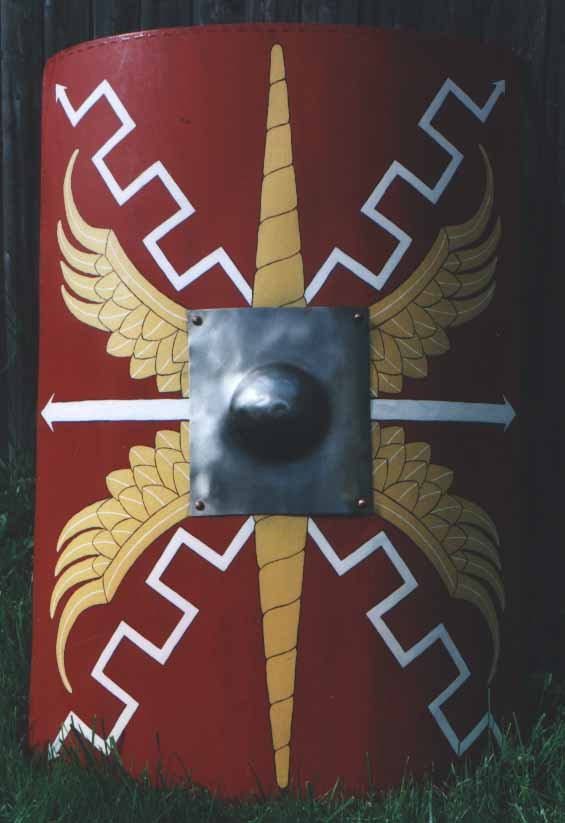
There are many
options for scutum
size, shape, and materials. The common shape in the mid-first
century
seems to have been rectangular, but the curve-sided "Augustan" style
(right)
is still seen on Trajan's Column. The height ranges from 37" to
42",
about from the shoulders to the top of the knee, and the width is 24"
to
33". The corners are typically rounded, but square corners are
easier
for a leather rim or a rimless shield. Click on the images at
left
and right for larger views. (Photo at left copyright Jane Walker.)
|
 |
WOOD CORE--The scutum was
originally
constructed of three layers of thin strips of wood (such as birch or
oak),
glued together at right angles to each other to form a curved piece of
plywood 1/4" to 3/8" thick. While this method is certainly the
most
authentic option, we usually use two layers of 1/8" luan plywood glued
together in a curve. Bendable birch plywood is very easy to work
with though more expensive, and even plywood wall paneling has been
used
(but sand off the glossy finish before gluing!). The local Home
Depot
or lumber store may have "door skins" which are 30"x80" sheets of 1/8"
luan plywood--perfect for one scutum.
Ordinary carpenter's glue
works
fine. Liquid hide glue may be a little more authentic, and should
work as well.
|
There are several ways to curve
the wood. The layers can be glued together (dry, without soaking)
and then tied around a large tree, 55-gallon drum, or water heater with
ropes or strap clamps until the glue is dry. A length of 2x2 or
2x4
along each long edge, between the ropes and the shield wood, will help
prevent a wavy edge. Alternatively, a press can be constructed
for
holding the glued layers in the proper curve. Click
here for the Scutum Press. In either case, the grain of
the
wood should be vertical, to avoid cracking. Once the glue is dry,
trim the edges and corners to the desired shape.

|
The central
HOLE is actually a pair of semicircles c.
3/4" apart, the horizontal space between them forming the HANDGRIP.
The holes are c. 2-1/2" in radius, and are most easily cut with a
hand-held jigsaw. The grip is then thickened by
adding the central back bracing strip (see below) of wood or
steel. Wood strips should be glued in place (held with clamps
until
dry), and can be reinforced with rivets or clenched nails. Drill
holes first, put the nails through from the front, and
clench
securely at back (be sure these nails will not interfere with those
that
will secure the boss); or clip them off and peen them over a metal
washer like a rivet. A steel strip would be riveted in place.
Nail or rivet heads can be left exposed on the front of the
shield, or covered by the covering and/or the
boss. The grip
can be rounded somewhat for comfort, and/or wrapped with leather or
cord. |

|
The grip is held
overhand, like a suitcase handle. This allows the shoulder to be
braced against it, and allows the shield to be carried for long periods
without tiring.
|
BACK BRACING--Either
wood 1/2"
to 3/4" wide, c. 1/4" thick, flat or half-round; or steel strip c. 1/8"
thick. Arrangement shown at right, 3" to 4" in from edges.
Horizontal braces can be bent to fit, or cut to match curve.
Screen molding, 3/4" wide, is perfect and easy to use, and can be
soaked
and curved for horizontal braces (some molding is flexible enough to
bend
without soaking).
There are additional
pictures
of the backs of scuta in the books by Connolly and Simkins (see the Bibliography).
|
 |
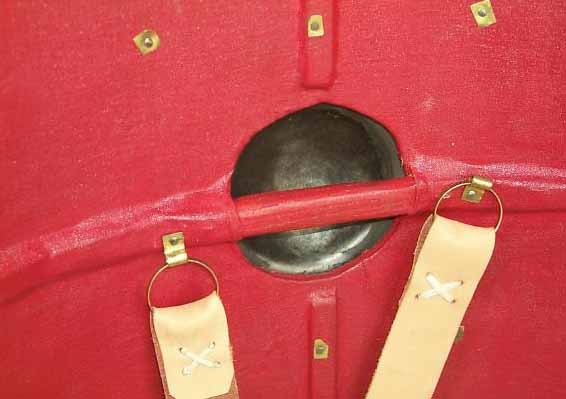
At right, a detail of
the handle of a completed shield. The rivets securing the boss
and
their washers are visible, the two in the middle securing loops and
rings
for the carrying strap. In this case, there is a single round
hole, and the handle has been cut from hardwood to match the curve of
the shield, being made thicker in the middle (such as the handle on a
bow). Making two semicircular holes creates an integral handle
which is simpler, stronger, and more authentic.
|
 |
COVER the front and back,
with
leather, rawhide, linen, felt, canvas, etc. We typically use
leather on
the
front and fabric on the back. The fiber content of any fabric
used
is not vital, but plywood must be completely covered. Leather
should
be max. 3 oz. thickness, top grain and vegetable-tanned or rawhide
(chrome-tanned
or waxed leathers may be difficult to paint). Glue coverings on
with
hide or wood glue--spread it with a spackling knife or piece of
cardboard. (Hint: spread glue on one half of the shield and
smooth
the fabric or leather down neatly, then apply glue to the other half
and
repeat.) If two or more pieces of leather are used, seams can be
covered by applied arrows or spines, but a neat seam in a leather
facing
is not very visible. When covering the back with fabric
over
the bracing, there are going to be some puckers. Old linen
tablecloths
have worked very well, but nothing is likely to glue down tightly into
all the corners and crannies. For a neater finish you could
cover the shield blank first and then put the bracing on; the Dura
Europas
scutum definitely had the covering over the braces, though.
A thin facing of rawhide (goat,
for example) is probably the most accurate facing. The rawhide
must be soaked in water to soften it before applying, then smoothed
over the shield and very thoroughly fastened down to keep it smooth and
prevent shrinkage as it dries. Avoid stretching it too much, as
this can warp or even break the wood! Here are some tips: http://www.romanarmy.com/rat/viewtopic.php?t=21503
PAINT the front and
back
RED. (Alteratively the facing may be dyed red before gluing
it to the wood.) According to Holger Ratsdorf of HReplikate,
the Dura Europas shields and others were painted with casein, a milk
derivative.
Casein paints such as Shiva brand should be available in an art supply
store in small tubes. Larger quantities, in powder form to be
mixed with water, can be obtained from
the
Old-Fashioned Milk Paint Company, http://www.milkpaint.com/.
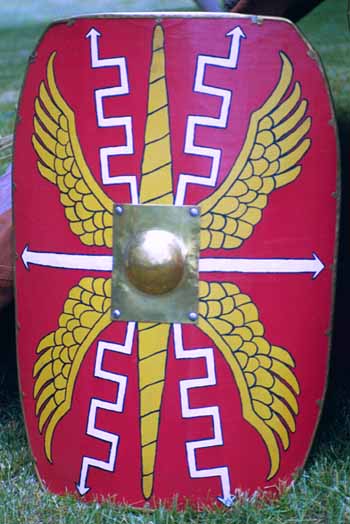
Wings and vertical spines should be
yellow or golden, outlined in black; lightning bolts and arrows
are white
with
black or blue outlines. Trace the emblem using the Legion's
stencil
(Click here for Emblem Patterns).
Arrange the emblem while double-checking angles and alignments--point
the
lightning bolts towards the corners, then fit the wings into
place.
Trace the outer shapes lightly with pencil, then repeat for each
quarter,
making sure you get it more or less symmetrical. Paint in the
basic
colors, using more than one coat if necessary. It is very
helpful
to do the wings and spines in white first, as an undercoat, so that the
yellow will cover better. Outlines and details are best
done
last, using a small brush.
Old-Fashioned Milk Paint
Company's "Salem Red" is now the standard color for the backgrounds of
our shields, but "Barn Red" or other brands or variations are certainly
permissable (such as the Real Milk Paint Company, http://www.realmilkpaint.com).
That is
the most convenient source for the larger amounts of paint needed for
the red, while it may be more convenient to buy small tubes of white,
yellow, and black casein paint from an art supply store. Artist
& Craftsman Supply company, http://artistcraftsman.com/,
carries both the Old-Fahioned Milk Paint
and the Shiva casein paints, making a very convenient source for online
shopping.
Note that water and rain will
cause spotting on casein painted surfaces, a chalky white effect.
To prevent this, a coating of wax is recommended. Regular bees
wax can be melted (using a double-boiler method) and and brushed on, or
"Sno-Seal" wax coating can simply be spread on by hand. In either
case, use a hair dryer or heat gun to melt the wax evenly over the
surface and help it soak in. Sno-Seal is basically bees wax with
an emulsifier, and is available from camping and sport supply stores.
Neatsfoot oil or boiled linseed
oil (the latter optionally mixed 50/50 with turpentine) can also be
used to coat the casein painted shield instead of wax. Neither
should cause any significant discoloration of the white or yellow
paint, but they do not seem to be as effective in preventing water
stains. It is possible that several good coats would be more
effective, but our experiments have not yet gotten to that stage.
Shields
which are already painted with modern paints do NOT need to be
repainted! Milk or casein paints are supposed to be applied to a
porous
surface, so if you wish to repaint a latex-painted shield, first apply
a primer coat of "Extra-Bond" or similar product, as sold by milk paint
companies. All NEW shields made for
Legio XX use must be painted with milk and casein paints.
The various parts of the emblem may
optionally be linen or thin leather, either dyed with painted details,
or entirely painted, and sewn to the facing before it is glued to the
shield.
They can even be thin brass, with the white parts either tinned or made
of thin steel (click here for photo); nail on
with brass escutcheon pins after the covering is in place.
(Beware!
A metal emblem can be a real maintenance problem!)
Obviously, if you are not an
active
member of Legio XX, you can use a different color scheme, or use
elements
of our emblem to make a different design. Ours is one of the many
designs shown on Trajan's Column, since it is not known what emblem the
original Legio XX used. Many reenactors make the wings much
larger
than shown in Roman artwork, crowding the other design elements out of
place.
RIM--Most popular is a
brass
rim. Originally it was decorative rather than heavy and
protective,
c. .015" thick. Corners can be made from 6" lengths of 1/2" to
3/4"
tube--mark a 12" length of tube to be bent and cut into 2 corner
pieces,
but don't cut in half until after it is bent. (The 12" lengths of
K&S brand hobby brass tube are best for this; the longer tubes
available
from other metal dealers are too thick to bend to a tight
corner.)
Anneal the section where the bends will be, pack the tube with sand
(tape
the ends shut), and bend one-third to halfway with a spring-type
pipe-bender.
Remove from the bender, dump the sand, re-anneal, and repeat the
packing
and bending until it reaches a right angle. Once both bends
are done, cut the tube in two at the center mark. Now on each
corner
cut a strip about 1/2" wide out of the inside of the curve with Dremel
tool or snips (this will remove most of the puckers), leaving the full
circumference for about 3/4" at each end to form the nailing
tabs.
File the cut edges and flatten the edges a little bit if necessary, and
trim the tabs to shape. Finally, pickle the brass in vinegar and
water (50/50) for a few minutes, rinse clean, dry thoroughly, and buff
or polish to a bright finish. Once all four corners are
done,
decide where each one will go and put them in place. (Don't worry
too much if they don't all match!) The corner of the scutum may
need
to be trimmed to match the bend of the rim corner piece. Nail the
rim corners on with brass escutcheon pins or similar steel brads,
clenched
at back, or use flat headed rivets.
For the top and bottom use either
a single piece of tube, or several pieces (with small overlaps for
security)
if necessary. The longer lengths of heavy-walled tubing from
Online
Metals or other dealers are good for the top and bottom, and do not
need
to be annealed or packed with sand before bending.
Once the corners and top and
bottom
are done, the sides are easy, using .015" brass sheet. Measure
the
distance between the corner pieces and determine how far apart the tabs
will be (4" to 6"). The width including the tabs will be 2" at
most.
(Make a paper mockup if you are not sure.) Each side can be done
in several pieces with overlaps, if only small sheets of brass are
available,
or get a 6"x100" roll of .015" Shim brass from one of the dealers on
the
Suppliers
page. Draw and cut out the pieces with snips, and file.
The
strips can be bent into shape by hand, even directly onto the shield
edge,
without annealing. They will have a tendency to twist and curve
outwards
somewhat, and will have to be forced into place as you nail or rivet
them
in place. The sides can also be made from tube like the top and
bottom.
There is an excellent tutorial
on Scutum Edging from Legio VI Victrix here: http://www.florentius.com/scutumedging.htm
If you doubt your ability to do
a nice job on a brass rim, use leather or rawhide--1-1/2" to 2" wide
strips
STITCHED on. Start by gluing the strips in place, clamping with
spring-type
clothes pins and wood or cardboard shims. Cut the corner pieces
to
match the curve and avoid puckering at the front, or for square corners
simply cut 45 degree "mitres" at front and back. Then use a 1/16"
drill bit to drill the stitching holes, 1/4" to 1/2" apart, 1/4" to
1/2"
in from edge. Use heavy linen thread to do a running stitch
or double-stitch, all the way around. (This sounds laborious but
is much quicker and easier than a brass rim!) The leather rim can
be painted or dyed, red, black, or yellow.
Another option is a rimless
shield--make
the front covering large enough to fold over the edge to the back, and
glue or stitch in place. Fabric edges should be turned neatly
under
at back. One advantage of a rimless shield is that a leather or
metal
rim can be added in the future, if desired.
 |
At right, detail of rim
corners,
from the back. Click on image for a larger view. Note tabs
on brass rim with clenched nails. These can also be peened like
rivets.
The leather facing of a "rimless" shield
is also shown, stitched with 3/8" stitches. A regular
leather
rim will also look like this. |
 |
BOSS: 18 to
12-ga.
brass or steel, 4-1/2" to 5" diameter dome on rectangular base
from
8" square to 10"x11". (If the scutum is to be used for any sort
of
staged or competitive combat, the boss will need to be thicker than
18-gauge.)
To make a boss: Cut a 5" diameter hole in 2 or 3 scraps of
thick plywood and glue/screw together, or a piece of 2x8 lumber, or
gouge
a hole into the end of a stump or large log. Dish the metal into
the hole with a large ball-peen hammer. Start at the center and
work
outwards in a slow spiral, then repeat until dome is at least 1-1/2"
deep.
The metal can be annealed for easier working. Dishing may also be
done into a sandbag (old blue jeans leg filled with sand and tied at
both
ends), or directly into the ground. After dishing, rest the dome
on a large hammerhead or similar object (inside the boss) and go over
the
outside with a small hammer to plannish (smooth) out the dents.
The
edges of the base will stay straighter if dishing is done before the
base
is curved to match the shield. Finish by sanding with finer and
finer
sandpaper, and buffing for brass or bronze. The boss may have
punched,
engraved, or inlaid decoration, and may be tinned or silvered. (Click
here for more hints on metalworking.)
Rivet the boss in place with 4
to 8 steel or brass nails or carriage bolts, using square washers or
nuts
at the back. (Do not use hex nuts or hex bolts!) Some
filing or sanding may be needed to keep the head from looking too
modern. Cut off
any
excess bolt shank and peen down over the nut like a rivet. Line
up
the holes carefully to go through the back bracing--this will reinforce
the handle.
Optional corner "L"s on the
shield's
face--Brass or steel c. .015" thick, 4"x4", 3/4" wide. They are
aligned
with the corners of the back bracing and are riveted on with brass or
steel
nails, 3 or 5 each. (Lightning bolts may be shortened to fit.)
Optional carrying strap--heavy
leather 1-1/4" to 2" wide. Secure ends to boss rivets or directly
to grip. The exact form and use of a carrying strap is debated--modern
experiments are contradictory! Fayum shield had iron rings on the
back, and an iron shield handle from Newstead has loops, possibly for
strap
attachments.
Click here for the marching
cover
for the scutum
 |
Republican oval scuta, 2nd to 1st century BC.
Matthew
Amt's at left, based on the Fayum scutum but it came out too squarish
(and
apparently a little narrow). Mike Cope's at right, made by Tom
Kolb, much nicer
shape
and leather covered, with steel boss by Stallari Armory. (These 2
photos by Marsh Wise.)
|
 |
Roger Moskey's parma, made by Tom Kolb, carried by standard
bearers and
musicians. These are seen on Trajan's Column and later
artwork, though shields used by standard bearers in the first century
may more often have been larger ovals more like an auxiliary shield.
|
Historical Evidence
Polybius' description,
mid-2nd
century BC: Curved, layered wood, covered with leather and
linen.
Top and bottom rimmed with metal, iron boss. Four feet tall,
2-1/2 feet
wide (in the early oval shape).
Fayum shield, 1st cent.
BC:
Curved oval, 52"x25". Three layers of birch strips, totalling c.
1/2" thick at the middle, c. 3/8" at the edges. Wooden "spine"
boss,
horizontal handgrip. Front and back covered with felt which is
folded
over the edges and stitched through the wood. Weight, 22 pounds.
Dura Europas Scutum,
c.
250 AD: Curved rectangle c. 41"x33", quite deep, with square
corners.
Three layers of wood strips totalling 1/4" thick overall. Wood
back
bracing, "half-round", middle horizontal brace thickened to form
grip.
Front and back covered with thin leather, and front has additional
layer
of fabric between leather and wood. Leather or hide rim
stitched on. Whole
shield
painted red, and front heavily decorated with intricate painted designs
and figures. Boss missing, but had rectangular base. Total
weight c. 12 pounds.
A second scutum from Dura
Europas,
less well-preserved, is 37"x25".
Doncaster shield, 1st
century
AD: Apparently flat rectangle with slightly convex top and bottom
edges,
roughly
2'x4'. Three layers of oak and elder, covered with hide.
Bronze
boss with round flange, iron handle wrapped with leather, possibly
vertical rather than horizontal. Weight 20+ pounds.
For a drawing of the metallic remains, http://www.vicus.org.uk/images/bits%20from%20the%20doncaster%20shield.gif.
A reconstruction which might be somewhat imaginative, http://www.vicus.org.uk/images/doncaster%20reconstruction.gif.
Tyne Boss, 1st cent.
AD:
Brass; hemispherical dome on rectangular base 10"x10-1/2", curved to
radius
of c. 18". Decorated with punched and engraved designs.
Iron
bosses of same shape also known.
Brass rim pieces, found on
numerous
1st cent. sites: thin metal (less than 1/32"), so purpose was
cosmetic
rather than defensive. Dimensions show that the scutum edge was
c.
1/4" thick.
Oval shield covers from
Valkenburg
indicate shield sizes of about 42"x23", plus fragments showing widths
of
23" and 16"! The Caerleon shield cover (second century AD) was
for
an oval shield as large as 45"x26". It is not known if these
shields
were flat or curved.
Other finds: Thin
metal
stars, moons, lightning bolts; thin cast bronze motifs with flat backs
and rivet holes; fragments of leather from shield facings or covers
with
stitch holes in decorative patterns.
There are numerous depictions
of the scutum from the 1st century, but some details are still
unclear.
It is most often rectangular, but sometimes has curved sides.
Sometimes
corner "L"s are visible: those and other features could have been
applied
or painted. From the few colored illustrations that survive, it
seems
that shields were often red.
The best commercially made shields are
being developed by Daniyal Steelcrafts in India. They should be
available soon from Keltica Iron Age Village, http://www.kelticaironagevillage.com/,
and other suppliers.
Soul of the Warrior has
EXCELLENT scutum blanks by Robert Wear for $150, http://legvi.tripod.com/armamentarium/id266.html
Deepeeka
in India finally has some acceptable shields. The newer "L" and
"H"
shields, denoting coverings of linen or hide, are much improved over
their
first attempts (though they seem to be inconsistent about the L, H, and
W designations). The wood is thinner so the weight is much
better,
under 15 pounds. The rims are improved, too, with longer segments
and nailed only through the appropriate tabs. Handles are
correctly
done as well. The backs of some of these may be uncovered wood,
but
this should be easy to solve simply by gluing on a piece of
linen. The pre-painted versions are great if you are not
affiliated with a unit and don't want to do your own painting.
For those of us who prefer to use our own paints and emblems,
Deepeeka offers unpainted "blanks" of any style they produce. See
the Suppliers
page for Deepeeka vendors.
#3853L Roman Thunderbolt Scutum -- Linen-covered, front and
back,
with wooden back bracing applied over the linen. Also offered in
rawhide-covered version, #3853H. Has curved sides, 42" x
33".
#3992L Roman Arena Scutum-- Rectangular, linen covered, 42" x
33". Also comes with rawhide covering, #3992H.
Different
paint job from #3853L.
#6711W Roman Centurion Wooden Scutum, #3998W Roman Cavalier Scutum,
#3997W Roman Infantry Scutum--All are actually flat oval "clipeus"
shields,
48" x 30", linen-covered wood, nicely painted. Also #6710W The
Praetorian
Cavlary Wooden Shield, hexagonal 47"x27", ditto.
#6718L Dura Europas shield (Linen Covered), and #6718H (Leather Hide
covered) 42" x 33"-- Darn nice paint job! This shield dates to
250
AD.
#3853W Shield Roman (Wooden)--Old bad version, to be avoided. Wood
is
too thick , no fabric or leather covering over the it, handle is metal
with thick wood grip, set out from back of shield. Dimensions 36"
tall, 21" wide at the middle and curves down to 19.5" at the top and
bottom.
Total loss. Also #3992W Roman Arena Scutum w/ no covering, about
the same size, w/ same problems.
Other possible sources for
shields
include Soul of the Warrior,
but
these
have not been inspected for accuracy.
Deepeeka also now offers
good-looking
bosses, #6751B Round Boss, #6752B Shield Boss, #6753B, and
#6754.
The square scutum boss is about 8" square, dome c. 4-1/2" in
diameter.
Metal is c. 18 gauge, not really heavy enough for any sort of staged or
competitive fighting, but fine for display. Their fancy #6750
Decorative
Boss does not seem to be properly done.
Mark
Morrow makes wonderful bosses as well, in whatever size, thickness,
style, and material you want.
Click here for the marching
cover
for the scutum
Click here for the Scutum
Press
Click here for Emblem
Patterns
----------
*Home*Handbook Intro*Tunic*Caligae*Cloak*Belt*Helmets*Segmentata*Hamata*Squamata*Subarmalis*Scutum*Gladius*
*Pilum*Pugio*Packs*Mess
Gear*Tools*Crests*Drill*Leatherworking*Armoring*
----------
*Home*Schedule*Handbook
*Auxiliaries *Civilian
Clothing *Cold-Weather Clothing *Signum*LINKS*SUPPLIERS*Bibliography
*
*ADLOCVTIO*Tent
and Camp *Roman Days*History*Names
*Advice
on Starting a Group *PHOTOGRAPHS*Bylaws
*Membership*

