


ARMORING HINTS 2/28/09
To start off with, a
Disclaimer:
I am NOT a trained armorer or blacksmith! Anyone who is will find
at least a few things here to dispute or cringe at. This
information
is mostly intended for people who have little experience, few tools,
and
limited facilities, but would like to try making their own equipment
anyway.
I wouldn't quite say that "anyone can do this", and certainly this is
not
the only way to do it, but it's what has worked for me.
This page is still new and
growing.
I have tried not to duplicate too much of what is already on the Lorica
page. Got questions or additions?
matthew_amt AT yahooo DOT com.
A terrific site for beginning armorers is the Armour Archive, http://www.armourarchive.org, which has patterns, essays, and a discussion board.
BELOW:
Tools and
Equipment
Metals
Rivets
Prodedures,
Methods,
and Hints
There is also a page on Leather Tips.
SAFETY FIRST! I am not kidding about this. My workshop (and methods, sometimes) would make an OSHA worker run screaming, so I'm not the best role model, but some of the tools and procedures you'll be using can cause you serious harm, either suddenly and very shockingly, or insidiously, without your knowing it at the time. Please protect yourself better than I do! Even little things like a 3/8" splinter under your thumbnail or an 80-pound anvil falling on your toe can ruin an afternoon.
--Goggles/safety glasses--What good is making all this good stuff if
you can never look at it again?
--Gloves--Strong leather, with heavier ones when working with a torch
or forge.
--Ear Protection--Either plugs of various types (I use the expanding
foam ones), or headphones made for the purpose.
--Dust Mask--Usually something a step up from the el-cheapo "comfort
mask" will do.
--Ventilation--When soldering or using any kinds of solvents,
etc.
Melting lead or torching metal with paint on it are things that I do
OUTSIDE.
A good safety article is "An Armourer's Basic Safety Guidelines", by Eric Slyter, http://www.arador.com/articles/safety.html.
And another very illustrative
article
on shop safety: http://www.anvilfire.com/iForge/tutor/safety/top_index.htm
Below is a good starting list. Not everything is needed at first, but you may have much more than this by the time you're done. Obviously, wood-working tools won't be needed for a lorica, for instance. And I have not covered blacksmithing tools needed for forging pilum heads, etc. Investing in the right tool for the job can save you a LOT of time and effort! See the Suppliers List for a couple tool companies.
--Electric drill with bits for wood and metal, several grinding
bits,
a sanding disc, and a buffing wheel. A "rotary rasp" bit is also
great for making scabbards.
--Electric saber saw/jigsaw. with blades for wood and metal
--Hammers: large (c. 16 to 20-ounce) and small (c. 8-ounce) ball
peins. A cross-pein or straight pein hammer of about 16-ounce is
also handy, but almost any hammer can be used for riveting. Also
a wood, rubber, or rawhide mallet.
--Metal snips/aviation snips
--Wire cutters
--Files: Coarse and fine half-round for metal, and half-round rasp
and file for wood. Also, a set of small jeweler's files is
essential:
round, half-round, square, and triangular.
--Plyers, regular and needle-nose
--Hand held hole punch for metal ("Whitney punch"). You'll never
drill a hole in metal again! Harbor
Freight Tools carries a cheap
one ($20) (shown with a "nibbler" from Radio Shack, which
takes little rectangular bites from thin metal).
--Vise. Doesn't have to be very big, but some jobs can be very
difficult without it.
--Anvil. Again, not necessarily a large one. Most riveting
jobs can be done on one weighing only a few pounds, or your vise might
have a built-in anvil on the back. Your riveting tool (see below)
might also simply be held in the vise, or clamped to a sturdy work
surface.
A chunk of steel like a short piece of railroad rail from a scrapyard
can
serve very well.
--Propane torch for soldering and annealing metal. The ones with
built-in lighters are very cool!
--Hacksaw; Coping saw; Hand saw. A Jeweler's saw is great for
cutting out lorica fittings.
--Cold chisel. For cutting metal or making incised lines in
it.
You can make tiny chisels out of masonry nails by grinding and filing
the
points.
--Bench Grinder/Buffer. Not completely vital, but it will make
life SO much easier! Fine and/or medium grinding stones, and
stiff
(spiral stitched) buffing wheel(s) with buffing compound. I just
use T6 "Tripoli", but several grades are available, and you'll need a
different
wheel for each compound. If you don't have a bench-mounted (or
free-standing)
grinder/buffer, make sure you have grinding and buffing heads for your
drill.
--Dremel rotary tool or equivalent. Again, not vital, but very
handy for many jobs.
--Rulers, tape measures, squares, compass, pencils, grease pencils,
permanent markers, scissors
--Lead block--A handful of tireweights melted in a tin can (seamless,
like a soup or stew can) and poured into a simple mold made of sand,
wood,
a small shallow tin, or aluminum foil. DO THIS OUTSIDE AND DON'T
BREATH THE LEAD FUMES!! (Oh, and pick out the steel clips and the
worst of the slag with an old spoon before pouring.) The
resulting
slab or block will have numerous uses.
--3-in-One oil, WD-40, and lots of rags (old socks are great)
--Sand paper, multi-purpose, 60 or 80-grit, 100, 150, and 220, and
perhaps 400 as well.
--Scotch-Brite pads, those green pot scrubber pads sold in the dish
detergent aisle of the grocery store. Don't leave home without
it!
Makes a perfect satin finish on steel and takes rust right off.
--Masking tape, duct tape, scrap paper and cardboard, and scraps of
wood, leather, and metal.
--Elmers Carpenter/Wood glue (or moral equivalent)
Both brass and steel are sold in various thicknesses, listed either by gauge or fractions of an inch (decimal). Some metric equivalents are also given here, for the benefit of our friends in other provinces. There is also great confusion caused by the existence of several different gauge systems, so I hope my chart below is close to at least one version of reality! (It is taken mostly from the Alaskan Copper and Brass catalog, which gives B&S gauges and decimals of some thicknesses up to 14 gauge.)
30 gauge = .010"
26 gauge = .016" = c. 0.4 mm
24 gauge = .020"
20 gauge = .032" = c. 1/32" = c. 0.8 mm
18 gauge = .040" = c. 1 mm (This is what we use for a lorica--I
think...)
16 gauge = .050" = c. 3/64" = c. 1.2mm
14 gauge = .064"
12 gauge = .080" = c. 5/64" = c. 2mm
Efunda Sheet Metal Gauges--http://www.efunda.com/designstandards/gages/sheet_forward.cfm#SteelGage1
From the official US code for standards - http://www4.law.cornell.edu/uscode/15/206.html
Gauge ---------- Thickness ---------- ---------
Density
---------
14 5/64"
0.078125"
1.984375 mm 50 oz/sq-ft 15.26 kg/sq-m
15 9/128" 0.0703125"
1.7859375mm
45 oz/sq-ft 13.73 kg/sq-m
16 1/16"
0.0625"
1.5875 mm 40
oz/sq-ft
12.21 kg/sq-m
17 9/160"
0.05625"
1.42875 mm 36 oz/sq-ft 10.99
kg/sq-m
18 1/20"
0.05"
1.27
mm
32 oz/sq-ft 9.765kg/sq-m
19 7/160"
0.04375"
1.11125 mm 28 oz/sq-ft
8.544kg/sq-m
20 3/80"
0.0375"
0.9525 mm 24
oz/sq-ft
7.324kg/sq-m
Hmm, yes, there are definitely some discrepencies! Now I'll have to buy a measuring gauge of some sort and see for myself what I've been using all these years.
The Romans had both iron and
steel,
though they were not aware of the molecular differences between the
two,
and their techniques for making steel might not have been very
consistent.
There are some technical analyses of Roman ferrous metals, but suffice
it to say that we are content with modern mild steel for our armor and
helmets.
Mild steel is available as both
cold-rolled and hot-rolled. I'm not sure if either is
significantly
easier to work. Hot-rolled steel has a black finish which is good
if you want your armor to have a very correct forge-blackended look on
the inside, though you will have to work harder to bring the outside to
the shine you want. Cold-rolled steel is perfectly workable for
our
purposes, and has a satiny finish which is more easily brought to the
desired
final appearance.
For making a lorica, the steel can be worked cold and needs no heating. Red hot steel can be shaped without stressing it, but continued cold working will eventually work-harden it and cause it to crack. Annealing is heating steel to at least a low red heat and then allowing it to cool slowly (NOT quenching), which softens the metal and allows more work. Hot working or annealing is a good idea for using heavier gauges of steel for items like shield bosses, or certainly for making helmets, but a propane torch will not give enough heat for this.
Roman brass or orichalcum was
copper
and zinc, generally in the range of 15 to 20 percent zinc for things
like
helmets, lorica fittings, etc. But the percentage of zinc varied,
from 5 to 10 percent for rivets up to a known maximum of about 26
percent,
and for cast items a little lead was usually added. Modern yellow
brass is usually 30 percent zinc, so its color will be a little
yellower
than many Roman items, but it is readily available and is acceptable
for
Legion use. Red brass, with 15 to 20 percent zinc, is perfect,
but
seems to be used only for plumbing fixtures these days.
The Romans also used bronze, an
alloy of copper with 10 to 20 percent tin. In the Republic, all
"copper
alloy" items were bronze, but around the beginning of the Empire brass
came into use for military items and coinage, while bronze remained in
use for domestic items (such as paterae). A number of modern
bronzes
are available and generally acceptable, but note that they usually
contain
little or no tin, instead being alloys of copper with silicon,
phosphor,
or other elements. Each alloy has its own strengths and
weaknesses,
but one advantage is that they may match the color of Roman orichalcum
more closely than modern yellow brass. Some modern armorers
prefer
certain alloys over others for strength or workability, but these
differences
are probably not significant for our purposes. Regular copper
should
not be used, however, except for rivets. Note that some brass
items
had small amounts of tin as well as zinc, and some bronze items had
small
amounts of zinc, presumably due to recycling of scrap metal and broken
parts.
Brass should NOT be worked hot. It does work-harden like steel, and can be annealed by heating red-hot and either allowing to cool or quenching in cold water. Bending or flattening a brass rod, for instance, may require annealing several times during the process, to avoid cracking or breaking the piece. Sheets of hobby brass or shim brass from a roll are typically "half hard" and are much easier to work after annealing, particularly for stamping, ridging, or embossing.
For a wonderful article on tools for cutting metal, http://www.armourarchive.org/essays/sasha_metal_cutting/
|
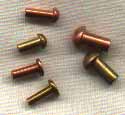
Rivets
are just short studs like
nails without
points. The head is either flat or domed, and the shank is
hammered
or "peened" to make it mushroom, thus essentially forming a second head
so that the pieces being riveted are permanently secured. At left
are copper and brass domed and flat-head rivets with 1/8" shanks, and
two
domed 3/16" rivets. |
|
MAKE A RIVETING
TOOL! Take
any handy chunk of brass or steel that can be set or clamped in place,
and drill a shallow hole or divot in it, say 1/8" wide by 1/16"
deep.
That's your riveting tool. The domed rivet head rests in the hole
and stays domed while you mash the other end flat. Mine is a
piece of 1/2" brass rod from a door handle, which rests in the hardy
hole on my anvil. Also visible is my washer-holding tool (see
below). |
|
"Peening"
rivets
is not hard, and you'll get lots of practice. Put it through its
proper holes, washers, whatever, and rest the head on your riveting
tool. Here a domed copper rivet goes through a steel plate, a
leather strap, and a brass washer. |
|
Nip off the rivet shank quite close to the
piece
with a pair of wire cutters, leaving about 1/16" of shank plus whatever
"peak" is left by the cutters. I simply rest the jaws on the
piece, lightly, perhaps at a very slight angle (handles down, beak up),
not trying to press the cutters down onto the work. |
|
Washers can be held in place with a piece of masking tape to keep them
from popping off. However, any scrap of thin metal or
plastic or even cardboard with a V-shaped notch cut into one end
becomes an indispensible washer-holding tool. Save your sanity
and your fingertips! Just don't rivet it to the work. |
|
Then hammer on that peak, striking from slightly different angles, to make it spread and flatten. Solid taps, not big bashes. This rivet took only 8 or 9 hammer blows. Do a few tests with scrap leather and metal to get the hang of it. Sometimes rivets will "turn", flopping over so it's impossible to get a square hit on the shank, which can be a nuisance, so best to make the holes for the rivets no larger than the shanks. If you have too much trouble, you can either just rest the heads on a flat surface, which will flatten them some (but most domed rivets are more domed than the Roman ones anyway), or use flat headed rivets, which are easier to peen. |
Most of the steel work
in
a lorica is cutting and bending. We have gotten several batches
of
metal from a sheet metal shop that cuts a 4'x8' sheet of 18-ga steel
into
strips for us: 32 strips 48"x2-14" for four sets of girdle plates, and
8 strips 48"x2" for four sets of lesser shoulder guards. The
leftover
piece and a couple other scaps are cut up to make the collar plates and
upper shoulder guards--we do that ourselves with a saber saw.
I usually bend the longer
plates over my leg, but that's hard to do with the shorter plates (no
leverage),
and you want to be careful of kinks in either case. You can shape
them over a small log or other handy solid curved surface, either by
leaning
on them, or careful pounding with a wood, rubber, or rawhide mallet.
Folding the edges of the collar plates, top and bottom girdle plates, and outermost shoulder guards can be started with large plyers, as stated on the Lorica page, but some armorers will recommend hammering the fold bit by bit over the square edge of an anvil. Your method may depend on whether you have a suitable solid edge to use or not. In either case, when the fold reaches 90 degrees or more and you are ready to pound it down flat at the back, rest the face of the metal on wood, lead, or leather to avoid marring the outside.
Dishing or "sinking" a shield
boss (see also the Scutum page) from 18-ga
steel
or brass can be done without heat, but it does stretch the metal pretty
thin and I have broken through a couple times. Use 14 or 12-ga
metal
if your boss will be used for any staged or competitive combat, since
18-ga
will not be strong enough! My dishing form (also called
swage
or swedge) is just 2 pieces of 1" exterior plywood about a foot square,
glued and screwed together, with a 5" diameter hole in the
middle.
The holes can be cut in each piece before putting them together since
they
don't have to line up perfectly. Just to be sure it was deep
enough
I tacked a couple strips of 3/4" wood to the bottom.
If your first attempt at dishing
is very shallow and lumpy, don't give up, that's how it looks before
it's
done. Anneal the metal again (if you can) and keep
hammering.
You can start at the center again and work outwards, or start around
the
edge to make the dome rise nice and abruptly from the base. To
spare
your arm, work in 5 or 10 minute sessions with good breaks in
between.
When the dome finally reaches a good height, keep working a little
longer,
a little more gently, working out the low spots. This will also
take
out the worst of the lumps.
When the base starts to get wavy
at the edges, straighten them out with careful hammering (a mallet is
better).
Once the dome has been dished to a certain point the edges will stop
waving.
The curve of the base will flatten out in the middle, but the sides can
still be adjusted to match the curve of the shield.
Plannishing (smoothing, also
called
bouging) requires a small hammer and some sort of "stake" or
smooth-topped
metal post. A railroad spike is good, and can simply be driven
into
a stump or log. You might also clamp a hammerhead in your
vise.
I use an old chisel with a mushroomed head, which fits nicely into the
square "hardy hole" in my anvil. Rest the boss over your stake
and
work your way over the outside, using rapid light hits with the hammer
to smooth out the lumps. Move the boss around so that you
hammer
only that part which is resting flat on the stake. Be careful at
the edges since the edge of the hammer can make nicks in the base of
the
boss.
To see a real master at work,
go to this link and click on "Raising a Norman Helmet": http://www.anvilfire.com/21centbs/armor/index.htm.
By the way, the word "stake" is
apparently
the source of the oft-repeated blooper that helmets and other items
were
made by hammering metal over a WOODEN stake. Not so! A
wooden
form is fine for light dishing, but "raising" a helmet (beating a flat
sheet into a bowl shape from the outside) is done over an iron or steel
stake.
YouTube videos on making a lorica segmentata by G. Horvath, http://www.youtube.com/user/gabber700
Also, an Armor Raising Tutorial
(15th century Knee cop, but good for techniques), http://www.ageofarmour.com/education/index.html.
Sanding and finishing can be done with a sanding disc on your electric drill. Start with 150 grit sandpaper, or 100 (followed by 150) if the metal is badly scratched or marred. It's a good idea to use 220 next. At each stage try to remove all the marks of the previous grit. Then use my "secret weapon", a regular green Scochbrite pot scrubber pad on the sanding disc. It brings the metal up to a nice satin finish. For armor or a steel boss, that's all you need. For brass or bronze, however, finish by buffing, with either a bench grinder/buffer or a buffing head on your drill. It's surprising how quickly you can get a mirror polish this way!
Ridging metal can be done by taping a piece of coat hanger wire to the back of the metal and hammering, backed with leather, lead, or wood. For more pronounced ridges, use wire on the front and back, being careful to line them up accurately (or do the back first and then wire and hammer the front). I've done cheekpieces and neckguards this way, plus the browband on my helmet. Others in Legio XX have made the ribbed bands on their gladius scabbards with this method.
Turn your drill into a small lathe! The styli shown on the Photos page were made simply by locking a brass or steel rod into the drill's chuck like a bit, then running it while using files to make various grooves and narrow sections where desired. (Then the end was flattened out by hammering and any knurling or faceting filed in as well.) Other small items can be turned or lathed in this way. The shape of a Coolus helmet crest knob can be altered very quickly as long as it has a threaded hole into which a bolt can be screwed. Cut the head off the bolt and lock it into the chuck, and proceed. Similarly, discs for pugio frogs or studs for an apron or lorica hamata can be scribed with rings in this way.
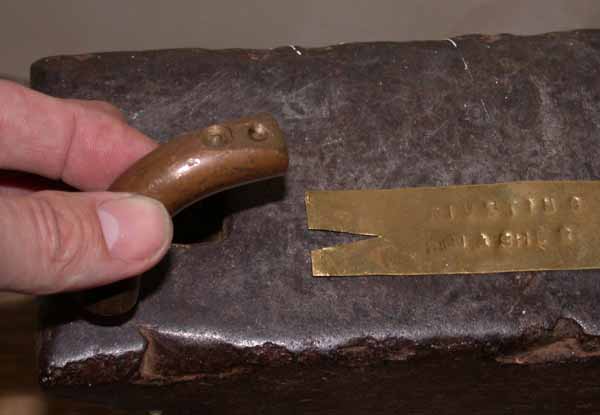
File, file, file!
All the fittings, the edges of the plates, whatever is sharp or jagged
or has marks from your snips. A few minutes' filing can make an
icky,
raggedy hinge look much better. Plate edges don't have to be
straight
to be authentic, but you don't want to slice yourself on them.
Arild Barrett (Legio X Fretensis, California) on making lorica hinges: "I cut the rectangular blank. Fold over in the vise and form the hinge tube. I've had to use contact cement to keep the top and bottom from springing apart. Cut the lobate pattern with a jeweler's saw. I make the notches for the hinge tube this way: Put two hinge halves back to back in a vise make the vertical cuts for the hinge notches with the jeweler's saw. Remove, set on a hard surface and make the appropriate horizontal cuts for the notches with a small chisel."
For soldering I usually
use 5-core electronics solder (I found a spool in a trash pile!), which
has hollows running through it filled with flux. Plumbers' solder
needs flux to make it stick, basically just goop some onto the parts to
be soldered then heat them and melt the solder on. Overlap joints
are better than butted. Make sure you have a decent fit, and that
the surfaces are clean and a little roughened.
Heat the metal, don't put the flame directly on the solder. If one part is substantially bigger or more massive than the other, it should get more of the heat. Keep touching the solder to it until it melts and flows into place. And if you get the metal too hot, the solder will bubble and spit, so heat small pieces gently. On the other hand, small pieces clamped in a vise or pliers may not get hot enough because the vise or pliers will serve as a heat sink, sucking up all the heat. And of course, soldering your piece to your tools can be annoying... Molten metal will drip, so watch your toes!
Tinning can be done with
instant
solder paste, a gray goo of powdered tin and flux in a tube.
(Oatey
brand seems to work better than Kester.) Spread it on, heat
carefully
from below, and when it melts give a quick wipe with a slightly damp
smooth
rag. The excess solder will be wiped off and splatter,
beware!
You might also try melting a coil of lead-free solder (95 percent tin,
close enough) in a pot or can, fluxing the piece, and dipping it in the
tin for a few seconds. I got mixed results with this, but
apparently
the secret is to leave the item in the tin long enough to reach the
same
temperature. Tinning tips, http://www.romanarmy.com/rat/viewtopic.php?t=21449
Johnson's E-127 Flux-N-Solder,
a pure tin solder paste, Johnson Manufacturing Company, Princeton, IA
52768, 563-289-5123
http://www.johnsonmfg.com/temp/PASTE.HTM
When cool, going over the
tinned surface with very fine sandpaper or steel wool can help a
lot. Spots that are too thinly covered can be re-tinned, and
blobs can be melted off, usually. Takes a little
experimentation. If tinned pieces are going to be soldered
together, tin them first, then solder, otherwise the heat of tinning
will melt your solder joint (but the heat of soldering won't make your
tinning go away).
When I'm making
stamped belt plates that are tinned, I tin the brass blanks first
(after annealing and repolishing), then stamp. Tinning a plate
that is already stamped can fill in low spots and can't be wiped
easily. The natural uneveness of the tinning will hide details in
the stamping. But tinning first means that there is less
uneveness to begin with, and it is disguised by the stamping.
Tinning buckles and flat plates is more straightforward. In fact,
cast parts like buckles hold the heat longer, so the tin stays molten
and can be wiped for a few more seconds, a big advantage. But
please don't try to tin items that are already riveted to a leather
belt! You will burn the leather and make a mess.
David Hare (Ermine Street Guard) on tinning: "Having tried unsuccessfully, so far, to tin by dipping, due to slag build-up, I put the lump of tin (which had been plumber's solder) I had to good use. I filed some of it off, collected the particles, and mixed it with an active flux paste. Apply this mix, heat and wipe off with a damp cloth, and one gets the same result as with a manufactured paste or paint, without the lead content." (The solder pastes I've seen sold in the US are lead-free.)
Care and Feeding!
Keep your steel protected against rust!! I use regular 3-in-One
oil,
which is handy because I can carry a small glass bottle of it in my
pack,
without needing a modern container. Various gun oils will work,
as
will WD-40 though that may be harsh on the leather. Neatsfoot oil
is made for leather and will probably work fine on the metal,
too.
Do NOT use olive oil, or even linseed oil, as you will get a sticky
yellow
coating. Some people prefer wax such as automobile wax, applying
a good coat and leaving it in place when the armor is in storage.
However, when you remove it before use it can be hard to get it out of
the nooks and crannies around the fittings, where it will be rather
visible.
Grease or tallow may be options, as well. Just what the Romans
used
is unknown. Whatever you choose, always give your armor a good
wipe-down
after taking it off for the day, no matter how tired you are! Pay
special attention to the areas under the arms and around the neck, and
any part that comes into contact with your sweaty skin.
If rust does develop, remove it as soon as possible and re-oil. Scotch-Brite pads are very quick and effective on helmets and armor, though it will leave a satin finish rather than a mirror polish. For blades or armor which you want to keep at a higher polish, fine steel wool may be better, or some sort of metal polish such as Metal-Glo or Nevr-Dull.
For brass and bronze that are at or near a mirror-polish, any sort of non-abrasive metal polish such as Brasso or Nevr-Dull is fine. Always rub brass objects well with a clean cloth after they have been handled, to keep green fingerprints from showing up quite so quickly. It is likely that some sort of oil, grease, or wax coating will prevent brass from tarnishing rapidly, but so far I've left my helmets and bosses untreated. There is a reference to Greek warriors rubbing their bronze armor with oil to keep it clean.
The Armour Archive, http://www.armourarchive.org
AnvilFire.com, http://www.anvilfire.com/
More metalworking sites:
Charcoal Foundry by Dave Gingery: http://www.lindsaybks.com/dgjp/djgbk/char/index.html
Metalworking LINKS (gazillions of them!): http://www.metalwork.0catch.com/list.htm
Artists and Blacksmiths Association of North America which has links to many other pages, http://www.ABANA.org/
Celtic Bard Metalworking and Jewelrymaking Links, http://www.celticbard.com/kjmcm/cat_jwl_lnks.html
Metal Casting info:
http://hem.passagen.se/anders.sberg/vikingbronze/index.htm
Pre-1600 metalcasting group at
Metalcasting@yahoogroups.com
The Real Wrought Iron Company, UK--http://www.realwroughtiron.com/
----------
*Home*Handbook Intro*Tunic*Caligae*Cloak*Belt*Helmets*Segmentata*Hamata*Squamata*Subarmalis*Scutum*Gladius*
*Pilum*Pugio*Packs*Mess
Gear*Tools*Crests*Drill*Leatherworking*Armoring*
----------
*Schedule*Handbook
*Auxiliaries *Civilian
Clothing *Cold-Weather Clothing *Signum*LINKS*SUPPLIERS*Bibliography
*
*ADLOCVTIO*Tent
and Camp *Roman Days*History*Names
*Advice
on Starting a Group *PHOTOGRAPHS*Bylaws
*Membership*