PUGIO 1/31/13
|
|
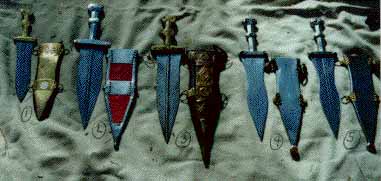
| Throughout the period
the outline
of the hilt remained basically the same. It was made with 2
layers
of horn or wood sanwiching the tang, each overlaid with a thin metal
plate.
The hilt plates were almost always iron, often thin sheet but sometimes
solid--see cross sections at far right. There is apparently no
evidence
that the hilt plates were ever cast out of brass or bronze, as on many
reproductions. Occasionally the hilt was decorated with engraving
or inlay. Note that the hilt is 3-1/2" to under 5" long overall
and that the
grip is quite narrow--it will always seem to be too small, and even the
solid iron ones will not be very heavy. It is possible that some rod-tang daggers had hilts which were entirely organic, with no iron plates, but only one ivory grip has survived (compare to numerous gladius hilt parts!). Also note the distinctive "hour-glass" shape of the center swell--it is the natural result of the slightly domed or conical swell being intersected by "gabled" grip. A similar effect is seen at the pommel and guard. Photos of original
pugiones are at http://www.romancoins.info/MilitaryEquipment-pugio.html.
|
 |
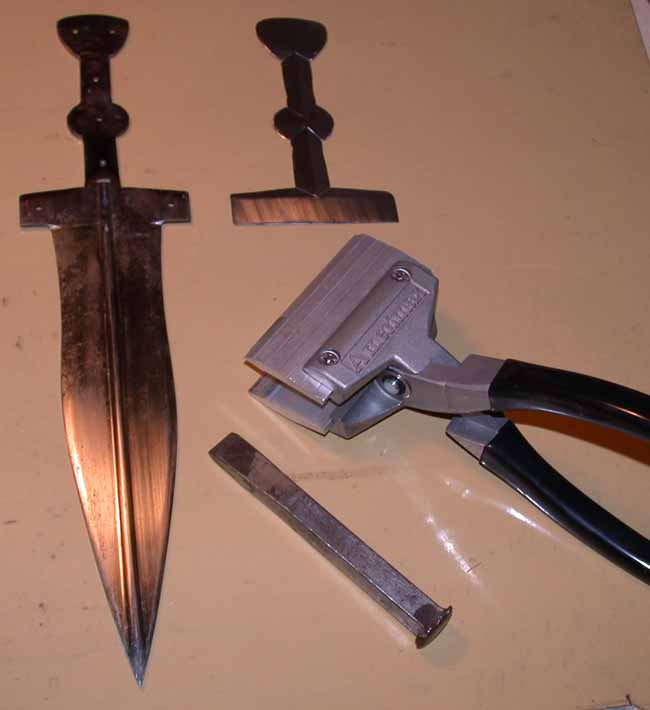 |
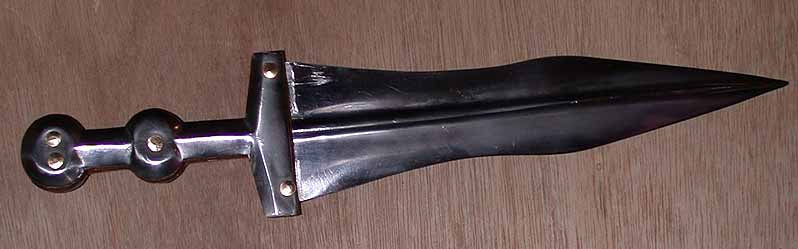
Pugio blade by Mark Morrow, showing the flat tang that matches the outline of the hilt. One hilt plate is shown nearly finished--the wide-jawed plyers (made for gutter and siding work) are perfect for forming the ridge through the grip and one across the guard. A cold chisel was used to make the short "valleys" where the central ridge meets the pommel, guard, and center swell. The pommel and center swell were slightly dished with a small ball-peen hammer. |
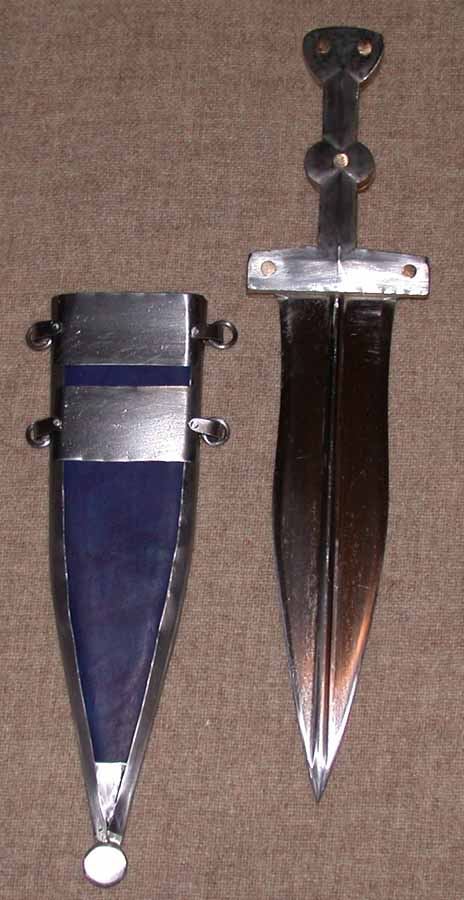 |
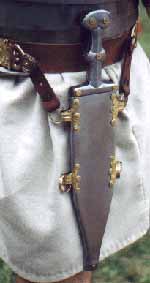
The completed pugio, with tinned hilt plates over wood. The scabbard is by Matthew Amt, based on a mid-first century AD iron example from Exeter. The gutters and plates are c. 26-gauge steel, and the loops are 18 gauge. The terminal is a solid steel disc 3/4" in diameter and 1/4" thick, soldered to the junction of the side gutters (which are longer in back than in front). The small triangular chape plate is also soldered into place. The rectangular plates (front and back) on the original are said to be secured by "welding" and the nails that hold the loops, but I decided just to use the nails. The core is wood covered with leather. |
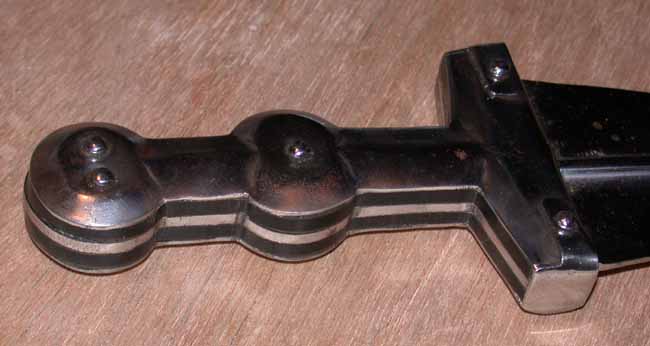 |
Hilt of the
typical Deepeeka pugio #AH3264E. #3264Bwill be just the same
except that it's brass instead of steel. The backplate is wrapped
around the end of the guards and overlaps the front plate (there does
not seem to be any evidence that this was done on originals), and the
whole hilt is a little too wide and large overall. Nice rivets,
but we weren't able to save them. |
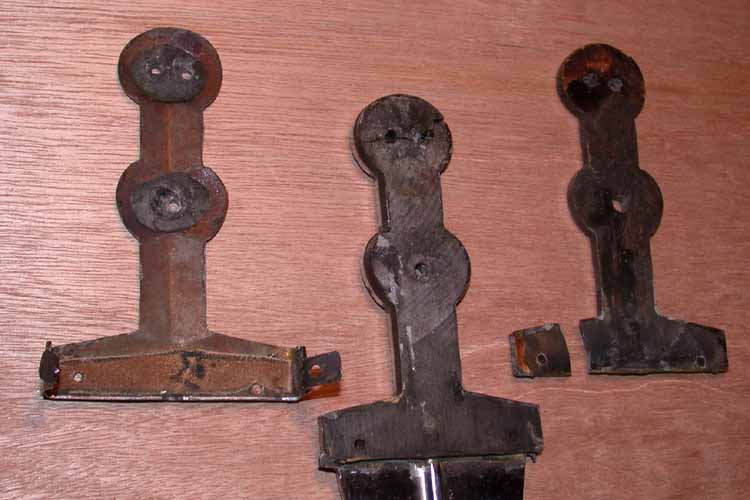 |
The rivets
have been ground and drilled out and removed. The inside of the
rear plate is visible--note the blobs of epoxy and the strip of leather
used as filler. The flat plates of black "horn" turned out to be
plastic (no big surprise). |
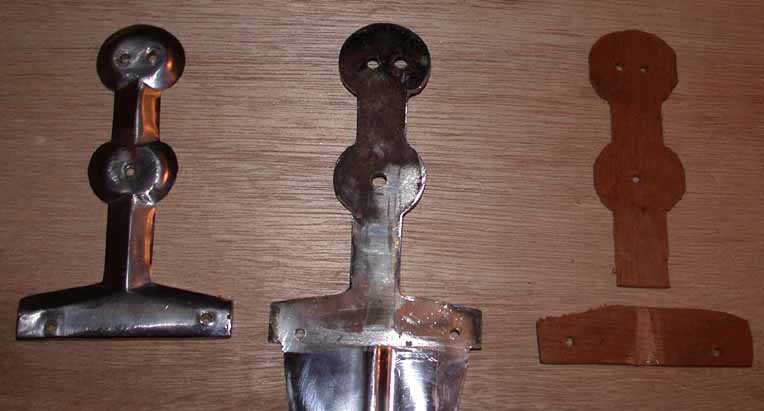 |
Plates and
tang trimmed narrower through the grip and the upper edge of the
guard. The pommel was left as is. New wood inserts have
been rough-cut--be sure to make them wider than necessary. Excess
wood is simply trimmed away after assembly. Two separate pieces
are used for grip/pommel and guard. |
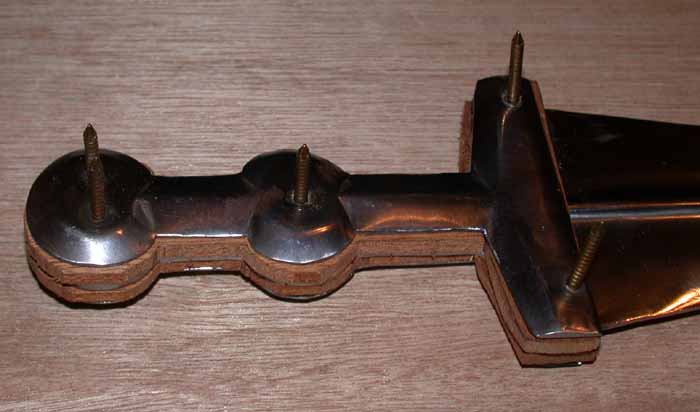 |
Temporarily
assembled using bronze boat nails to check the fit. I lined up
all the layers and clamped them while carefully drilling through the
wood. The wood sticks out all around. |
 |
The hilt is
finished by clipping and peening the nails as rivets, and trimming and
filing the wood. In a few spots, the metal plates and/or the tang
also needed a little more filing or grinding, which is pretty simple to
do. The wood edges were coated with linseed oil. |
 |
The
finished pugio. Nothing was done to the blade itself in this
case, though many need to have their edges ground (being VERY
blunt!). The midrib is rather large, but reducing it would be a
tricky job. |
Scabbards
In the 1st century BC pubio
scabbards
were constructed much like sword scabbards: wood covered with leather,
in a metal frame with decorated metal panels. Early in the 1st
century
AD, 2 new types of scabbard came into use, known for convenience as
type
A and type B.
Type A had a metal shell
consisting
of a front and back plate with the edges worked over and soldered
together.
Inside was a wood or leather liner. Four suspension loops were
held
on by driving small nails through the shell and the liner, and
clenching
them over in back.
Type B scabbards were
leather-covered
wood, with a metal plate fastened to the front by the same nails which
secured the suspension loops.
Presumably there were leather thongs or tabs on the suspension
rings which tied or "buttoned" to the frogs on the balteus.
The type A scabbard disappeared
after c. 50 AD, but the type B continued in use.
Most type A and B scabbards
were
made with iron plates, and most of those which have been published are
inlaid, type A with enamel and either brass or silver (or tin), type B
with just silver or tin. The scabbard of the Leeuwen dagger is
brass,
decorated with lines of raised dots. These are usually
reconstructed
as repousse (punched from the back), but are acually cast in thin
strips
and soldered to the scabbard plate, according to Sebastiaan Berntsen of
the Gemina Project, who has
examined
the original closely. There is also a brass sheath decorated with
groups of engraved parallel lines. It is possible that many
dagger
scabbards were not decorated at all, but few plain scabbards have been
published.
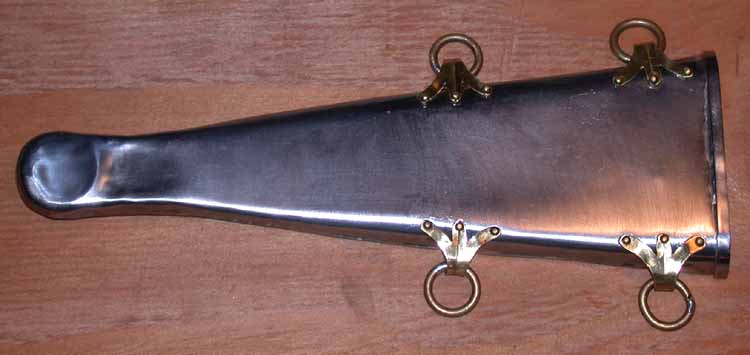 |
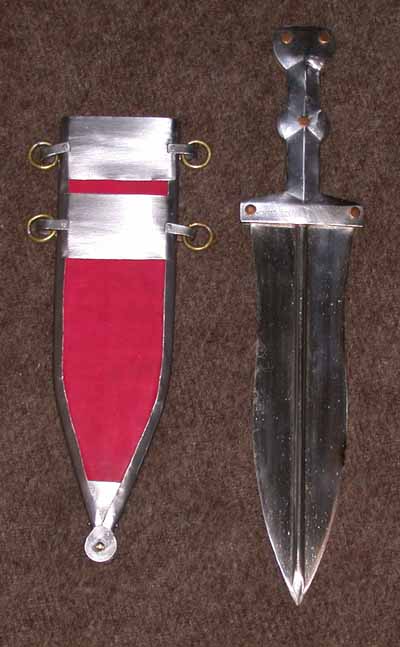
Plain Type
A scabbard based on a plain example from Mainz, made by Matthew
Amt. It is c. 26-gauge steel. The edges of the front plate
have been bent back and soldered to the flat back plate. There is
also a narrow trim strip soldered around the mouth. At right are
the suspension loops, one shown upside-down and bent to shape.
This scabbard was made as a replacement for the Deepeeka pugio shown
above. |
 |
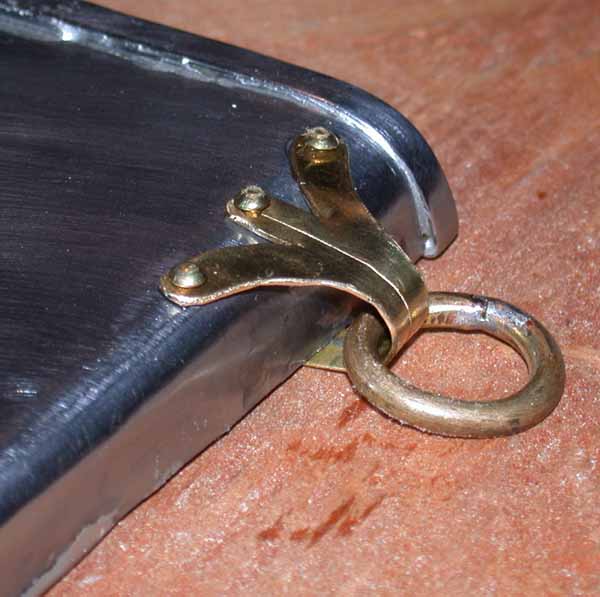 |
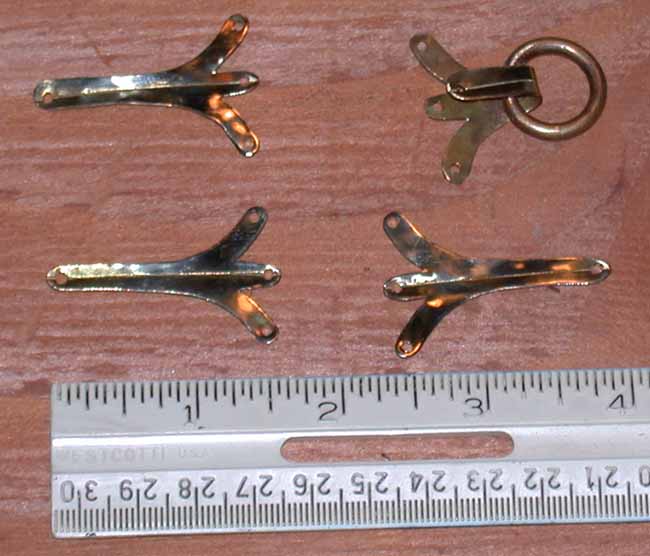
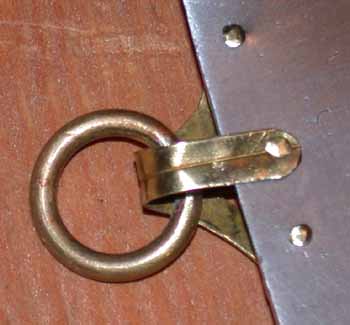
Detail of
the suspension loops and rings, front and back. The brass nails
go all the way through and are peened (or clenched) at the back.
The center nail goes through the back end of the loop to secure
it. It is very important to plan the shape of the scabbard and
place the loops so that the nails do not interfere with the blade!
The rings are soldered shut. |
 |
Construction
Making a pugio can be difficult,
since the blade must have the proper shape, with either a simple or
grooved
midrib.
The flat tang matches the outline
of the hilt, and is sanwiched between 2 "organic" layers: wood, horn,
bone,
or ivory. Each layer can be several pieces (for guard, grip, and
pommel), often pinned or riveted through the tang. On some
examples
the tang ends at the pommel, so there is a solid organic block in that
space instead of 2 layers. Finally the thin iron (steel) plates
are
laid over the organic layers and riveted in place, with 2 or 4 rivets
through
the guard, 2 or 3 through the pommel, and occasionally one through the
center swell. The rivet heads can be decorative (even inlaid),
and
some have small dished washers under them.
The contours of the hilt
plates--approximately
matched by the organic layers--are often quite pronounced, but
reproductions
can be more conservative. The effect can be achieved by a shallow
ridge down the middle of the grip and another along the guard, plus
chiselled
accents and some slight dishing out of the pommel and center swell.
For rod-tanged blades, the handle
is assembled separately (with a solid organic piece or several), and
the
tang inserted into a hole through the length of the handle. It is
either held simply by friction, or by allowing the tang to project
beyond
the pommel and peening it flat.
Manning Imperial in
Australia makes a good pugio, just be sure to specify steel instead of
brass for the hilt and scabbard.
Mark Morrow also makes an
excellent pugio blade, as shown above.
Deepeeka makes the only
acceptable
"off the shelf" dagger, though it has minor problems: #3264B Brass
Beaded Pugio. It is a reasonable copy of the Leeuwen dagger,
though the scabbard is simply
embossed (like most repros), whereas on the original the dots are cast
in strips and soldered on. The scabbard may need an insert of
wood
or leather to keep the blade from rattling. The grip is a little
too wide, and the way the hilt plates at the ends of the guard wrap
around and overlap is badly done (and may not be correct anyway).
The blade is often VERY blunt, and the midrib is too large.
Overall, we rate this pugio as acceptable, though it can be improved
with relatively simple modifications (as shown above).
Also see the Suppliers page.
------------------------
Deepeeka's #3264E Pugio
Embossed is no longer on the "acceptable" list,
unfortunately.
The method of decorating the scabbard by riveting 4 incised brass
plates to the front is not found on any known original.
There are other minor problems (like the Brass Beaded version), but
that is the fatal flaw.
Deepeeka's #3264R "Royal" pugio
is definitely unacceptable--colored enamel was not used in that way,
certainly not
on a first century dagger. Their older pugio, #3264, is also
unusable,
as is anything Museum Replicas/Windlass calls a pugio. See page
of Things
to Avoid.